오레오(Oreo API 26) 이상부터는 채널을 추가해야 노티피케이션을 사용할 수 있다는 것을 알게되어 포스트를 수정합니다.
안드로이드 폰에서 사용하는 운영체제 버전에 따라 실행결과가 다릅니다.
1. 노티피케이션 동작 설명
2. 전체 소스코드
3. 관련 포스트
4. 참고
|
2015.02.19 - 최초작성
2016.10.22
2019.08.13 - 오레오를 위한 코드 추가
1. 노티피케이션 동작 설명
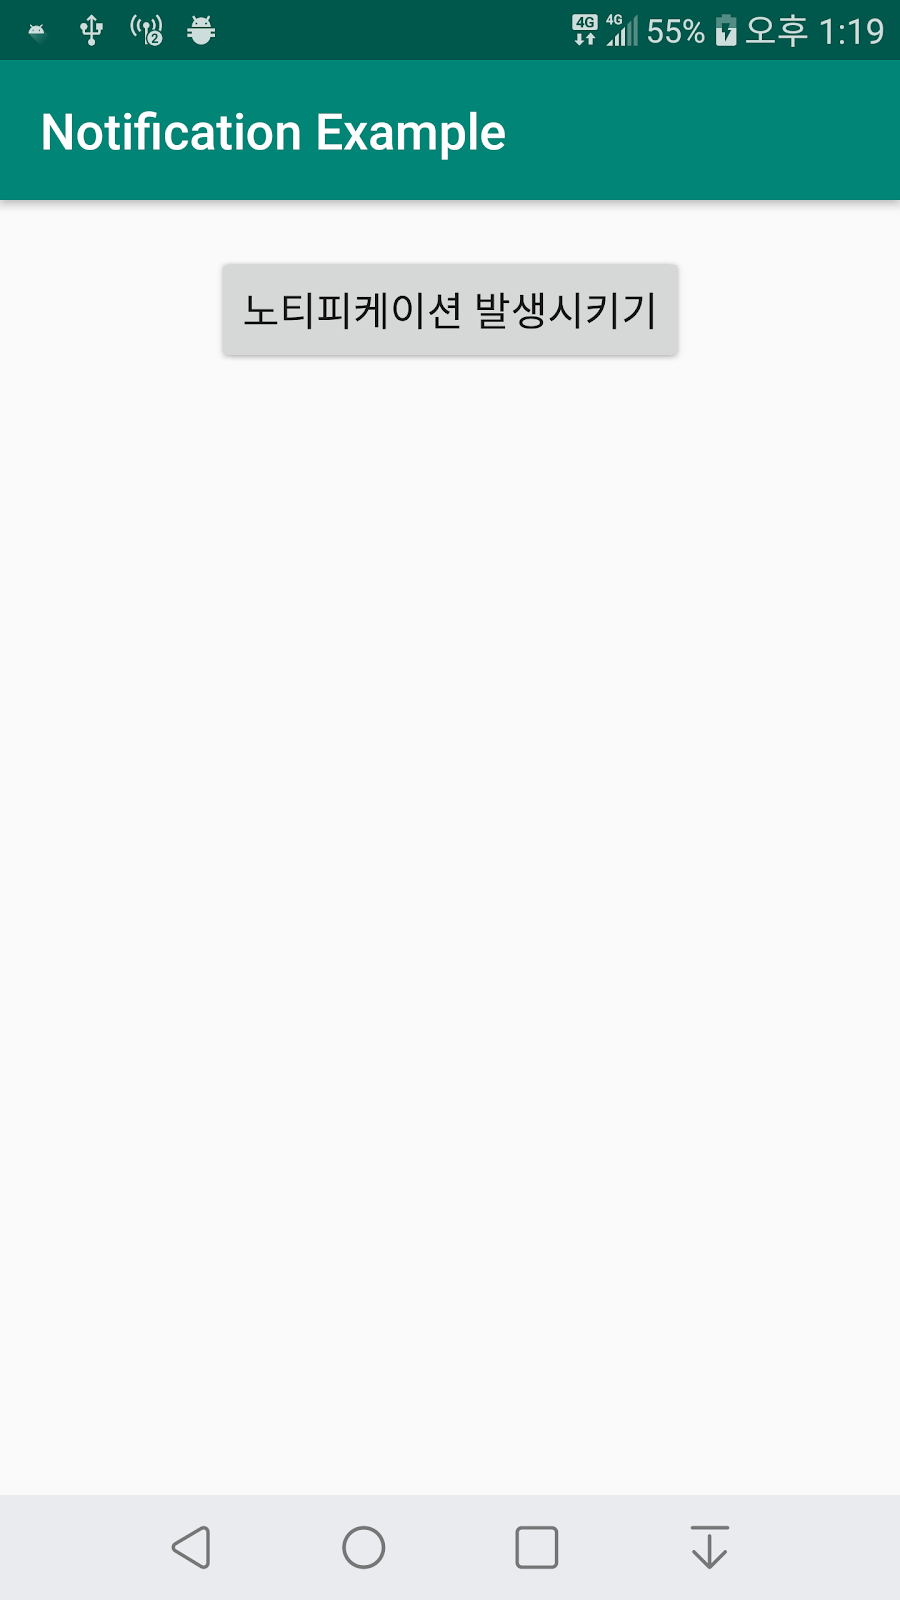
실행시키면 노티피케이션을 발생시키는 버튼을 보여줍니다.
버튼을 터치할 때마다 변수 count 값을 증가시켜주도록 했습니다.
최종적으로 노티피케이션에 의해 전달되는 값은 마지막에 전달한 값이 되는 걸 확인하기 위해서 입니다.
3번 터치한 후 결과를 보겠습니다.

노티피케이션 우선순위가 충분히 높다면 아래처럼 헤드업(heads-up) 알림이 보입니다. 이때 터치해도 됩니다.
우선순위가 높지 않으면 헤드업 알림이 보이지 않고 다음 단계에 보이는 스크린샷처럼 아이콘만 보여줍니다.
참고로 에뮬레이터에서도 헤드업 알림이 보이지 않습니다.

왼쪽 위에 작은 아이콘으로 알림이 도착한 것을 알려줍니다.
상태바를 아래로 드래그하면 자세한 알림 정보를 볼 수 있습니다.
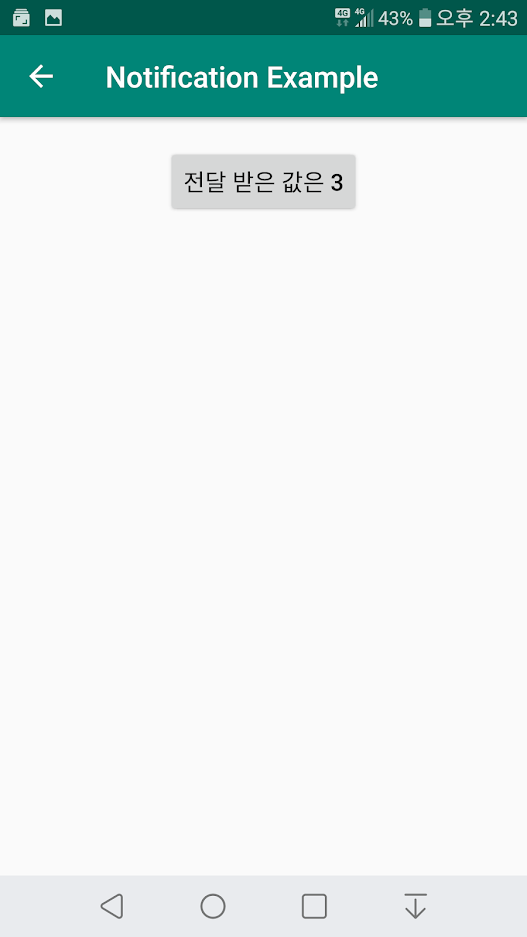
알림을 터치해주면 다른 액티비티로 넘어가도록 했습니다. 이 때 변수 count 값을 전달합니다.

새로운 액티비티가 실행되면서 앞에서 버튼을 터치한 횟수를 보여줍니다.
앞에서 3번 터치해서 3이 보입니다.
변수 count의 마지막 값만 사용자가 볼 수 있다는 것을 알 수 있습니다.
즉 알림이 여러개 와도 마지막에 온 알림에 해당하는 정보만 볼 수 있도록 구현되어 있습니다.
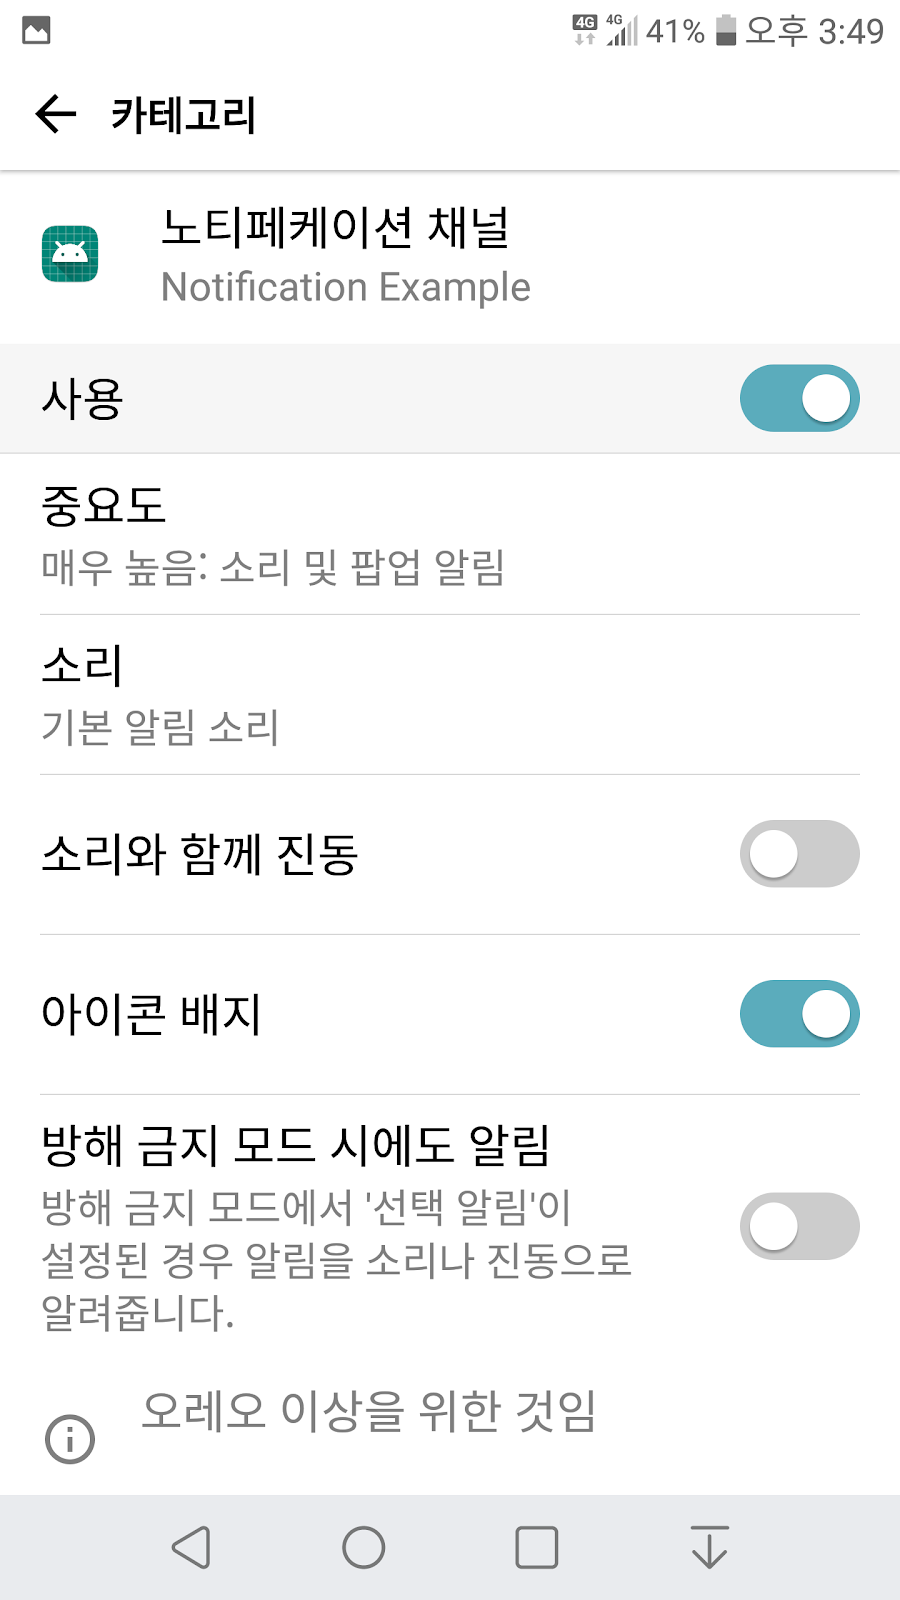
앱 정보에서 다음처럼 등록한 알림 채널을 볼 수 있고.. 사용자가 수정도 가능합니다.
앱 알림을 선택합니다.

노티페케이션 채널이(오타가 났네요..) 코드에서 추가한 채널입니다.
해당 채널을 터치하면.

채널에서 변경가능한 값들을 보여줍니다.
2. 전체 소스코드
API 29와 androidx를 사용하여 작성하였습니다.
노티피케이션을 사용하기 위해 필요한 패키지를 설치해줍니다.
dependencies {
implementation fileTree(dir: 'libs', include: ['*.jar'])
implementation 'androidx.appcompat:appcompat:1.1.0-rc01'
implementation 'androidx.constraintlayout:constraintlayout:1.1.3'
testImplementation 'junit:junit:4.12'
androidTestImplementation 'androidx.test:runner:1.2.0'
androidTestImplementation 'androidx.test.espresso:espresso-core:3.2.0'
implementation "androidx.core:core:1.0.2"
} |
노트피케이션 결과를 보여줄 액티미티를 매니페스트에 추가해줍니다.
<?xml version="1.0" encoding="utf-8"?>
<manifest xmlns:android="http://schemas.android.com/apk/res/android"
package="com.tistory.webnautes.notificationexample">
<application
android:allowBackup="true"
android:icon="@mipmap/ic_launcher"
android:label="@string/app_name"
android:roundIcon="@mipmap/ic_launcher_round"
android:supportsRtl="true"
android:theme="@style/AppTheme">
<activity android:name=".MainActivity">
<intent-filter>
<action android:name="android.intent.action.MAIN" />
<category android:name="android.intent.category.LAUNCHER" />
</intent-filter>
</activity>
<activity
android:name=".ResultActivity"
android:parentActivityName=".MainActivity" >
</activity>
</application>
</manifest> |
노티피케이션을 발생시킬 버튼이 추가되어 있습니다.
<?xml version="1.0" encoding="utf-8"?>
<androidx.constraintlayout.widget.ConstraintLayout
xmlns:android="http://schemas.android.com/apk/res/android"
xmlns:app="http://schemas.android.com/apk/res-auto"
xmlns:tools="http://schemas.android.com/tools"
android:layout_width="match_parent"
android:layout_height="match_parent"
tools:context=".MainActivity">
<Button
android:text="노티피케이션 발생시키기"
android:layout_width="wrap_content"
android:layout_height="wrap_content"
app:layout_constraintLeft_toLeftOf="parent"
app:layout_constraintRight_toRightOf="parent"
app:layout_constraintTop_toTopOf="parent"
android:layout_marginTop="20dp"
android:id="@+id/button" />
</androidx.constraintlayout.widget.ConstraintLayout> |
노티피케이션 동작 결과를 보여줄 버튼이 추가되어 있습니다.
필요시 이 버튼에 다른 동작을 추가하면 좋을 듯합니다.
<?xml version="1.0" encoding="utf-8"?>
<androidx.constraintlayout.widget.ConstraintLayout xmlns:android="http://schemas.android.com/apk/res/android"
xmlns:app="http://schemas.android.com/apk/res-auto"
xmlns:tools="http://schemas.android.com/tools"
android:layout_width="match_parent"
android:layout_height="match_parent"
tools:context=".MainActivity">
<Button
android:text=""
android:layout_width="wrap_content"
android:layout_height="wrap_content"
app:layout_constraintLeft_toLeftOf="parent"
app:layout_constraintRight_toRightOf="parent"
app:layout_constraintTop_toTopOf="parent"
android:layout_marginTop="20dp"
android:id="@+id/textView" />
</androidx.constraintlayout.widget.ConstraintLayout> |
노티피케이션이 구현된 자바코드입니다.
package com.tistory.webnautes.notificationexample;
import androidx.appcompat.app.AppCompatActivity;
import androidx.core.app.NotificationCompat;
import android.app.NotificationChannel;
import android.app.NotificationManager;
import android.app.PendingIntent;
import android.content.Context;
import android.content.Intent;
import android.graphics.BitmapFactory;
import android.os.Build;
import android.os.Bundle;
import android.view.View;
import android.widget.Button;
public class MainActivity extends AppCompatActivity {
public static final String NOTIFICATION_CHANNEL_ID = "10001";
private int count = 0;
@Override
protected void onCreate(Bundle savedInstanceState) {
super.onCreate(savedInstanceState);
setContentView(R.layout.activity_main);
Button button = (Button) findViewById(R.id.button);
button.setOnClickListener(new View.OnClickListener() {
@Override
public void onClick(View arg0) {
// 버튼을 누를때마다 count 를 증가시며 최근에 보낸 노티피케이션만 사용자의 탭 대기중인지 테스트
count++;
NotificationSomethings();
}
});
}
public void NotificationSomethings() {
NotificationManager notificationManager = (NotificationManager)getSystemService(Context.NOTIFICATION_SERVICE);
Intent notificationIntent = new Intent(this, ResultActivity.class);
notificationIntent.putExtra("notificationId", count); //전달할 값
notificationIntent.setFlags(Intent.FLAG_ACTIVITY_NEW_TASK | Intent.FLAG_ACTIVITY_CLEAR_TASK) ;
PendingIntent pendingIntent = PendingIntent.getActivity(this, 0, notificationIntent, PendingIntent.FLAG_UPDATE_CURRENT);
NotificationCompat.Builder builder = new NotificationCompat.Builder(this, NOTIFICATION_CHANNEL_ID)
.setLargeIcon(BitmapFactory.decodeResource(getResources(), R.drawable.ic_launcher_foreground)) //BitMap 이미지 요구
.setContentTitle("상태바 드래그시 보이는 타이틀")
.setContentText("상태바 드래그시 보이는 서브타이틀")
// 더 많은 내용이라서 일부만 보여줘야 하는 경우 아래 주석을 제거하면 setContentText에 있는 문자열 대신 아래 문자열을 보여줌
//.setStyle(new NotificationCompat.BigTextStyle().bigText("더 많은 내용을 보여줘야 하는 경우..."))
.setPriority(NotificationCompat.PRIORITY_DEFAULT)
.setContentIntent(pendingIntent) // 사용자가 노티피케이션을 탭시 ResultActivity로 이동하도록 설정
.setAutoCancel(true);
//OREO API 26 이상에서는 채널 필요
if (Build.VERSION.SDK_INT >= Build.VERSION_CODES.O) {
builder.setSmallIcon(R.drawable.ic_launcher_foreground); //mipmap 사용시 Oreo 이상에서 시스템 UI 에러남
CharSequence channelName = "노티페케이션 채널";
String description = "오레오 이상을 위한 것임";
int importance = NotificationManager.IMPORTANCE_HIGH;
NotificationChannel channel = new NotificationChannel(NOTIFICATION_CHANNEL_ID, channelName , importance);
channel.setDescription(description);
// 노티피케이션 채널을 시스템에 등록
assert notificationManager != null;
notificationManager.createNotificationChannel(channel);
}else builder.setSmallIcon(R.mipmap.ic_launcher); // Oreo 이하에서 mipmap 사용하지 않으면 Couldn't create icon: StatusBarIcon 에러남
assert notificationManager != null;
notificationManager.notify(1234, builder.build()); // 고유숫자로 노티피케이션 동작시킴
}
} |
노티피케이션 결과 전달 받은 숫자를 보여주는 역활을 합니다.
package com.tistory.webnautes.notificationexample;
import android.app.NotificationManager;
import android.content.Context;
import android.os.Bundle;
import android.widget.TextView;
import androidx.annotation.Nullable;
import androidx.appcompat.app.AppCompatActivity;
public class ResultActivity extends AppCompatActivity {
@Override
protected void onCreate(@Nullable Bundle savedInstanceState) {
super.onCreate(savedInstanceState);
setContentView(R.layout.result_main);
String text = "전달 받은 값은";
int id = 0;
Bundle extras = getIntent().getExtras();
if (extras == null) {
text = "값을 전달 받는데 문제 발생";
}
else
id = extras.getInt("notificationId");
TextView textView = (TextView) findViewById(R.id.textView);
textView.setText(text + " " + id);
NotificationManager notificationManager = (NotificationManager) getSystemService(Context.NOTIFICATION_SERVICE);
//노티피케이션 제거
notificationManager.cancel(id);
}
} |
3. 관련 포스트
안드로이드 예제 - 알람 보여주기 위해 화면을 켜는 방법(PowerManager.WakeLock)
https://webnautes.tistory.com/1368
화면이 꺼진 상태에서 알람 메시지를 보여주기 위해 화면을 켜는 방법을 소개합니다.
4. 참고
[1] https://developer.android.com/training/notify-user/build-notification?hl=ko
[2] https://stackoverflow.com/questions/43093260/notification-not-showing-in-oreo
[3] https://stackoverflow.com/questions/47368187/android-oreo-notification-crashes-system-ui


 Android 알람 앱 예제(AlarmManager, NotificationManager, SharedPreferences)2019.08.15
 Android 강좌 - 컨스트레인트 레이아웃를 사용해보자 (ConstraintLayout)2019.08.06
 java.lang.ClassNotFoundException Didn't find class "com.google.android.gms.measurement.AppMeasurementInstallReferrerReceiver"2019.07.06