

어떻게 사용하는지 알기 어려웠던 컨스트레인트 레이아웃에 조금 친숙해진 기념으로 만든 영상입니다.
다음 순으로 영상이 올라가게 됩니다.
도움이 되었으면 좋아요와 구독을 해주세요.
감사합니다.
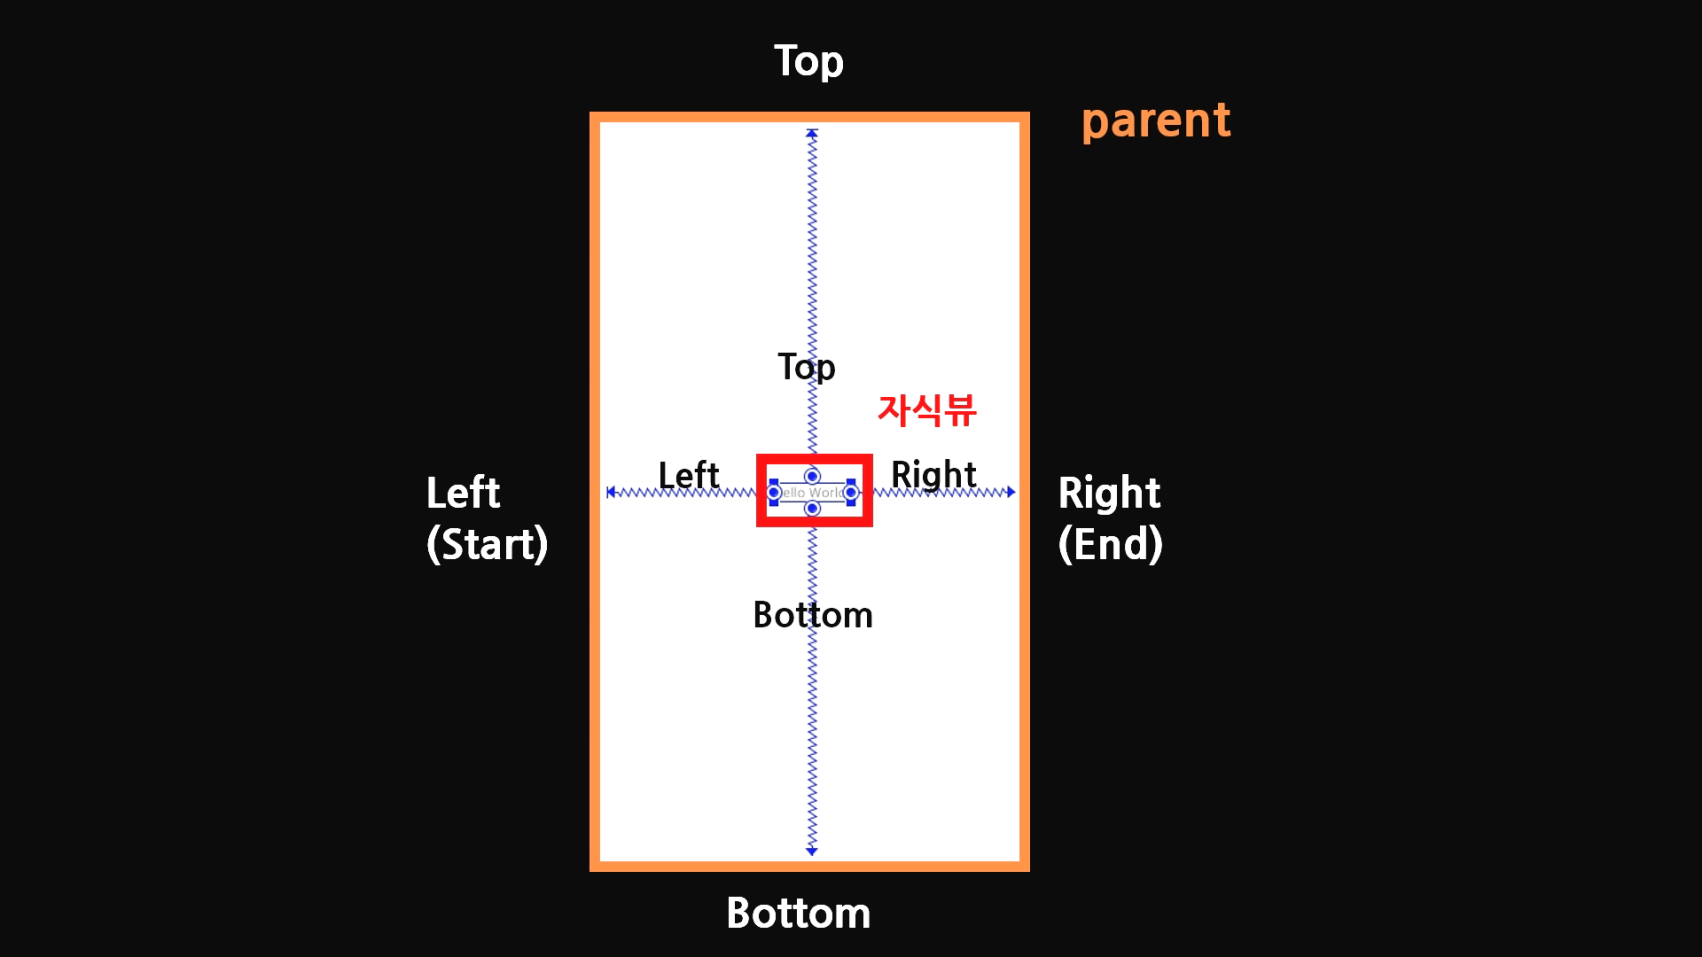
컨스트레인트 레이아웃은 부모뷰와 자식뷰에 붙이는 Left, Right, Top, Bottom을 숙지한다면 쉽게 이해할 수 있습니다.
자세한 내용은 영상에서 확인하세요. 컨스트레인트 레이아웃에 익숙해지도록 반복적으로 말하는 것을 염두하고 보세요.
1. 안드로이드 강좌 - 컨스트레인트 레이아웃을 사용해보자 1/3(Constraint Layout)
# 컨스트레인트 레이아웃 기본 개념
2. 안드로이드 강좌 - 컨스트레인트 레이아웃을 사용해보자 2/3(Constraint Layout)
# 가로 방향으로 자식뷰 배치
# ChainStyle
# Bias
# Weight
3. 안드로이드 강좌 - 컨스트레인트 레이아웃을 사용해보자 3/3(Constraint Layout)
# 세로 방향으로 자식뷰 배치
# baseline constraint
# march_constraint
# ChainStyle
# Bias
# Weight
4. 가이드라인(Guideline)과 배리어(Barrier)에 대해서는 본 포스트에 작성되어 있습니다.
Guideline
UI 컴포턴트에 대한 제약 조건을 추가할때 원하는 위치에 배치한 가이드라인을 사용할 수 있습니다.
가이드라인은 실행시에는 보이지 않고 UI 편집시에만 보이는 선입니다.
다음 3가지 방식으로 가이드라인을 레이아웃에 추가할 수 있습니다.
layout_constraintGuide_begin
수평방향(Left), 수직방향(Top)으로부터 지정한 dp만큼 떨어진 곳에 가이드라인을 위치시킵니다.
layout_constraintGuide_end
수평방향(Right), 수직방향(Bottom)으로부터 지정한 dp만큼 떨어진 곳에 가이드라인을 위치시킵니다.
app:layout_constraintGuide_percent
수평방향(Left), 수직방향(Top)으로부터 지정한 퍼센트만큼 떨어진 곳에 가이드라인을 위치시킵니다.
다음 예제는 Left로부터 100dp 떨어진 곳에 수직 가이드라인을, Top에서부터 400dp 떨어진 곳에 수평 가이드라인을 추가한 예제입니다.
이미지와 텍스트뷰, 에디트텍스트를 아래 그림처럼 배치해보았습니다.

<?xml version="1.0" encoding="utf-8"?>
<androidx.constraintlayout.widget.ConstraintLayout
    xmlns:android="http://schemas.android.com/apk/res/android"
    xmlns:app="http://schemas.android.com/apk/res-auto"
    xmlns:tools="http://schemas.android.com/tools"
    android:layout_width="match_parent"
    android:layout_height="match_parent"
    tools:context=".MainActivity">

    <ImageView
        android:id="@+id/imageView"
        android:layout_width="wrap_content"
        android:layout_height="wrap_content"
        android:src="@mipmap/ic_launcher"
        app:layout_constraintBottom_toTopOf="@+id/guideline1"
        app:layout_constraintLeft_toLeftOf="parent"
        app:layout_constraintRight_toRightOf="parent"
        app:layout_constraintTop_toTopOf="parent" />

    <androidx.constraintlayout.widget.Guideline
        android:id="@+id/guideline1"
        android:layout_width="wrap_content"
        android:layout_height="wrap_content"
        android:orientation="horizontal"
        app:layout_constraintGuide_begin="400dp" />

    <androidx.constraintlayout.widget.Guideline
        android:id="@+id/guideline2"
        android:layout_width="wrap_content"
        android:layout_height="wrap_content"
        android:orientation="vertical"
        app:layout_constraintGuide_begin="100dp" />


    <TextView
        android:id="@+id/textview1"
        android:layout_width="wrap_content"
        android:layout_height="wrap_content"
        android:layout_marginStart="30dp"
        android:text="Name"
        android:textSize="20sp"
        android:textAlignment="center"
        app:layout_constraintLeft_toLeftOf="parent"
        app:layout_constraintTop_toBottomOf="@id/guideline1" />


    <EditText
        android:id="@+id/edittext1"
        android:layout_marginStart="30dp"
        android:layout_marginEnd="30dp"
        app:layout_constraintLeft_toRightOf="@+id/textview1"
        app:layout_constraintTop_toBottomOf="@id/guideline1"
        app:layout_constraintRight_toRightOf="parent"
        android:layout_width="0dp"
        android:layout_height="wrap_content"/>

</androidx.constraintlayout.widget.ConstraintLayout>
Barrier
배리어도 가이드라인과 같은 용도로 사용되지만 차이가 있습니다.
가이드라인은 지정한 위치에 고정되는 반면 배리어는 UI의 크기가 변하면 그에따라 위치가 동적으로 변경됩니다.
예를 들어 아래처럼 TextView의 크기가 변함에 따라 배리어의 위치도 변합니다.
초기에 배치된 배리어입니다.

오른쪽에 있는 텍스트뷰의 크기가 변하자 배리어가 아래쪽으로 이동한 것을 볼 수 있습니다.
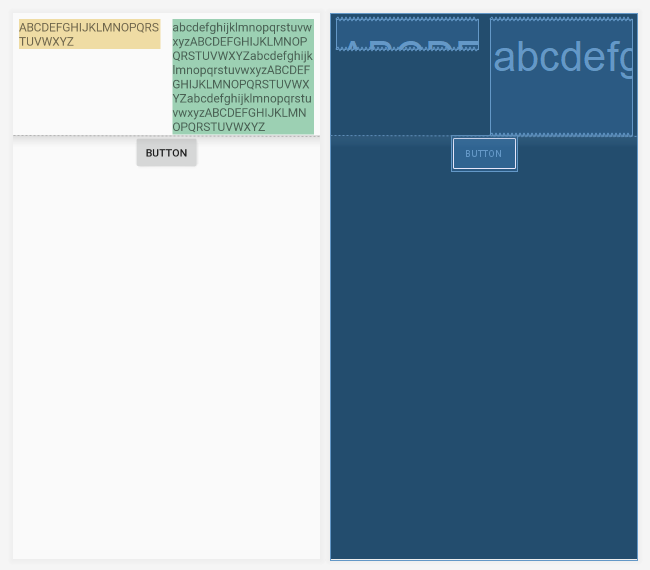
UI를 확인후. right_text_view의 텍스트를 두배로 늘려보세요.
<?xml version="1.0" encoding="utf-8"?>
<androidx.constraintlayout.widget.ConstraintLayout
    xmlns:android="http://schemas.android.com/apk/res/android"
    xmlns:app="http://schemas.android.com/apk/res-auto"
    xmlns:tools="http://schemas.android.com/tools"
    android:layout_width="match_parent"
    android:layout_height="match_parent"
    tools:context=".MainActivity">

    <TextView
        android:id="@+id/left_text_view"
        android:layout_width="0dp"
        android:layout_height="wrap_content"
        android:layout_marginTop="8dp"
        android:layout_marginEnd="8dp"
        android:layout_marginStart="8dp"
        android:text="ABCDEFGHIJKLMNOPQRSTUVWXYZ"
        android:textSize="16sp"
        android:background="#efdca4"
        app:layout_constraintLeft_toLeftOf="parent"
        app:layout_constraintRight_toLeftOf="@+id/right_text_view"
        app:layout_constraintTop_toTopOf="parent" />

    <TextView
        android:id="@+id/right_text_view"
        android:layout_width="0dp"
        android:layout_height="wrap_content"
        android:layout_marginTop="8dp"
        android:layout_marginStart="8dp"
        android:layout_marginEnd="8dp"
        android:text="abcdefghijklmnopqrstuvwxyzABCDEFGHIJKLMNOPQRSTUVWXYZabcdefghijklmnopqrstuvwxyzABCDEFGHIJKLMNOPQRSTUVWXYZ"
        android:textSize="16sp"
        android:background="#9cd0b3"
        app:layout_constraintRight_toRightOf="parent"
        app:layout_constraintLeft_toRightOf="@+id/left_text_view"
        app:layout_constraintTop_toTopOf="parent" />

    <androidx.constraintlayout.widget.Barrier
        android:id="@+id/barrier"
        android:layout_width="wrap_content"
        android:layout_height="wrap_content"
        app:barrierDirection="bottom"
        app:constraint_referenced_ids="left_text_view,right_text_view" />

    <Button
        android:id="@+id/button"
        android:layout_width="wrap_content"
        android:layout_height="wrap_content"
        android:layout_marginEnd="8dp"
        android:layout_marginStart="8dp"
        android:text="Button"
        app:layout_constraintEnd_toEndOf="parent"
        app:layout_constraintStart_toStartOf="parent"
        app:layout_constraintTop_toTopOf="@+id/barrier" />

</androidx.constraintlayout.widget.ConstraintLayout>
가이드라인은 아래 예제처럼 UI 컴포넌트의 크기가 변하더라도 가이드라인의 위치가 변하지 않습니다.
초기 상태

텍스트뷰 크기가 증가한 후
텍스트뷰의 크기는 커졌는데 가이드라인이 그대로라 텍스트뷰가 화면 바깥으로 벗어났습니다.
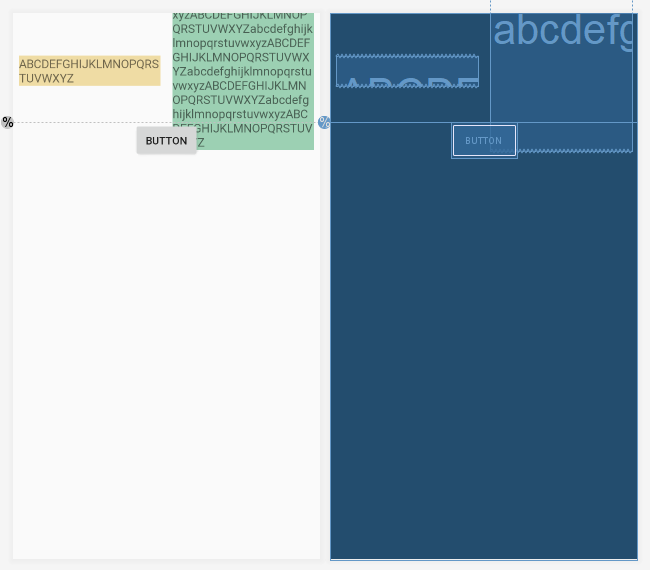
UI를 확인후. right_text_view의 텍스트를 두배로 늘려보세요.
<?xml version="1.0" encoding="utf-8"?>
<androidx.constraintlayout.widget.ConstraintLayout
    xmlns:android="http://schemas.android.com/apk/res/android"
    xmlns:app="http://schemas.android.com/apk/res-auto"
    xmlns:tools="http://schemas.android.com/tools"
    android:layout_width="match_parent"
    android:layout_height="match_parent"
    tools:context=".MainActivity">

    <TextView
        android:id="@+id/left_text_view"
        android:layout_width="0dp"
        android:layout_height="wrap_content"
        android:layout_marginTop="8dp"
        android:layout_marginEnd="8dp"
        android:layout_marginStart="8dp"
        android:text="ABCDEFGHIJKLMNOPQRSTUVWXYZ"
        android:textSize="16sp"
        android:background="#efdca4"
        app:layout_constraintBottom_toTopOf="@+id/guideline"
        app:layout_constraintLeft_toLeftOf="parent"
        app:layout_constraintRight_toLeftOf="@+id/right_text_view"
        app:layout_constraintTop_toTopOf="parent" />

    <TextView
        android:id="@+id/right_text_view"
        android:layout_width="0dp"
        android:layout_height="wrap_content"
        android:layout_marginTop="8dp"
        android:layout_marginStart="8dp"
        android:layout_marginEnd="8dp"
        android:text="abcdefghijklmnopqrstuvwxyzABCDEFGHIJKLMNOPQRSTUVWXYZabcdefghijklmnopqrstuvwxyzABCDEFGHIJKLMNOPQRSTUVWXYZ"
        android:textSize="16sp"
        android:background="#9cd0b3"
        app:layout_constraintBottom_toTopOf="@+id/guideline"
        app:layout_constraintRight_toRightOf="parent"
        app:layout_constraintLeft_toRightOf="@+id/left_text_view"
        app:layout_constraintTop_toTopOf="parent" />

    <Button
        android:id="@+id/button"
        android:layout_width="wrap_content"
        android:layout_height="wrap_content"
        android:layout_marginEnd="8dp"
        android:layout_marginStart="8dp"
        android:text="Button"
        app:layout_constraintEnd_toEndOf="parent"
        app:layout_constraintStart_toStartOf="parent"
        app:layout_constraintTop_toTopOf="@+id/guideline" />


    <android.support.constraint.Guideline
        android:id="@+id/guideline"
        android:layout_width="wrap_content"
        android:layout_height="wrap_content"
        android:orientation="horizontal"
        app:layout_constraintGuide_percent="0.2" />

</androidx.constraintlayout.widget.ConstraintLayout>
참고
https://stackoverflow.com/a/47241263
https://medium.com/@alancamargo92/the-ultimate-view-group-constraintlayout-e0598d2e1a05
'Android > 개념 및 예제' 카테고리의 다른 글
| Android 알람 앱 예제(AlarmManager, NotificationManager, SharedPreferences) (62) | 2019.08.15 |
|---|---|
| Android Notification 예제 ( Oreo, androidx 적용 ) (18) | 2019.08.13 |
| java.lang.ClassNotFoundException Didn't find class "com.google.android.gms.measurement.AppMeasurementInstallReferrerReceiver" (0) | 2019.07.06 |
| Android 앱에 광고 달기 ( AdMob ) (43) | 2019.07.04 |
| 안드로이드 예제 - 갤러리에서 이미지 불러와 이미지뷰에 보여주기 (26) | 2019.04.25 |
시간날때마다 틈틈이 이것저것 해보며 블로그에 글을 남깁니다.
블로그의 문서는 종종 최신 버전으로 업데이트됩니다.
여유 시간이 날때 진행하는 거라 언제 진행될지는 알 수 없습니다.
블로그 글과 유튜브 영상을 만드는 것은 전문가라서라기보단 공부한 내용을 함께 공유하는 게 좋아서입니다.
제가 쓴 책도 한번 검토해보세요 ^^


-
 Android 알람 앱 예제(AlarmManager, NotificationManager, SharedPreferences)2019.08.15
 -
Android Notification 예제 ( Oreo, androidx 적용 )2019.08.13
-
 java.lang.ClassNotFoundException Didn't find class "com.google.android.gms.measurement.AppMeasurementInstallReferrerReceiver"2019.07.06
 -
Android 앱에 광고 달기 ( AdMob )2019.07.04

