
OpenCV와 XFeat를 사용한 pyQt5 이미지 매칭 프로그램OpenCV/OpenCV 강좌2025. 1. 2. 10:49
Table of Contents
반응형
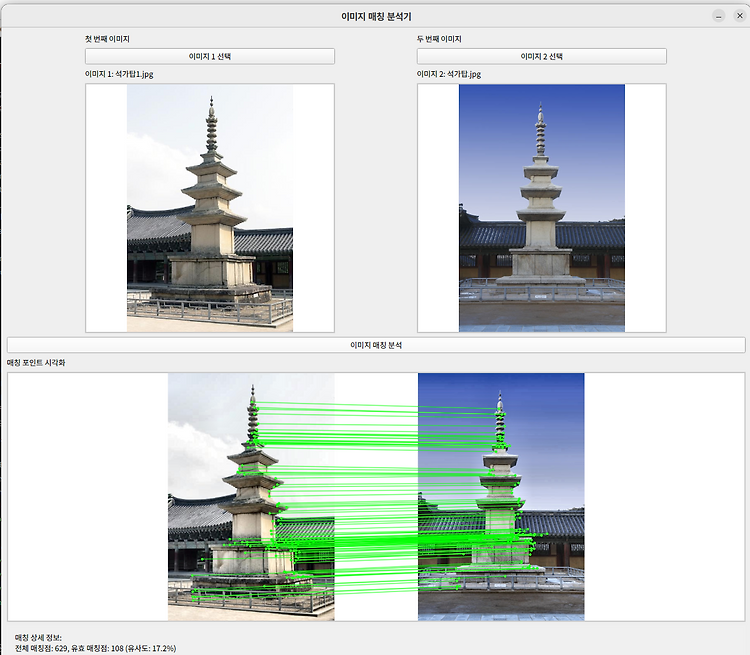
OpenCV와 XFeat를 사용하여 이미지 매칭을 테스트해볼 수 있도록 만든 pyQt5 프로그램입니다.
2025. 1. 2 최초작성
XFeat 사용방법은 아래 포스트를 참고하세요. 아래 포스트대로 진행 후, modules 폴더를 가져와서 사용하면 됩니다.
SIFT와 XFeat 사용해보기
https://webnautes.tistory.com/2360
실행 결과입니다. 항상 좋은 결과를 보여주지는 않습니다.


실행하려면 OpenCV와 pyQt5의 충돌로 다음 문제를 해결해야 합니다. 아래 포스트를 참고하세요
qt.qpa.plugin: Could not load the Qt platform plugin "xcb" 에러 해결 방법
https://webnautes.tistory.com/2303
사용한 전체 코드입니다.
| import sys import os import cv2 import numpy as np from PyQt5.QtWidgets import (QApplication, QMainWindow, QWidget, QVBoxLayout, QPushButton, QLabel, QFileDialog, QMessageBox, QHBoxLayout) from PyQt5.QtCore import Qt from PyQt5.QtGui import QImage, QPixmap from modules.xfeat import XFeat class ImageMatcherApp(QMainWindow): def __init__(self): super().__init__() self.initUI() self.image1_path = None self.image2_path = None self.xfeat = XFeat() def initUI(self): self.setWindowTitle('이미지 매칭 분석기') self.setGeometry(200, 200, 1200, 700) central_widget = QWidget() self.setCentralWidget(central_widget) main_layout = QVBoxLayout(central_widget) # 이미지 선택 및 프리뷰 영역 image_section = QHBoxLayout() # 첫 번째 이미지 섹션 img1_section = QVBoxLayout() img1_section.addWidget(QLabel('첫 번째 이미지')) self.btn_img1 = QPushButton('이미지 1 선택', self) self.btn_img1.clicked.connect(lambda: self.load_image(1)) img1_section.addWidget(self.btn_img1) self.label_img1 = QLabel('이미지 1: 선택되지 않음') self.label_img1.setWordWrap(True) img1_section.addWidget(self.label_img1) self.preview_img1 = QLabel() self.preview_img1.setFixedSize(400, 400) self.preview_img1.setAlignment(Qt.AlignCenter) self.preview_img1.setStyleSheet("border: 2px solid #cccccc; background-color: white;") img1_section.addWidget(self.preview_img1) image_section.addLayout(img1_section) # 두 번째 이미지 섹션 img2_section = QVBoxLayout() img2_section.addWidget(QLabel('두 번째 이미지')) self.btn_img2 = QPushButton('이미지 2 선택', self) self.btn_img2.clicked.connect(lambda: self.load_image(2)) img2_section.addWidget(self.btn_img2) self.label_img2 = QLabel('이미지 2: 선택되지 않음') self.label_img2.setWordWrap(True) img2_section.addWidget(self.label_img2) self.preview_img2 = QLabel() self.preview_img2.setFixedSize(400, 400) self.preview_img2.setAlignment(Qt.AlignCenter) self.preview_img2.setStyleSheet("border: 2px solid #cccccc; background-color: white;") img2_section.addWidget(self.preview_img2) image_section.addLayout(img2_section) main_layout.addLayout(image_section) # 매칭 컨트롤 섹션 control_section = QHBoxLayout() self.btn_match = QPushButton('이미지 매칭 분석', self) self.btn_match.clicked.connect(self.analyze_matching) control_section.addWidget(self.btn_match) main_layout.addLayout(control_section) # 매칭 결과 섹션 result_section = QVBoxLayout() result_section.addWidget(QLabel('매칭 포인트 시각화')) self.matches_preview = QLabel() self.matches_preview.setMinimumSize(800, 400) self.matches_preview.setAlignment(Qt.AlignCenter) self.matches_preview.setStyleSheet("border: 2px solid #cccccc; background-color: white;") result_section.addWidget(self.matches_preview) self.label_details = QLabel('매칭 상세 정보: ') self.label_details.setAlignment(Qt.AlignLeft) self.label_details.setWordWrap(True) self.label_details.setStyleSheet("background-color: #f0f0f0; padding: 10px;") result_section.addWidget(self.label_details) main_layout.addLayout(result_section) def normalize_image(self, img): lab = cv2.cvtColor(img, cv2.COLOR_BGR2LAB) l_channel, a, b = cv2.split(lab) clahe = cv2.createCLAHE(clipLimit=2.0, tileGridSize=(8,8)) cl = clahe.apply(l_channel) normalized = cv2.merge((cl,a,b)) return cv2.cvtColor(normalized, cv2.COLOR_LAB2BGR) def normalize_size_with_padding(self, img, target_size): h, w = img.shape[:2] padded = np.ones((target_size[1], target_size[0], 3), dtype=np.uint8) * 255 target_ratio = target_size[0] / target_size[1] img_ratio = w / h if img_ratio > target_ratio: new_w = target_size[0] new_h = int(new_w / img_ratio) scaled = cv2.resize(img, (new_w, new_h)) y_offset = (target_size[1] - new_h) // 2 padded[y_offset:y_offset+new_h, :] = scaled else: new_h = target_size[1] new_w = int(new_h * img_ratio) scaled = cv2.resize(img, (new_w, new_h)) x_offset = (target_size[0] - new_w) // 2 padded[:, x_offset:x_offset+new_w] = scaled return padded def draw_matches(self, img1, img2, ref_points, dst_points, mask): h1, w1 = img1.shape[:2] h2, w2 = img2.shape[:2] vis = np.zeros((max(h1, h2), w1 + w2, 3), dtype=np.uint8) vis[:h1, :w1] = img1 vis[:h2, w1:w1+w2] = img2 mask = mask.ravel().tolist() for (x1, y1), (x2, y2), inlier in zip(ref_points, dst_points, mask): if inlier: cv2.circle(vis, (int(x1), int(y1)), 3, (0, 255, 0), -1) cv2.circle(vis, (int(x2) + w1, int(y2)), 3, (0, 255, 0), -1) cv2.line(vis, (int(x1), int(y1)), (int(x2) + w1, int(y2)), (0, 255, 0), 1, cv2.LINE_AA) return vis def show_preview(self, image_path, preview_label): try: img = cv2.imread(image_path) if img is None: return img = cv2.cvtColor(img, cv2.COLOR_BGR2RGB) preview_size = preview_label.size() h, w = img.shape[:2] aspect = w/h if aspect > 1: new_w = preview_size.width() new_h = int(preview_size.width() / aspect) else: new_h = preview_size.height() new_w = int(preview_size.height() * aspect) img = cv2.resize(img, (new_w, new_h)) h, w = img.shape[:2] qimg = QImage(img.data, w, h, w*3, QImage.Format_RGB888) pixmap = QPixmap.fromImage(qimg) preview_label.setPixmap(pixmap) preview_label.setAlignment(Qt.AlignCenter) except Exception as e: print(f"Error showing preview: {str(e)}") def load_image(self, img_num): fname, _ = QFileDialog.getOpenFileName(self, f'이미지 {img_num} 선택', '', 'Images (*.png *.jpg *.jpeg *.bmp)') if fname: if img_num == 1: self.image1_path = fname self.label_img1.setText(f'이미지 1: {os.path.basename(fname)}') self.show_preview(fname, self.preview_img1) else: self.image2_path = fname self.label_img2.setText(f'이미지 2: {os.path.basename(fname)}') self.show_preview(fname, self.preview_img2) def analyze_matching(self): if not self.image1_path or not self.image2_path: QMessageBox.warning(self, '경고', '두 이미지를 모두 선택해주세요.') return try: img1 = cv2.imread(self.image1_path) img2 = cv2.imread(self.image2_path) if img1 is None or img2 is None: QMessageBox.warning(self, '경고', '이미지를 불러오는데 실패했습니다.') return img1 = self.normalize_image(img1) img2 = self.normalize_image(img2) scales = [0.75, 1.0, 1.25] max_similarity = 0.0 best_result = None for scale in scales: target_size = (int(800 * scale), int(800 * scale)) img1_scaled = self.normalize_size_with_padding(img1, target_size) img2_scaled = self.normalize_size_with_padding(img2, target_size) ref_points, dst_points = self.xfeat.match_xfeat(img1_scaled, img2_scaled, top_k=2000) if len(ref_points) < 4: continue H, mask = cv2.findHomography( dst_points, ref_points, cv2.RANSAC, ransacReprojThreshold=5.0, maxIters=2000, confidence=0.995 ) if mask is None: continue total_matches = len(mask) inlier_count = np.sum(mask) similarity = inlier_count / total_matches if total_matches > 0 else 0 if similarity > max_similarity: max_similarity = similarity best_result = { 'scale': scale, 'img1': img1_scaled, 'img2': img2_scaled, 'ref_points': ref_points, 'dst_points': dst_points, 'mask': mask, 'inlier_count': inlier_count, 'total_matches': total_matches } if best_result: vis = self.draw_matches( best_result['img1'], best_result['img2'], best_result['ref_points'], best_result['dst_points'], best_result['mask'] ) h, w = vis.shape[:2] vis_rgb = cv2.cvtColor(vis, cv2.COLOR_BGR2RGB) qimg = QImage(vis_rgb.data, w, h, w*3, QImage.Format_RGB888) pixmap = QPixmap.fromImage(qimg) scaled_pixmap = pixmap.scaled(self.matches_preview.size(), Qt.KeepAspectRatio, Qt.SmoothTransformation) self.matches_preview.setPixmap(scaled_pixmap) self.label_details.setText( f'매칭 상세 정보:\n' f'전체 매칭점: {best_result["total_matches"]}, ' f'유효 매칭점: {best_result["inlier_count"]} ' f'(유사도: {max_similarity*100:.1f}%)\n' f'스케일: {best_result["scale"]:.1f}x' ) else: QMessageBox.warning(self, '알림', '유효한 매칭점을 찾을 수 없습니다.') except Exception as e: QMessageBox.critical(self, '오류', f'매칭 분석 중 오류가 발생했습니다: {str(e)}') if __name__ == '__main__': app = QApplication(sys.argv) ex = ImageMatcherApp() ex.show() sys.exit(app.exec_()) |
반응형
'OpenCV > OpenCV 강좌' 카테고리의 다른 글
| 칼만 필터를 사용하여 파란색 원을 추적하는 간단한 테스트 (0) | 2025.02.12 |
|---|---|
| YoLo를 사용하여 영상에 사람이 있었던 총시간을 측정하는 OpenCV Python 예제 (1) | 2025.01.28 |
| XFeat를 사용한 월리를 찾기 구현 (0) | 2024.12.17 |
| OpenCV Python + pyQt5 구현 - 두 개의 이미지 더하는 블렌딩 (2) | 2024.08.28 |
| SIFT와 XFeat 사용해보기 (0) | 2024.07.28 |


