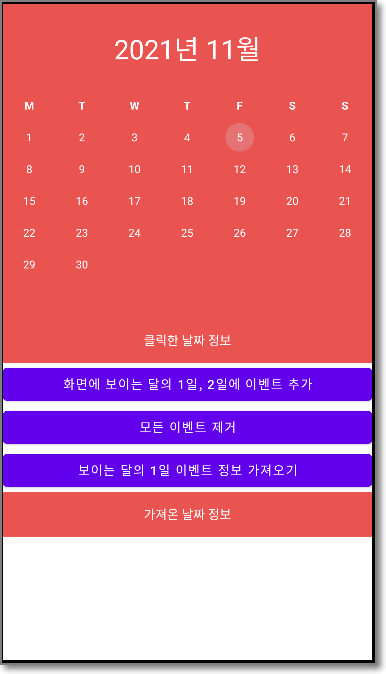

이벤트 추가와 날짜 선택이 가능한 안드로이드 달력 예제입니다.
2021. 11. 5 최초작성
아래 깃허브 저장소에 있는 CompactCalendarView 라이브러리를 사용했습니다.
https://github.com/SundeepK/CompactCalendarView
초기 실행 상태입니다. 달력 부분을 좌우로 스와프하여 달을 변경할 수 있습니다.

첫번째 버튼을 클릭하면 현재 화면에 보이는 달의 1일과 2일에 이벤트가 추가되면서 초록색 점이 날짜 아래에 표시됩니다.
여러개가 추가되면 해당 개수만큼 초록색 점이 추가됩니다.

2일을 터치해보면 해당 날짜와 해당 날짜에 추가된 이벤트 정보를 출력해줍니다.
이벤트가 없는 날은 날짜만 출력됩니다.

3번째 버튼을 클릭하면 현재 보이는 달의 1일 이벤트 정보를 가져와 아래쪽 텍스트뷰에 출력해줍니다.

2번째 버튼을 클릭하면 달력에 추가되어 있는 모든 달의 이벤트를 제거해줍니다.
이벤트 하나만 삭제하려면 removeEvent 메소드를 사용하세요.

달력 예제 프로젝트를 테스트해보는 방법을 간단히 소개합니다.
1. 새로운 안드로이드 프로젝트를 빈 프로젝트로 생성합니다.
2. build.gradle에 EventCalender 패키지를 추가합니다.
| dependencies { implementation 'com.github.sundeepk:compact-calendar-view:3.0.0' implementation 'androidx.appcompat:appcompat:1.3.1' implementation 'com.google.android.material:material:1.4.0' implementation 'androidx.constraintlayout:constraintlayout:2.1.1' testImplementation 'junit:junit:4.+' androidTestImplementation 'androidx.test.ext:junit:1.1.3' androidTestImplementation 'androidx.test.espresso:espresso-core:3.4.0' } |

3. 상단에 보이는 Sync Now를 클릭하고 잠시 처리가 완료되기를 기다립니다.

4. 레이아웃 파일을 다음 코드로 변경합니다.
주의할점은 달력 컴포넌트에서 년도와 월을 표시해주지 않기때문에 별도의 컴포넌트를 추가해줘야 합니다.
여기에서는 TextView를 사용했습니다.
| <?xml version="1.0" encoding="utf-8"?> <LinearLayout xmlns:android="http://schemas.android.com/apk/res/android" xmlns:app="http://schemas.android.com/apk/res-auto" xmlns:tools="http://schemas.android.com/tools" android:layout_width="match_parent" android:layout_height="match_parent" android:orientation="vertical" tools:context=".MainActivity"> <TextView android:id="@+id/textView_month" android:layout_width="match_parent" android:layout_height="100dp" android:textAlignment="center" android:background="#ffe95451" android:textColor="#fff" android:textSize="30sp" android:gravity="center" android:text="Month" /> <com.github.sundeepk.compactcalendarview.CompactCalendarView xmlns:app="http://schemas.android.com/apk/res-auto" android:id="@+id/compactcalendar_view" android:layout_width="match_parent" android:paddingRight="10dp" android:paddingLeft="10dp" android:layout_height="250dp" app:compactCalendarTargetHeight="250dp" app:compactCalendarTextSize="12sp" app:compactCalendarBackgroundColor="#ffe95451" app:compactCalendarTextColor="#fff" app:compactCalendarCurrentSelectedDayBackgroundColor="#E57373" app:compactCalendarCurrentDayBackgroundColor="#B71C1C" app:compactCalendarMultiEventIndicatorColor="#fff" /> <TextView android:id="@+id/textView_result" android:layout_width="match_parent" android:layout_height="50dp" android:textAlignment="center" android:background="#ffe95451" android:textColor="#fff" android:gravity="center" android:text="클릭한 날짜 정보" /> <Button android:id="@+id/button_add_events" android:layout_width="match_parent" android:layout_height="wrap_content" android:text="화면에 보이는 달의 1일, 2일에 이벤트 추가" /> <Button android:id="@+id/button_remove_events" android:layout_width="match_parent" android:layout_height="wrap_content" android:text="모든 이벤트 제거" /> <Button android:id="@+id/button_get_event" android:layout_width="match_parent" android:layout_height="wrap_content" android:text="보이는 달의 1일 이벤트 정보 가져오기" /> <TextView android:id="@+id/textView_result2" android:layout_width="match_parent" android:layout_height="50dp" android:textAlignment="center" android:background="#ffe95451" android:textColor="#fff" android:gravity="center" android:text="가져온 날짜 정보" /> </LinearLayout> |

5. 타이틀 바를 없애기 위해 themes.xml 파일에 추가합니다.
<!-- Base application theme. --> <style name="Theme.CalendarExample" parent="Theme.MaterialComponents.DayNight.DarkActionBar"> <!-- Primary brand color. --> <item name="colorPrimary">@color/purple_500</item> <item name="colorPrimaryVariant">@color/purple_700</item> <item name="colorOnPrimary">@color/white</item> <!-- Secondary brand color. --> <item name="colorSecondary">@color/teal_200</item> <item name="colorSecondaryVariant">@color/teal_700</item> <item name="colorOnSecondary">@color/black</item> <!-- Status bar color. --> <item name="android:statusBarColor" tools:targetApi="l">?attr/colorPrimaryVariant</item> <!-- Customize your theme here. --> <!-- No Title Bar--> <item name="windowActionBar">false</item> <item name="windowNoTitle">true</item> </style> </resources> |

MainActivity.java를 다음 코드로 변경합니다. 혼선을 방지하기 위해서 패키지 이름 선언하는 부분은 제거했습니다.
| import androidx.appcompat.app.AppCompatActivity; import android.graphics.Color; import android.os.Bundle; import android.util.Log; import android.view.View; import android.widget.Button; import android.widget.TextView; import android.widget.Toast; import com.github.sundeepk.compactcalendarview.CompactCalendarView; import com.github.sundeepk.compactcalendarview.domain.Event; import java.text.ParseException; import java.text.SimpleDateFormat; import java.util.Calendar; import java.util.Date; import java.util.List; import java.util.Locale; public class MainActivity extends AppCompatActivity { final String TAG = "calendar test"; private SimpleDateFormat dateFormatForDisplaying = new SimpleDateFormat("yyyy-MM-dd", Locale.KOREA); private SimpleDateFormat dateFormatForMonth = new SimpleDateFormat("yyyy년 MM월", Locale.KOREA); private SimpleDateFormat dateFormatForMonth2 = new SimpleDateFormat("yyyy-MM", Locale.KOREA); @Override protected void onCreate(Bundle savedInstanceState) { super.onCreate(savedInstanceState); setContentView(R.layout.activity_main); final CompactCalendarView compactCalendarView = (CompactCalendarView) findViewById(R.id.compactcalendar_view); TextView textView_month = (TextView) findViewById(R.id.textView_month); TextView textView_result = (TextView) findViewById(R.id.textView_result); TextView textView_result2 = (TextView) findViewById(R.id.textView_result2); textView_month.setText(dateFormatForMonth.format(compactCalendarView.getFirstDayOfCurrentMonth())); compactCalendarView.setFirstDayOfWeek(Calendar.MONDAY); Button button_add_events = (Button) findViewById(R.id.button_add_events) ; button_add_events.setOnClickListener(new Button.OnClickListener() { @Override public void onClick(View view) { Date date = compactCalendarView.getFirstDayOfCurrentMonth(); String yyymm = dateFormatForMonth2.format(date); String date1 = yyymm + "-01"; //"2021-11-01"; Date trans_date1 = null; try { trans_date1 = dateFormatForDisplaying.parse(date1); } catch (ParseException e) { e.printStackTrace(); } long time1 = trans_date1.getTime(); Event ev1 = new Event(Color.GREEN, time1, "이벤트 1"); compactCalendarView.addEvent(ev1); String date2 = yyymm + "-02"; //"2021-11-02"; Date trans_date2 = null; try { trans_date2 = dateFormatForDisplaying.parse(date2); } catch (ParseException e) { e.printStackTrace(); } long time2 = trans_date2.getTime(); Event ev2 = new Event(Color.GREEN, time2, "이벤트 2"); compactCalendarView.addEvent(ev2); } }); Button button_remove_events = (Button) findViewById(R.id.button_remove_events) ; button_remove_events.setOnClickListener(new Button.OnClickListener() { @Override public void onClick(View view) { compactCalendarView.removeAllEvents(); } }); Button button_get_event = (Button) findViewById(R.id.button_get_event) ; button_get_event.setOnClickListener(new Button.OnClickListener() { @Override public void onClick(View view) { Date dateyymm = compactCalendarView.getFirstDayOfCurrentMonth(); String yyymm = dateFormatForMonth2.format(dateyymm); String date = yyymm + "-01"; //"2021-11-01"; Date trans_date = null; try { trans_date = dateFormatForDisplaying.parse(date); } catch (ParseException e) { e.printStackTrace(); } long time = trans_date.getTime(); List<Event> events = compactCalendarView.getEvents(time); String info = ""; if (events.size() > 0) { info = events.get(0).getData().toString(); } textView_result2.setText("이벤트 이름 : " + info); } }); // 이벤트 관련 코드 compactCalendarView.setListener(new CompactCalendarView.CompactCalendarViewListener() { @Override public void onDayClick(Date dateClicked) { List<Event> events = compactCalendarView.getEvents(dateClicked); SimpleDateFormat transFormat = new SimpleDateFormat("yyyy-MM-dd"); String date1 = transFormat.format(dateClicked); String event_name = ""; String event_date = ""; if (events.size() > 0) { event_name = events.get(0).getData().toString(); long time1 = events.get(0).getTimeInMillis(); event_date = transFormat.format(new Date(time1)); } textView_result.setText("클릭한 날짜 " + date1 + " event 정보 " + event_name + " " + event_date); } @Override public void onMonthScroll(Date firstDayOfNewMonth) { textView_month.setText(dateFormatForMonth.format(firstDayOfNewMonth)); } }); } } |
'Android > 개념 및 예제' 카테고리의 다른 글
| 안드로이드 카메라 예제 ( 프리뷰 및 사진찍기, android.hardware.camera2 ) (0) | 2023.10.17 |
|---|---|
| Andorid 카메라 동영상 녹화 예제 (0) | 2023.10.17 |
| Android와 PC JAVA 프로그램 간 블루투스 통신 예제 (0) | 2023.10.14 |
| Android ViewPager 예제 - 좌우로 스와이프로 화면 전환 (0) | 2023.10.14 |
| Android용 HTML 파서(Parser) jsoup 사용해보기 (11) | 2021.01.26 |


