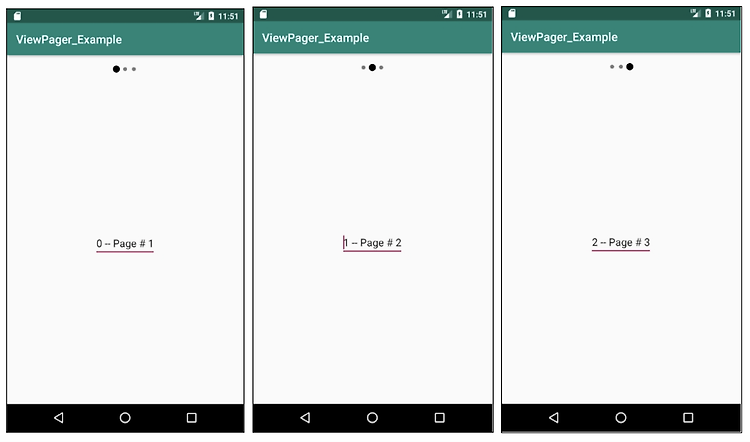

좌우로 움직이는 스와이프 제스처로 앱의 화면을 전환을 하는 예제입니다.
최초작성 2016. 7.24
2019. 10. 12
2023. 8. 15
스와이프(swipe)는 손가락을 화면에 댄 후, 일직선으로 드래그했다가 손을 떼는 동작입니다.
스와이프하여 이동할 때마다 상단에 있는 인디케이터가 움직여서 현재 위치를 알려줍니다.

ViewPager는 좌우 스와이프 동작으로 페이지 전환을 가능하도록 해주는 레이아웃 매니저입니다.
보여지는 뷰를 생성하기 위해서 FragmentPagerAdapter와 FragmentStatePagerAdapter를 사용하여 fragment를 생성할 수 있습니다.
FragmentStatePagerAdapter는 화면에 보여지지 않는 fragment를 메모리에서 제거하지만 FragmentPagerAdapter는 모든 fragment를 메모리에 유지합니다.
메모리에 부담을 주지 않기 위해서 FragmentPagerAdapter에서 생성한 fragment수를 3이하로 하거나 FragmentStatePagerAdapter를 사용하는 것을 권장하고 있습니다.
다음 과정으로 예제를 테스트할 수 있습니다.
1. build.gradle에 me.relex:circleindicator를 추가합니다. 인디케이터를 표시하기 위해 필요합니다.
implementation 'me.relex:circleindicator:2.1.6'
2. drawable 폴더에 black_radius.xml 파일을 추가합니다. 인디케이터를 검은색 동그라미로 표시하기 위해 필요합니다.
| <?xml version="1.0" encoding="utf-8"?> <shape xmlns:android="http://schemas.android.com/apk/res/android" android:shape="oval"> <solid android:color="@android:color/black"/> </shape> |
3. activity_main.xml 레이아웃 파일을 추가합니다. 인디케이터와 뷰페이저가 포함되어 있습니다.
| <?xml version="1.0" encoding="utf-8"?> <LinearLayout xmlns:android="http://schemas.android.com/apk/res/android" android:layout_width="match_parent" android:layout_height="match_parent" xmlns:app="http://schemas.android.com/apk/res-auto" android:orientation="vertical"> <me.relex.circleindicator.CircleIndicator android:id="@+id/indicator" app:ci_drawable="@drawable/black_radius" app:ci_height="7dp" app:ci_width="7dp" app:ci_margin="4dp" android:layout_width="match_parent" android:layout_height="48dp"/> <androidx.viewpager.widget.ViewPager android:id="@+id/vpPager" android:layout_width="match_parent" android:layout_height="wrap_content"/> </LinearLayout> |
4. 프레그먼트를 위한 레이아웃을 추가합니다. 예제에서는 3개의 프레그먼트를 사용하기에 3개를 추가합니다.
다음 내용으로 fragment_first.xml, fragment_second.xml, fragment_third.xml 레이아웃 파일을 생성합니다.
| <?xml version="1.0" encoding="utf-8"?> <LinearLayout xmlns:android="http://schemas.android.com/apk/res/android" android:gravity="center" android:layout_width="match_parent" android:layout_height="match_parent"> <EditText android:id="@+id/editText" android:layout_width="wrap_content" android:layout_height="wrap_content" android:text="EditText" /> </LinearLayout> |
5. MainActivity.java 메인 액티비티 파일을 다음 내용으로 변경합니다.
| import android.support.v4.app.Fragment; import android.support.v4.app.FragmentManager; import android.support.v4.app.FragmentPagerAdapter; import android.support.v4.view.ViewPager; import android.support.v7.app.AppCompatActivity; import android.os.Bundle; import me.relex.circleindicator.CircleIndicator; public class MainActivity extends AppCompatActivity { FragmentPagerAdapter adapterViewPager; @Override protected void onCreate(Bundle savedInstanceState) { super.onCreate(savedInstanceState); setContentView(R.layout.activity_main); ViewPager vpPager = (ViewPager) findViewById(R.id.vpPager); adapterViewPager = new MyPagerAdapter(getSupportFragmentManager()); vpPager.setAdapter(adapterViewPager); CircleIndicator indicator = (CircleIndicator) findViewById(R.id.indicator); indicator.setViewPager(vpPager); } public static class MyPagerAdapter extends FragmentPagerAdapter { private static int NUM_ITEMS = 3; public MyPagerAdapter(FragmentManager fragmentManager) { super(fragmentManager); } // Returns total number of pages @Override public int getCount() { return NUM_ITEMS; } // Returns the fragment to display for that page @Override public Fragment getItem(int position) { switch (position) { case 0: return FirstFragment.newInstance(0, "Page # 1"); case 1: return SecondFragment.newInstance(1, "Page # 2"); case 2: return ThirdFragment.newInstance(2, "Page # 3"); default: return null; } } // Returns the page title for the top indicator @Override public CharSequence getPageTitle(int position) { return "Page " + position; } } } |
6. 프레그먼트를 위한 파일 3개를 추가합니다. 클래스 이름만 다른 동일한 코드입니다.
FirstFragment.java
| import android.os.Bundle; import androidx.fragment.app.Fragment; import android.view.LayoutInflater; import android.view.View; import android.view.ViewGroup; import android.widget.EditText; public class FirstFragment extends Fragment { // Store instance variables private String title; private int page; // newInstance constructor for creating fragment with arguments public static FirstFragment newInstance(int page, String title) { FirstFragment fragment = new FirstFragment(); Bundle args = new Bundle(); args.putInt("someInt", page); args.putString("someTitle", title); fragment.setArguments(args); return fragment; } // Store instance variables based on arguments passed @Override public void onCreate(Bundle savedInstanceState) { super.onCreate(savedInstanceState); page = getArguments().getInt("someInt", 0); title = getArguments().getString("someTitle"); } // Inflate the view for the fragment based on layout XML @Override public View onCreateView(LayoutInflater inflater, ViewGroup container, Bundle savedInstanceState) { View view = inflater.inflate(R.layout.fragment_first, container, false); EditText tvLabel = (EditText) view.findViewById(R.id.editText); tvLabel.setText(page + " -- " + title); return view; } } |
SecondFragment.java
| import android.os.Bundle; import androidx.fragment.app.Fragment; import android.view.LayoutInflater; import android.view.View; import android.view.ViewGroup; import android.widget.EditText; public class SecondFragment extends Fragment { // Store instance variables private String title; private int page; // newInstance constructor for creating fragment with arguments public static SecondFragment newInstance(int page, String title) { SecondFragment fragment = new SecondFragment(); Bundle args = new Bundle(); args.putInt("someInt", page); args.putString("someTitle", title); fragment.setArguments(args); return fragment; } // Store instance variables based on arguments passed @Override public void onCreate(Bundle savedInstanceState) { super.onCreate(savedInstanceState); page = getArguments().getInt("someInt", 0); title = getArguments().getString("someTitle"); } // Inflate the view for the fragment based on layout XML @Override public View onCreateView(LayoutInflater inflater, ViewGroup container, Bundle savedInstanceState) { View view = inflater.inflate(R.layout.fragment_second, container, false); EditText tvLabel = (EditText) view.findViewById(R.id.editText); tvLabel.setText(page + " -- " + title); return view; } } |
ThirdFragment.java
| import android.os.Bundle; import androidx.fragment.app.Fragment; import android.view.LayoutInflater; import android.view.View; import android.view.ViewGroup; import android.widget.EditText; public class ThirdFragment extends Fragment { // Store instance variables private String title; private int page; // newInstance constructor for creating fragment with arguments public static ThirdFragment newInstance(int page, String title) { ThirdFragment fragment = new ThirdFragment(); Bundle args = new Bundle(); args.putInt("someInt", page); args.putString("someTitle", title); fragment.setArguments(args); return fragment; } // Store instance variables based on arguments passed @Override public void onCreate(Bundle savedInstanceState) { super.onCreate(savedInstanceState); page = getArguments().getInt("someInt", 0); title = getArguments().getString("someTitle"); } // Inflate the view for the fragment based on layout XML @Override public View onCreateView(LayoutInflater inflater, ViewGroup container, Bundle savedInstanceState) { View view = inflater.inflate(R.layout.fragment_second, container, false); EditText tvLabel = (EditText) view.findViewById(R.id.editText); tvLabel.setText(page + " -- " + title); return view; } } |
참고
https://guides.codepath.com/android/viewpager-with-fragmentpageradapter
https://github.com/ongakuer/CircleIndicator
'Android > 개념 및 예제' 카테고리의 다른 글
| 이벤트 추가와 날짜 선택 가능한 안드로이드 달력 예제 ( CompactCalendarView 라이브러리) (0) | 2023.10.14 |
|---|---|
| Android와 PC JAVA 프로그램 간 블루투스 통신 예제 (0) | 2023.10.14 |
| Android용 HTML 파서(Parser) jsoup 사용해보기 (11) | 2021.01.26 |
| Android RecyclerView에 데이터를 추가/편집/삭제하는 예제 (76) | 2019.08.22 |
| Android RecyclerView 아이템 클릭 이벤트 구현 (8) | 2019.08.22 |
시간날때마다 틈틈이 이것저것 해보며 블로그에 글을 남깁니다.
블로그의 문서는 종종 최신 버전으로 업데이트됩니다.
여유 시간이 날때 진행하는 거라 언제 진행될지는 알 수 없습니다.
블로그 글과 유튜브 영상을 만드는 것은 전문가라서라기보단 공부한 내용을 함께 공유하는 게 좋아서입니다.
제가 쓴 책도 한번 검토해보세요 ^^