
request 객체를 사용한 로그인, 파일 업로드, 쿠키 예제입니다.
Flask의 Quickstart 문서를 보며 진행한 과정을 작성한 글입니다.
https://flask.palletsprojects.com/en/2.0.x/quickstart/
부족한 부분이나 이상한 부분이 있을 수 있습니다.
개발 환경 구축은 다음 포스트를 참고하세요
Windows 10 환경에서 Visual Studio Code와 Miniconda를 사용한 Flask 개발 환경 만들기
https://webnautes.tistory.com/1522
Miniconda를 설치하지 않고 pip install flask 명령으로 해도 상관은 없습니다.
2021. 12. 22 최초작성.
로그인
요청 객체(Request Object)를 사용하여 로그인을 간단히 구현해봅니다.
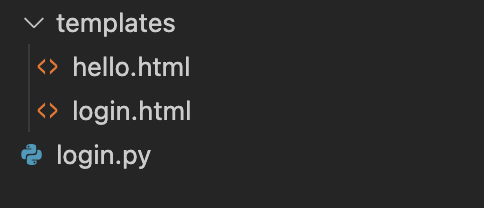
3가지 파일을 다음 구조로 저장합니다.

login.html
| <html> <head> </head> <body> <form method="post"> <label for="username" style="float:left">Username:</label> <input type=text name=username> <p> <label for="password" style="float:left;">Password:</label> <input type=password name=password> <p><input type=submit value=Login> </form> </body> </html> |
hello.html
| <!doctype html> <title>Hello from Flask</title> {% if name %} <h1>Hello {{ name }}!</h1> {% else %} <h1>Hello, World!</h1> {% endif %} |
login.py
| from flask import Flask, render_template, request app = Flask(__name__) def log_the_user_in(name=None): print(name) return render_template('hello.html', name=name) def valid_login(name=None, password=None): if name == 'lee' and password == '1234': return True else: return False @app.route('/login', methods=['POST', 'GET']) def login(): error = None if request.method == 'POST': if valid_login(request.form['username'], request.form['password']): return log_the_user_in(request.form['username']) else: error = 'Invalid username/password' # the code below is executed if the request method # was GET or the credentials were invalid return render_template('login.html', error=error) |
다음처럼 실행합니다.
set FLASK_APP=login
flask run
웹브라우저에서 http://127.0.0.1:5000/login 에 접속하면 다음과 같은 화면이 보입니다.

로그인이 정상적으로 이루어진 경우( Username은 lee, Password는 1234 입니다.)

다음과 같은 화면이 보입니다.

로그인에 실패한 경우에는

초기화면으로 돌아옵니다.

파일 업로드
요청 객체를 사용한 파일 업로드 예제입니다.
upload.py 파일 이름으로 저장합니다.
| import os from flask import Flask, flash, request, redirect, url_for, send_from_directory from werkzeug.utils import secure_filename UPLOAD_FOLDER = './uploads' ALLOWED_EXTENSIONS = {'txt', 'pdf', 'png', 'jpg', 'jpeg', 'gif'} app = Flask(__name__) app.config['UPLOAD_FOLDER'] = UPLOAD_FOLDER def allowed_file(filename): return '.' in filename and \ filename.rsplit('.', 1)[1].lower() in ALLOWED_EXTENSIONS @app.route('/', methods=['GET', 'POST']) def upload_file(): if request.method == 'POST': # check if the post request has the file part if 'file' not in request.files: flash('No file part') return redirect(request.url) file = request.files['file'] # If the user does not select a file, the browser submits an # empty file without a filename. if file.filename == '': flash('No selected file') return redirect(request.url) if file and allowed_file(file.filename): filename = secure_filename(file.filename) file.save(os.path.join(app.config['UPLOAD_FOLDER'], filename)) return redirect(url_for('download_file', name=filename)) return ''' <!doctype html> <title>Upload new File</title> <h1>Upload new File</h1> <form method=post enctype=multipart/form-data> <input type=file name=file> <input type=submit value=Upload> </form> ''' @app.route('/uploads/<name>') def download_file(name): return send_from_directory(app.config["UPLOAD_FOLDER"], name) |
upload.py가 있는 폴더에 uploads 폴더를 생성한 후 진행합니다.
다음처럼 실행합니다.
set FLASK_APP=upload
flask run
웹브라우저에서 http://127.0.0.1:5000/ 로 접속합니다.
파일 선택 버튼을 클릭하여 flask 코드에서 지정한 다음 파일중 하나를 선택합니다.
'txt', 'pdf', 'png', 'jpg', 'jpeg', 'gif'

선택한 파일 이름이 보입니다. Upload 버튼을 클릭합니다.

웹 브라우저에 업로드한 파일을 보여줍니다.

uploads 폴더에 test.png 파일이 저장된 것을 볼 수 있습니다.

쿠키
요청 객체를 사용한 쿠키 예제입니다.
쿠키에 액세스하려면 cookies 속성을 사용해야 합니다.
쿠키를 설정하기 위해 응답 개체의 set_cookie 메서드를 사용합니다.
request 객체의 cookies 속성은 클라이언트가 전송하는 모든 쿠키가 포함된 딕셔너리입니다. 세션을 사용하려면 쿠키를 직접 사용하지 말고 대신 쿠키 위에 보안을 추가하는 Flask의 Sessions을 사용하세요.
3개의 파일을 다음 위치에 각각 저장합니다.

cookie.py
| from flask import Flask, make_response, render_template, request app = Flask(__name__) @app.route('/') def index(): return render_template('index.html') @app.route('/setcookie', methods = ['POST', 'GET']) def setcookie(): if request.method == 'POST': user = request.form['name'] # 쿠키를 저장합니다. resp = make_response(render_template('readcookie.html')) resp.set_cookie('name', user, max_age = None) return resp @app.route('/getcookie') def getcookie(): # 쿠키를 읽습니다. name = request.cookies.get('name') print(name) return name #return '<h1>welcome ' + name + '</h1>' |
index.html
| <html> <body> <form action = "/setcookie" method = "POST"> <p><h3>Enter userID</h3></p> <p><input type = 'text' name = 'name'/></p> <p><input type = 'submit' value = 'Login'/></p> </form> </body> </html> |
readcookie.html
| <html> <body> <h1>Cookie values are set</h1> <a href="http://127.0.0.1:5000/getcookie">Click here to Read Cookie</a> </body> </html> |
다음처럼 실행합니다.
set FLASK_APP=cookie
flask run
웹브라우저에서 http://127.0.0.1:5000/ 로 접속합니다.
userID로 1234를 입력 후, Login을 클릭합니다.

다음처럼 화면이 변합니다.

크롬 웹브라우저의 경우 F12 눌러 저장된 쿠키를 확인할 수 있습니다.

“Click here to Read Cookie” 링크를 클릭하면 쿠키 내용이 보여집니다.

'WEB > Flask' 카테고리의 다른 글
| Flask 강좌 7 - JSON 응답하기 (0) | 2021.12.25 |
|---|---|
| Flask 강좌 6 - 리다이렉트와 에러(Redirects and Errors) (0) | 2021.12.24 |
| Flask 강좌 4 - 렌더링 템플릿 (0) | 2021.12.20 |
| Flask 강좌 3 - Routing (0) | 2021.12.19 |
| Flask 강좌 2 - HTML Escaping (0) | 2021.12.19 |


