
다음 깃허브에 있는 욜로 YOLO V4를 실행하는 방법을 소개합니다.
hunglc007 / tensorflow-yolov4-tflite ( https://github.com/hunglc007/tensorflow-yolov4-tflite )
2020. 05. 03
최초작성
2020. 08. 22
다음과 같은 에러가 발생하여 확인해보니 다크넷(darknet)에서 배포하는 yolov4.weights를 그대로 사용하는 방식에서 Tensorflow에서 사용하는 포맷으로 바꾸어서 하는 방식으로 바뀌었네요.
변경된 방식으로 포스트를 수정하였습니다.
"C:\Users\webnautes\AppData\Local\Programs\Python\Python37\lib\site-packages\tensorflow\python\saved_model\loader_impl.py", line 113, in parse_saved_model
constants.SAVED_MODEL_FILENAME_PB))
OSError: SavedModel file does not exist at: ./data/yolov4.weights/{saved_model.pbtxt|saved_model.pb}
2020. 09. 26
webcam 영상을 사용하여 테스트
2023. 5. 7
실행시 문제 해결
tflite 제거
1. 글작성 시점에서는 Tensorflow를 설치해야 합니다.
윈도우의 경우 명령 프롬프트, 리눅스의 경우 터미널에서 다음 명령을 사용하여 Tensorflow를 설치합니다.
pip install tensorflow
하위 버전이 설치된 경우 자동으로 제거되고 최신 버전이 설치됩니다.
글 작성 시점에서 Tensorflow 2.12가 설치되었습니다.
참고로 CUDA를 설치하면 실행속도가 많이 개선됩니다.
노트북을 사용하는 경우 전원 어댑터를 연결해야 cuda가 제 성능으로 동작합니다.
다음 포스트를 참고하여 설치하세요.
Windows에 CUDA Toolkit 11.2 cuDNN 8.1.0 Tensorflow 설치하는 방법
Ubuntu 22.04에 CUDA 사용하도록 Tensorflow 설치하는 방법
2. 이미 설치된 Tensorflow의 버전은 다음처럼 확인이 가능합니다.
본 글에서는 윈도우의 명령 프롬프트에서 진행했지만 리눅스의 터미널에서도 동일한 방법으로 확인할 수 있습니다.
| C:\Users\webnautes>python Python 3.10.5 (tags/v3.10.5:f377153, Jun 6 2022, 16:14:13) [MSC v.1929 64 bit (AMD64)] on win32 Type "help", "copyright", "credits" or "license" for more information. >>> import tensorflow as tf >>> tf.__version__ '2.12.0' |
3. 아래 링크의 프로젝트를 다운로드한 후, 압축을 풀어줍니다.
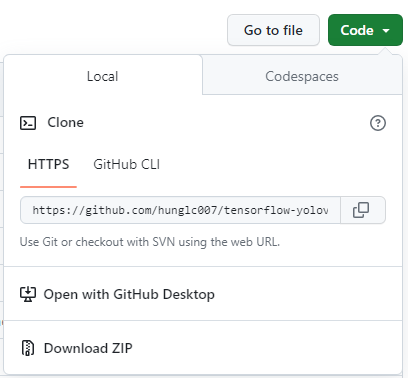
초록색 버튼 Code를 클릭한 후, Download ZIP를 클릭하면 yolo 프로젝트가 ZIP 파일로 압축되어 다운로드 됩니다.
https://github.com/hunglc007/tensorflow-yolov4-tflite

4. 아래 링크에서 yolov4.weights 파일을 다운로드합니다.
https://github.com/AlexeyAB/darknet/releases/download/darknet_yolo_v3_optimal/yolov4.weights
5. yolov4.weights 파일을 압축 푼 폴더의 tensorflow-yolov4-tflite-master\data에 복사해줍니다.
압축 푸는 방법에 따라서는 tensorflow-yolov4-tflite-master 폴더 안에 tensorflow-yolov4-tflite-master 폴더가 있을 수도 있습니다.
tensorflow-yolov4-tflite-master 폴더를 사용자 폴더 위치에 복사해두면 진행하기 편합니다.
명령 프롬프트 실행시 초기 위치입니다.
C:\Users\사용자이름\
6. 윈도우키 + R을 누른 후, cmd를 입력하여 명령 프롬프트를 실행합니다.
7. 압축을 풀은 폴더로 이동합니다.
C:\Users\webnautes> cd tensorflow-yolov4-tflite-master
추가로 패키지를 설치해야 합니다.
pip install opencv-python easydict pillow
8. 다크넷 가중치 파일을 텐서플로우를 위한 것으로 변환합니다.
python save_model.py --weights ./data/yolov4.weights --output ./checkpoints/yolov4-416 --input_size 416 --model yolov4
9. 이미지 테스트 코드입니다. 아래 코드를 욜로 폴더의 detect.py 파일 대신 사용합니다.
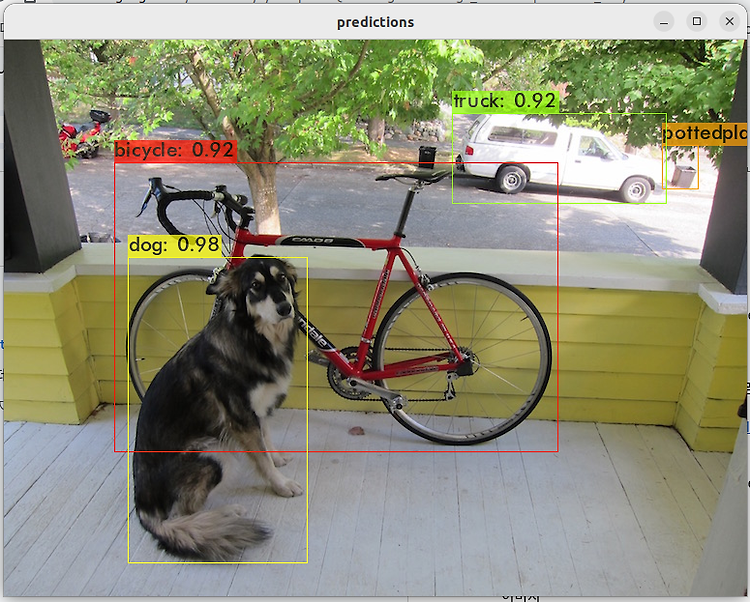
실행하고 잠시 기다리면 오브젝트 디텍션 결과가 보여집니다.
python detect.py
| import tensorflow as tf physical_devices = tf.config.experimental.list_physical_devices('GPU') if len(physical_devices) > 0: tf.config.experimental.set_memory_growth(physical_devices[0], True) from absl import app from tensorflow.python.saved_model import tag_constants import cv2 import numpy as np import random import colorsys from core.config import cfg def read_class_names(class_file_name): names = {} with open(class_file_name, 'r') as data: for ID, name in enumerate(data): names[ID] = name.strip('\n') return names def draw_bbox(image, bboxes, classes=read_class_names(cfg.YOLO.CLASSES), show_label=True): num_classes = len(classes) image_h, image_w, _ = image.shape hsv_tuples = [(1.0 * x / num_classes, 1., 1.) for x in range(num_classes)] colors = list(map(lambda x: colorsys.hsv_to_rgb(*x), hsv_tuples)) colors = list(map(lambda x: (int(x[0] * 255), int(x[1] * 255), int(x[2] * 255)), colors)) random.seed(0) random.shuffle(colors) random.seed(None) out_boxes, out_scores, out_classes, num_boxes = bboxes print(num_boxes[0]) for i in range(num_boxes[0]): if int(out_classes[0][i]) < 0 or int(out_classes[0][i]) > num_classes: continue coor = out_boxes[0][i] coor[0] = int(coor[0] * image_h) coor[2] = int(coor[2] * image_h) coor[1] = int(coor[1] * image_w) coor[3] = int(coor[3] * image_w) fontScale = 0.5 score = out_scores[0][i] class_ind = int(out_classes[0][i]) bbox_color = colors[class_ind] bbox_thick = int(0.6 * (image_h + image_w) / 600) c1, c2 = (coor[1], coor[0]), (coor[3], coor[2]) cv2.rectangle(image, np.int32(c1), np.int32(c2), bbox_color, bbox_thick) if show_label: bbox_mess = '%s: %.2f' % (classes[class_ind], score) t_size = cv2.getTextSize(bbox_mess, 0, fontScale, thickness=bbox_thick // 2)[0] c3 = (c1[0] + t_size[0], c1[1] - t_size[1] - 3) cv2.rectangle(image, np.int32(c1), (np.int32(c3[0]), np.int32(c3[1])), bbox_color, -1) #filled cv2.putText(image, bbox_mess, (np.int32(c1[0]), np.int32(c1[1] - 2)), cv2.FONT_HERSHEY_SIMPLEX, fontScale, (0, 0, 0), bbox_thick // 2, lineType=cv2.LINE_AA) return image def main(_argv): input_size = 416 image_path = './data/kite.jpg' weights = './checkpoints/yolov4-416' iou=0.45 score=0.25 original_image = cv2.imread(image_path) original_image = cv2.cvtColor(original_image, cv2.COLOR_BGR2RGB) image_data = cv2.resize(original_image, (input_size, input_size)) image_data = image_data / 255. image_data = image_data[np.newaxis, ...].astype(np.float32) saved_model_loaded = tf.saved_model.load(weights, tags=[tag_constants.SERVING]) infer = saved_model_loaded.signatures['serving_default'] batch_data = tf.constant(image_data) pred_bbox = infer(batch_data) for key, value in pred_bbox.items(): boxes = value[:, :, 0:4] pred_conf = value[:, :, 4:] boxes, scores, classes, valid_detections = tf.image.combined_non_max_suppression( boxes=tf.reshape(boxes, (tf.shape(boxes)[0], -1, 1, 4)), scores=tf.reshape( pred_conf, (tf.shape(pred_conf)[0], -1, tf.shape(pred_conf)[-1])), max_output_size_per_class=50, max_total_size=50, iou_threshold=iou, score_threshold=score ) pred_bbox = [boxes.numpy(), scores.numpy(), classes.numpy(), valid_detections.numpy()] image = draw_bbox(original_image, pred_bbox) image = cv2.cvtColor(image, cv2.COLOR_BGR2RGB) cv2.namedWindow("result", cv2.WINDOW_AUTOSIZE) cv2.imshow("result", image) cv2.waitKey(0) if __name__ == '__main__': try: app.run(main) except SystemExit: pass |

10. 웹캠 영상 테스트 코드입니다. 욜로 폴더의 detectvideo.py 파일로 대체하여 사용합니다.
실행하고 잠시 기다리면 오브젝트 디텍션 결과가 보여집니다.
깃허브 저장소에 있는 코드로는 gpu 사용시 욜로 박스가 보이지 않아서 참고한 링크의 코드를 수정하여 사용했는데 프레임당 200ms 정도 시간이 걸립니다. 예전에 진행할때에는 50ms 였습니다.
참고 https://github.com/hunglc007/tensorflow-yolov4-tflite/issues/383
python detectvideo.py
ESC 키를 누르면 프로그램이 종료됩니다.
| import time import tensorflow as tf physical_devices = tf.config.experimental.list_physical_devices('GPU') if len(physical_devices) > 0: tf.config.experimental.set_memory_growth(physical_devices[0], True) from core.yolov4 import filter_boxes, decode, YOLO from absl import app from absl.flags import FLAGS import core.utils as utils from core.yolov4 import filter_boxes from core.config import cfg from PIL import Image import cv2 import numpy as np import random import colorsys def read_class_names(class_file_name): names = {} with open(class_file_name, 'r') as data: for ID, name in enumerate(data): names[ID] = name.strip('\n') return names def draw_bbox(image, bboxes, classes=read_class_names(cfg.YOLO.CLASSES), show_label=True): num_classes = len(classes) image_h, image_w, _ = image.shape hsv_tuples = [(1.0 * x / num_classes, 1., 1.) for x in range(num_classes)] colors = list(map(lambda x: colorsys.hsv_to_rgb(*x), hsv_tuples)) colors = list(map(lambda x: (int(x[0] * 255), int(x[1] * 255), int(x[2] * 255)), colors)) random.seed(0) random.shuffle(colors) random.seed(None) out_boxes, out_scores, out_classes, num_boxes = bboxes print(num_boxes[0]) for i in range(num_boxes[0]): if int(out_classes[0][i]) < 0 or int(out_classes[0][i]) > num_classes: continue coor = out_boxes[0][i] coor[0] = int(coor[0] * image_h) coor[2] = int(coor[2] * image_h) coor[1] = int(coor[1] * image_w) coor[3] = int(coor[3] * image_w) fontScale = 0.5 score = out_scores[0][i] class_ind = int(out_classes[0][i]) bbox_color = colors[class_ind] bbox_thick = int(0.6 * (image_h + image_w) / 600) c1, c2 = (coor[1], coor[0]), (coor[3], coor[2]) cv2.rectangle(image, np.int32(c1), np.int32(c2), bbox_color, bbox_thick) if show_label: bbox_mess = '%s: %.2f' % (classes[class_ind], score) t_size = cv2.getTextSize(bbox_mess, 0, fontScale, thickness=bbox_thick // 2)[0] c3 = (c1[0] + t_size[0], c1[1] - t_size[1] - 3) cv2.rectangle(image, np.int32(c1), (np.int32(c3[0]), np.int32(c3[1])), bbox_color, -1) #filled cv2.putText(image, bbox_mess, (np.int32(c1[0]), np.int32(c1[1] - 2)), cv2.FONT_HERSHEY_SIMPLEX, fontScale, (0, 0, 0), bbox_thick // 2, lineType=cv2.LINE_AA) return image def load_config(): STRIDES = np.array(cfg.YOLO.STRIDES) ANCHORS = get_anchors(cfg.YOLO.ANCHORS, False) XYSCALE = cfg.YOLO.XYSCALE NUM_CLASS = len(read_class_names(cfg.YOLO.CLASSES)) return STRIDES, ANCHORS, NUM_CLASS, XYSCALE def get_anchors(anchors_path, tiny=False): anchors = np.array(anchors_path) if tiny: return anchors.reshape(2, 3, 2) else: return anchors.reshape(3, 3, 2) # @tf.function def infer(batch_data, model, tiny, size, framework): STRIDES, ANCHORS, NUM_CLASS, XYSCALE = load_config() feature_maps = model(batch_data) bbox_tensors = [] prob_tensors = [] if tiny: for i, fm in enumerate(feature_maps): if i == 0: output_tensors = decode(fm, size // 16, NUM_CLASS, STRIDES, ANCHORS, i, XYSCALE, framework) else: output_tensors = decode(fm, size // 32, NUM_CLASS, STRIDES, ANCHORS, i, XYSCALE, framework) bbox_tensors.append(output_tensors[0]) prob_tensors.append(output_tensors[1]) else: for i, fm in enumerate(feature_maps): if i == 0: output_tensors = decode(fm, size // 8, NUM_CLASS, STRIDES, ANCHORS, i, XYSCALE, framework) elif i == 1: output_tensors = decode(fm, size // 16, NUM_CLASS, STRIDES, ANCHORS, i, XYSCALE, framework) else: output_tensors = decode(fm, size // 32, NUM_CLASS, STRIDES, ANCHORS, i, XYSCALE, framework) bbox_tensors.append(output_tensors[0]) prob_tensors.append(output_tensors[1]) pred_bbox = tf.concat(bbox_tensors, axis=1) pred_prob = tf.concat(prob_tensors, axis=1) if framework == 'tflite': pred_bbox = (pred_bbox, pred_prob) else: boxes, pred_conf = filter_boxes(pred_bbox, pred_prob, score_threshold=0.25, input_shape=tf.constant([size, size])) pred_bbox = tf.concat([boxes, pred_conf], axis=-1) boxes = pred_bbox[:, :, 0:4] pred_conf = pred_bbox[:, :, 4:] boxes, scores, classes, valid_detections = tf.image.combined_non_max_suppression( boxes=tf.reshape(boxes, (tf.shape(boxes)[0], -1, 1, 4)), scores=tf.reshape( pred_conf, (tf.shape(pred_conf)[0], -1, tf.shape(pred_conf)[-1])), max_output_size_per_class=50, max_total_size=50, iou_threshold=0.45, score_threshold=0.25 ) return boxes, scores, classes, valid_detections def main(_argv): vid = cv2.VideoCapture(0) STRIDES, ANCHORS, NUM_CLASS, XYSCALE = load_config() inputs = tf.keras.layers.Input([416, 416, 3]) outputs = YOLO(inputs, NUM_CLASS, 'yolov4', False) model = tf.keras.Model(inputs, outputs) model.load_weights('./checkpoints/yolov4-416/variables/variables') frame_id = 0 while True: return_value, frame = vid.read() if return_value: frame = cv2.cvtColor(frame, cv2.COLOR_BGR2RGB) image = Image.fromarray(frame) else: if frame_id == vid.get(cv2.CAP_PROP_FRAME_COUNT): print("Video processing complete") break raise ValueError("No image! Try with another video format") image_data = cv2.resize(frame, (416, 416)) image_data = image_data / 255. image_data = image_data[np.newaxis, ...].astype(np.float32) prev_time = time.time() batch_data = tf.constant(image_data) boxes, scores, classes, valid_detections = infer(batch_data, model, False, 416, 'tf') pred_bbox = [boxes.numpy(), scores.numpy(), classes.numpy(), valid_detections.numpy()] image = draw_bbox(frame, pred_bbox) curr_time = time.time() exec_time = curr_time - prev_time result = np.asarray(image) info = "time: %.2f ms" %(1000*exec_time) print(info) result = cv2.cvtColor(image, cv2.COLOR_RGB2BGR) cv2.namedWindow("result", cv2.WINDOW_AUTOSIZE) cv2.imshow("result", result) if cv2.waitKey(1) & 0xFF == 27: break frame_id += 1 if __name__ == '__main__': try: app.run(main) except SystemExit: pass |
'Deep Learning & Machine Learning > YOLO' 카테고리의 다른 글
| Ubuntu에서 darknet을 사용하여 Yolo v4 커스텀 학습하는 방법 (0) | 2023.10.08 |
|---|---|
| YOLO v8 pose 사용해보기 (0) | 2023.10.04 |
| YOLO v8 사용해보기 (0) | 2023.10.04 |


