
OpenCV 강좌 C++ & Python - 컨투어 영역에 텍스쳐 넣기(applying texture in a contour area)OpenCV/OpenCV 강좌2019. 8. 18. 12:40
Table of Contents
반응형
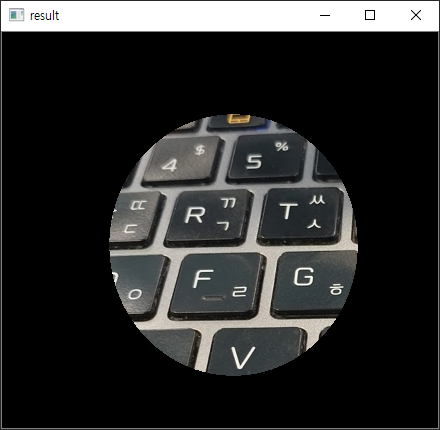
이미지에서 검출된 컨투어 영역에 특정 이미지를 텍스쳐로 넣는 예제입니다.
실행시키면 다음처럼 검출된 원 모양 컨투어 내부에 이미지 일부를 보여줍니다.

최초작성 2019. 7. 23
최종작성 2019. 8. 18
테스트에 사용한 이미지입니다.


전체 소스 코드입니다.
Python
import cv2 as cv
import numpy as np


# 마스크로 사용할 이미지와 텍스처로 사용할 이미지를 불러옵니다.
img_input_mask = cv.imread('1.png')
img_input_texture = cv.imread('2.png')


# 마스크로 사용할 이미지를 바이너리 이미지로 변환합니다.
img_gray = cv.cvtColor(img_input_mask, cv.COLOR_BGR2GRAY) # 그레이스케일 영상으로 변환합니다.
ret, img_binary = cv.threshold(img_gray, 60, 255, 0) # 상황에 따라 다른 방법으로 이진화해야 합니다.
contours, hierarchy = cv.findContours(img_binary, cv.RETR_LIST, cv.CHAIN_APPROX_SIMPLE) # 컨투어를 찾습니다.

height,width = img_input_mask.shape[:2]
img_mask = np.zeros((height,width,1), dtype=np.uint8) # 넘파이 배열을 생성합니다.


max_contour = None
max_area = -1

for contour in contours:
	area = cv.contourArea(contour)

	if area > max_area:
		max_area = area
		max_contour = contour


cv.drawContours(img_mask, [max_contour], 0, 255, -1)  # 마지막 파라미터가 -1이면 컨투어 내부가 지정한 색으로 칠해집니다.


# 텍스쳐 이미지를 마스크 이미지 크기만큼만 ROI합니다.
texture_roi = img_input_texture[0:height, 0:width]


# 텍스처 이미지와 마스크 이미지를 and 연산하면
# 마스크 이미지의 흰색 영역에만 텍스처가 보이게 됩니다.
img_result = cv.bitwise_and(texture_roi, texture_roi, mask = img_mask)


cv.imshow("result", img_result)
cv.waitKey(0)
C++
#include <opencv2/opencv.hpp>
#include <iostream>


using namespace cv;
using namespace std;


int main()
{

	// 마스크로 사용할 이미지와 텍스처로 사용할 이미지를 불러옵니다.
	Mat img_input_mask, img_input_texture;

	img_input_mask = imread("1.png");
	img_input_texture = imread("2.png");


	// 마스크로 사용할 이미지를 바이너리 이미지로 변환합니다.
	Mat img_gray, img_binary;
	cvtColor(img_input_mask, img_gray, COLOR_BGR2GRAY); // 그레이스케일 영상으로 변환합니다.
	threshold(img_gray, img_binary, 60, 255, 0); // 상황에 따라 다른 임계값을 사용하여 이진화해야 합니다.


	vector<vector<Point>> contours;
	findContours(img_binary, contours, RETR_LIST, CHAIN_APPROX_SIMPLE);  // 컨투어를 찾습니다.


	int height = img_input_mask.rows;
	int width = img_input_mask.cols;
	Mat img_mask(height, width, CV_8UC1, Scalar(0, 0, 0)); // 빈 Mat 객체를 생성합니다.


	int max_contour = -1;
	int max_area = -1;

	for (int i=0; i< contours.size(); i++)
	{
		int area = contourArea(contours[i]);

		if (area > max_area){
			max_area = area;
			max_contour = i;
		}
	}


	vector<vector<Point> > contours2;
	contours2.push_back(contours[max_contour]);

	drawContours(img_mask, contours2, -1, 255, -1);  // 마지막 파라미터가 -1이면 컨투어 내부가 지정한 색으로 칠해집니다.


	// 텍스쳐 이미지를 마스크 이미지 크기만큼만 ROI합니다.
	Mat texture_roi( img_input_texture, Rect(0,  0, width, height));


	// 텍스처 이미지와 마스크 이미지를 and 연산하면
	// 마스크 이미지의 흰색 영역에만 텍스처가 보이게 됩니다.
	Mat img_result;
	bitwise_and(texture_roi, texture_roi, img_result, img_mask);


	imshow("result", img_result);
	waitKey(0);


	return 0;
}
반응형
'OpenCV > OpenCV 강좌' 카테고리의 다른 글
| OpenCV를 사용하여 손 검출 및 인식하기(Hand Detection and Recognition using OpenCV) (53) | 2019.09.24 |
|---|---|
| OpenCV를 사용하여 책 검출하기(book detection with OpenCV) (1) | 2019.09.17 |
| OpenCV 강좌 - Camshift 이론과 C++ 예제(Camshift example code in C++) (4) | 2019.07.30 |
| OpenCV에서 이미지의 픽셀에 접근하는 방법 (29) | 2019.07.18 |
| OpenCV 강좌 - Meanshift 이론과 C++ 예제(meanshift example code in C++) (24) | 2019.07.04 |


