import cv2 as cv
import numpy as np
import math
import time
img_original = cv.imread('square.jpg', cv.IMREAD_COLOR)
img_gray = cv.cvtColor(img_original, cv.COLOR_BGR2GRAY)
img_edge = cv.GaussianBlur(img_gray, (5, 5), 0, 0)
img_edge = cv.Canny(img_edge, 50, 150, 3)
height = img_edge.shape[0]
width = img_edge.shape[1]
tmp = min(height, width)
hough_height = int(1.5 * tmp)
accumulator_width = 180
accumulator_height = hough_height * 2
accumulator_size = accumulator_height * accumulator_width
accumulator = np.zeros((accumulator_height, accumulator_width))
table_sin = np.zeros(180)
table_cos = np.zeros(180)
DEG2RAD = np.pi / 180
for angle in range(0,180):
table_sin[angle] = math.sin(np.radians(angle))
table_cos[angle] = math.cos(np.radians(angle))
start=time.clock()
for y in range(0,height):
for x in range(0,width):
if img_edge.item(y, x) > 0:
for angle in range(0,180):
r = int(x * table_cos[angle] + y * table_sin[angle])
r = r + hough_height # r이 음수인 경우 때문 -r ~ r 범위를 0 ~ 2r 범위로 변경
accumulator[r, angle] +=1
end=time.clock()
print(end - start)
# accumulator를 이미지화
img_accumulator = np.ones((accumulator_height, accumulator_width, 3), np.uint8)
img_accumulator = img_accumulator * 255
accumulator2 = cv.convertScaleAbs(accumulator,3,5)
start=time.clock()
for r in range(0,accumulator_height):
for angle in range(0,accumulator_width):
value = accumulator2[r, angle]
if value > 0:
img_accumulator.itemset(r, angle, 0, 255 - value)
img_accumulator.itemset(r, angle, 1, 255 - value)
img_accumulator.itemset(r, angle, 2, 255 - value)
end=time.clock()
print(end - start)
start=time.clock()
count = 0
for r in range(0, accumulator_height):
for angle in range(0,180):
if accumulator.item(r,angle) > 80: # Hough Line Transform Threshold
#현재 위치가 local maxima인지 검사
max = accumulator[r, angle]
for y in range(-5,6):
for x in range(-5,6):
new_r = r + y
new_angle = angle + x
if new_angle < 0:
new_angle = 180 + new_angle
elif new_angle >= 180:
new_angle = new_angle - 180
if new_r >= 0 and new_r < accumulator_height:
if accumulator[new_r, new_angle] > max:
max = accumulator[new_r, new_angle]
x = y = 6 #local maxima 아님. loop 종료
if max > accumulator.item(r, angle):
continue #현재 위치는 local maxima가 아님
# r = x * cos(theta) + y * sin(theta)
# x = (r - y * sin(theta)) / cos(theta) # 수직선인 경우
# y = (r - x * cos(theta)) / sin(theta) # 수평선인 경우
if angle >= 45 and angle <= 135: # 수직선
x1 = 0
x2 = width
y1 = ((r - hough_height) - x1 * table_cos[angle]) / table_sin[angle]
y2 = ((r - hough_height) - x2 * table_cos[angle]) / table_sin[angle]
else: #수평선
y1 = 0
y2 = height
x1 = ((r - hough_height) - y1 * table_sin[angle]) / table_cos[angle]
x2 = ((r - hough_height) - y2 * table_sin[angle]) / table_cos[angle]
x1 = int(x1)
y1 = int(y1)
x2 = int(x2)
y2 = int(y2)
cv.circle(img_accumulator, (angle, r), 5, (255, 0, 0),-1)
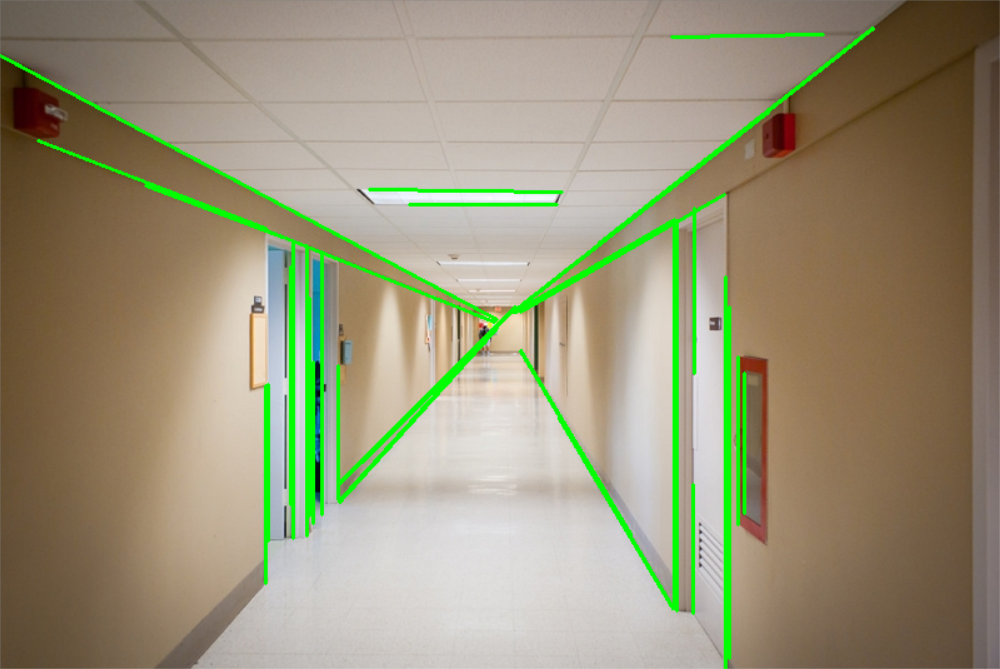
cv.line(img_original, (x1, y1), (x2, y2), (255, 0, 0), 1)
count += 1
print("(%d,%d)-(%d,%d), angle=%d, r=%d, accmulator=%d" % (x1,y1,x2,y2,angle,r,accumulator.item(r, angle)))
end=time.clock()
print(end - start)
cv.imshow("img_result", img_original)
cv.imshow("img_gray", img_gray)
cv.imshow("img_edge", img_edge)
cv.imshow("img_accumulator", img_accumulator)
cv.imwrite("img_accumulator.jpg", img_accumulator)
cv.waitKey(0) |