

bluetoothctl 명령을 사용하여 Bluetooth 모듈이 내장되어 있는 Raspberry Pi 3와 안드로이드폰 간에 페어링을 하고나서 Bluetooth 통신 테스트를 진행했습니다.
Android 앱에서 문자열을 전송하면 Raspberry Pi 3에서 실행 중인 서버 프로그램이 문자열을 에코해줍니다.
다음 순서로 진행합니다.
1. Raspberry Pi 3와 안드로이드폰 페어링 2. Raspberry Pi 3의 Bluetooth 에코 서버와 Android앱 간의 통신 테스트 |
2016.07.03 - 최초작성
~~~~~~~~
2019.11.26
2024. 5. 24 깨진 링크 수정
Raspberry Pi 3와 안드로이드폰 페어링
1. 페어링 작업 중 폰의 화면이 꺼지지 않도록 화면 켜짐 유지로 설정을 변경합니다.

2. Raspberry Pi 3에서 검색할 수 있도록 폰에서 블루투스 설정 화면을 띄워놓습니다.

3. Raspberry Pi 3의 터미널에서 안드로이드폰과 페어링을 하기 위해서 bluetoothctl 명령을 실행합니다.
| pi@raspberrypi:~ $ bluetoothctl |
4. 폰의 블루투스 모듈 맥어드레스를 검색합니다.
폰화면이 꺼지지 않아야 검색이 되며 폰의 이름이 보일 때까지 기다려야 합니다.
| [bluetooth]# scan on Discovery started [CHG] Controller B8:27:EB:DA:FA:66 Discovering: yes [CHG] Device 6D:C7:0B:20:60:50 RSSI: -79 [CHG] Device 78:D7:A5:67:52:90 RSSI: -86 [CHG] Device 04:52:C7:7C:5E:BF RSSI: -72 [CHG] Device 04:52:C7:7C:5E:BF TxPower: 4 [CHG] Device A8:7C:01:FD:ED:A1 RSSI: -81 [NEW] Device D0:13:FD:EE:43:2E V20 [CHG] Device 78:D7:A5:67:52:90 ManufacturerData Key: 0x004c |
5. 폰의 블루투스 모듈 맥어드레스를 확인했으면 검색을 중지하고 에이전트를 활성화 합니다.
| [bluetooth]# scan off [CHG] Device 72:E4:6C:89:73:CF RSSI is nil [CHG] Controller B8:27:EB:DA:FA:66 Discovering: no Discovery stopped [bluetooth]# agent on Agent registered [bluetooth]# default-agent Default agent request successful |
6. 안드로이드폰과 페어링을 진행하기 위해 pair 명령과 안드로이드 폰의 블루투스 모듈 맥어드레스를 같이 적어주면 페어링이 진행됩니다.
화면에 보이는 passkey를 확인하고..
| [bluetooth]# pair D0:13:FD:EE:43:2E Attempting to pair with D0:13:FD:EE:43:2E [CHG] Device D0:13:FD:EE:43:2E Connected: yes Request confirmation [agent] Confirm passkey 020589 (yes/no): |
안드로이드 폰에서 키값이 동일하다면 등록을 선택합니다.

라즈베리파이에서 yes를 입력하고 엔터를 입력합니다.
| [bluetooth]# pair D0:13:FD:EE:43:2E Attempting to pair with D0:13:FD:EE:43:2E [CHG] Device D0:13:FD:EE:43:2E Connected: yes Request confirmation [agent] Confirm passkey 020589 (yes/no): yes |
안드로이드 폰에서 페어링이 완료된 것을 볼 수 있습니다.

라즈베리파이에서도 페어링 성공여부가 확인됩니다.
| [bluetooth]# pair D0:13:FD:EE:43:2E Attempting to pair with D0:13:FD:EE:43:2E [CHG] Device D0:13:FD:EE:43:2E Connected: yes Request confirmation [agent] Confirm passkey 020589 (yes/no): yes [CHG] Device D0:13:FD:EE:43:2E Modalias: bluetooth:v00C4p13A1d1000 [CHG] Device D0:13:FD:EE:43:2E UUIDs: 00001105-0000-1000-8000-00805f9b34fb [CHG] Device D0:13:FD:EE:43:2E UUIDs: 0000110a-0000-1000-8000-00805f9b34fb [CHG] Device D0:13:FD:EE:43:2E UUIDs: 0000110c-0000-1000-8000-00805f9b34fb [CHG] Device D0:13:FD:EE:43:2E UUIDs: 0000110e-0000-1000-8000-00805f9b34fb [CHG] Device D0:13:FD:EE:43:2E UUIDs: 00001112-0000-1000-8000-00805f9b34fb [CHG] Device D0:13:FD:EE:43:2E UUIDs: 00001116-0000-1000-8000-00805f9b34fb [CHG] Device D0:13:FD:EE:43:2E UUIDs: 0000111f-0000-1000-8000-00805f9b34fb [CHG] Device D0:13:FD:EE:43:2E UUIDs: 0000112f-0000-1000-8000-00805f9b34fb [CHG] Device D0:13:FD:EE:43:2E UUIDs: 00001132-0000-1000-8000-00805f9b34fb [CHG] Device D0:13:FD:EE:43:2E UUIDs: 00001200-0000-1000-8000-00805f9b34fb [CHG] Device D0:13:FD:EE:43:2E UUIDs: 00001800-0000-1000-8000-00805f9b34fb [CHG] Device D0:13:FD:EE:43:2E UUIDs: 00001801-0000-1000-8000-00805f9b34fb [CHG] Device D0:13:FD:EE:43:2E ServicesResolved: yes [CHG] Device D0:13:FD:EE:43:2E Paired: yes Pairing successful |
7. 페어링 완료후, trust 명령을 해줘야 합니다.
| [bluetooth]# trust D0:13:FD:EE:43:2E [CHG] Device D0:13:FD:EE:43:2E Trusted: yes Changing D0:13:FD:EE:43:2E trust succeeded |
8. quit 명령으로 bluetoothctl를 종료합니다.
| [bluetooth]# quit Agent unregistered [DEL] Controller B8:27:EB:DA:FA:66 raspberrypi [default] pi@raspberrypi:~ $ |
Raspberry Pi 3의 블루투스 에코 서버와 Android앱 간의 통신 테스트
1. C/C++ 컴파일러와 관련 라이브러리, make 같은 도구들이 포함되어 있는 build-essential 패키지를 설치해줍니다.
다음처럼 이미 설치되어 있을 수도 있습니다.
| pi@raspberrypi:~ $ sudo apt-get install build-essential Reading package lists... Done Building dependency tree Reading state information... Done build-essential is already the newest version (12.3). 0 upgraded, 0 newly installed, 0 to remove and 73 not upgraded. |
2. 예제 코드를 컴파일 해줍니다. 코드는 다음 포스트 마지막에 있습니다.
Raspberry Pi 3 블루투스 페어링 방법(bluetoothctl) 및 C언어 블루투스 서버 예제
https://webnautes.tistory.com/1137
| pi@raspberrypi:~ $ gcc bluetooth_server.c -o bluetooth_server -lbluetooth -lpthread |
컴파일시 다음과 같은 에러가 나면 libbluetooth-dev 패키지가 설치 안되어 있어서 입니다.
| pi@raspberrypi:~ $ gcc bluetooth_server.c -o bluetooth_server -lbluetooth -lpthread bluetooth_server.c:6:33: fatal error: bluetooth/bluetooth.h: No such file or directory #include <bluetooth/bluetooth.h> ^ compilation terminated. |
libbluetooth-dev 패키지에는 블루투스 프로그래밍을 하기 위해 필요한 라이브러리가 포함되어 있습니다. 설치 해주고 나서 ..
| pi@raspberrypi:~ $ sudo apt-get install libbluetooth-dev |
다시 컴파일해보면 문제 없이 완료됩니다.
| pi@raspberrypi:~ $ gcc bluetooth_server.c -o bluetooth_server -lbluetooth -lpthread pi@raspberrypi:~ $ |
3. 실행시켜 보면 세그멘테이션 폴트(Segmentation Fault)가 발생합니다.
| pi@raspberrypi:~ $ ./bluetooth_server Registering UUID 00001101-0000-1000-8000-00805f9b34fb Segmentation fault |
에러를 해결하기 위해서는 SDP Server를 활성화시켜 줘야합니다.
dbus-org.bluez.service 파일을 편집기로 열어서
| pi@raspberrypi:~ $ sudo nano /etc/systemd/system/dbus-org.bluez.service |
아래 부분을 찾아서 빨간색 부분을 추가해줍니다.
| ExecStart=/usr/lib/bluetooth/bluetoothd --compat |
4. 재부팅해줘야 설정이 적용됩니다. (데몬 재시작으로는 반영이 안됩니다.)
| pi@raspberrypi:~ $ sudo reboot |
5. 재부팅 완료 후, 퍼미션 문제를 해결하기 위해 다음 한줄을 실행합니다.
재부팅할때 마다 실행시켜 주어야 세그멘테이션 폴트가 나지 않습니다.
| pi@raspberrypi:~ $ sudo chmod 777 /var/run/sdp |
부팅할때 마자 실행되도록 홈디렉토리에 있는 .bashrc 파일 끝에 추가해두어도 됩니다.
| pi@raspberrypi:~ $ sudo nano ~/.bashrc |

페어링은 한번 해주면 다시 할 필요가 없습니다.
6. Raspberry Pi에서 블루투스 서버를 실행시킵니다.
| pi@raspberrypi:~ $ ./bluetooth_server |
7. 안드로이드앱을 실행시킨 후, 페어링된 디바이스 목록에서 raspberrypi를 선택합니다.

테스트에 사용한 Android 앱 소스코드는 다음 포스팅에 있습니다.
Android와 PC JAVA 프로그램 간 블루투스 통신 예제
https://webnautes.tistory.com/2006
8. Raspberry Pi에서 실행중인 서버에 연결되면 앱 상단에 다음과 같은 메시지가 보입니다.
connected to raspberrypi

9. Raspberry Pi의 터미널에서 폰의 블루투스 모듈 맥어드레스를 보여주며 접속되었다는 것을 알려줍니다.

10. 폰에서 문자열을 입력 한 후, SEND를 터치하면...

11. Raspberry Pi의 터미널에서 수신한 문자와 다시 에코에서 보낸 문자를 보여줍니다.

12. 폰에서도 전송한 문자(Me:)와 Raspberry Pi로부터 수신 받은 문자열(raspberrypi:)을 확인 할 수 있습니다.
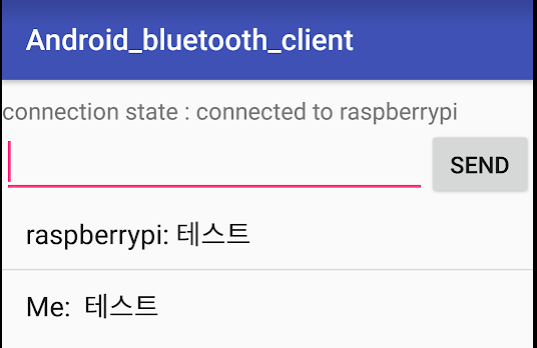
13. 앱에서 백버튼을 눌러서 종료하면 서버도 같이 종료됩니다.

'Raspberry Pi > Bluetooth' 카테고리의 다른 글
| Raspberry Pi 3 블루투스 페어링 방법(bluetoothctl) 및 C언어 블루투스 서버 예제 (214) | 2019.09.08 |
|---|
시간날때마다 틈틈이 이것저것 해보며 블로그에 글을 남깁니다.
블로그의 문서는 종종 최신 버전으로 업데이트됩니다.
여유 시간이 날때 진행하는 거라 언제 진행될지는 알 수 없습니다.
블로그 글과 유튜브 영상을 만드는 것은 전문가라서라기보단 공부한 내용을 함께 공유하는 게 좋아서입니다.
제가 쓴 책도 한번 검토해보세요 ^^

