Arduino Uno에 DS1302 RTC 모듈을 연결하는 방법과 RTC에 현재 시간 설정 한 후,
다시 저장된 시간을 가져와 출력하는 방법을 설명합니다.
1. Arduino Uno와 DS1302 RTC 모듈 연결
2. 라이브러리 준비
3. 테스트에 사용한 코드
4. 참고

1. Arduino Uno와 DS1302 RTC 모듈 연결
Arduino Uno와 DS1302 RTC 모듈을 다음처럼 연결해줍니다.
Arduino Uno D2 → DS1302 RTC RST Arduino Uno D3 → DS1302 RTC DAT Arduino Uno D4 → DS1302 RTC CLK Arduino Uno D5 → DS1302 RTC GND Arduino Uno D6 → DS1302 RTC VCC |
암수 점퍼 케이블를 이용하면 편합니다.

2. 라이브러리 준비
아래 주소에서 DS1302RTC 라이브러리를 다운로드 받아 압축을 풀어서
http://playground.arduino.cc/uploads/Main/DS1302RTC.zip
압축을 풀어서 Arduino IDE 라이브러리 폴더에 복사해줍니다.

아래 주소에서 Time 라이브러리를 다운로드 받을 수 있습니다.
https://github.com/PaulStoffregen/Time
오른쪽에 보이는 초록색 버튼을 클릭하고

Download ZIP을 클릭하면 다운로드가 시작됩니다.

압축을 풀어서 Arduino IDE 라이브러리 폴더에 복사해줍니다.

Arduino IDE 메뉴의 파일 > 예제 > DS1302RTC > SetSerial에서 불러올 수 있는 예제를 수정해서 사용했습니다.
전체 코드는 포스팅 끝에 추가되어 있습니다.
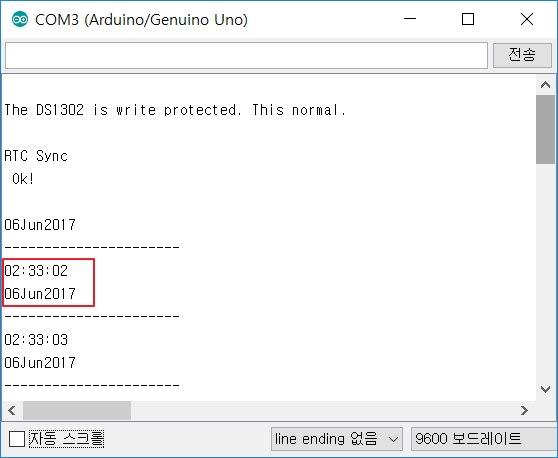
오래 전에 맞추어 놓은게 아직 유효했는지 날짜가 정확합니다.
하지만 현재 시간이 맞지 않습니다.
1시간 반정도 오차가 나네요.
현재 시간을 입력해줍니다.
2017-06-06 01:02:00을 콤마를 구분기호로해서 다음처럼 입력합니다..
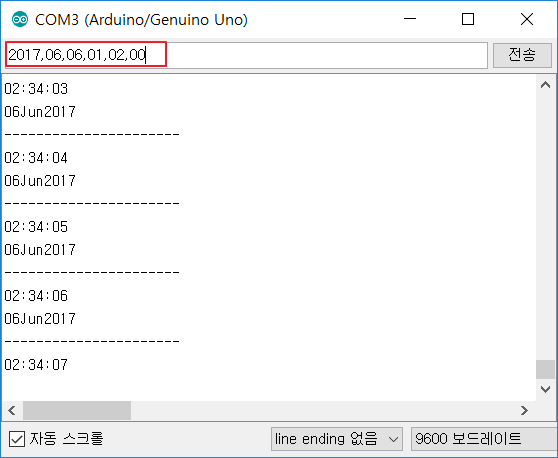
시간이 업데이트 되었습니다.

다시 시간을 정확하게 맞춘다음 아두이노 전원 공급을 차단하고 10분정도 기다려 봅니다.
DS1302 RTC 모듈에 전지가 들어있어 아두이노를 꺼두어도 동작합니다.

10분 정도 지난 후, Arduino Uno에 다시 전원을 공급하고 시리얼 모니터 결과와 컴퓨터의 시간을 비교해보았습니다.
DS1302 RTC 모듈이 전지로부터 전원공급받은지 10분정도 경과했는데도 시간이 정확합니다.

좀더 긴 시간을 두고 테스트해볼 필요가 있을 듯합니다.
3. 테스트에 사용한 코드
#include <DS1302RTC.h>
#include <TimeLib.h>
// Set pins: CE(reset), IO(dat),CLK
DS1302RTC RTC(2, 3, 4);
// Optional connection for RTC module
#define DS1302_GND_PIN 5
#define DS1302_VCC_PIN 6
void setup(void)
{
Serial.begin(9600);
// Activate RTC module
digitalWrite(DS1302_GND_PIN, LOW);
pinMode(DS1302_GND_PIN, OUTPUT);
digitalWrite(DS1302_VCC_PIN, HIGH);
pinMode(DS1302_VCC_PIN, OUTPUT);
Serial.println("RTC module activated");
delay(500);
if (RTC.haltRTC()) {
Serial.println("The DS1302 is stopped. Please set time");
Serial.println("to initialize the time and begin running.");
Serial.println();
}
if (!RTC.writeEN()) {
Serial.println("The DS1302 is write protected. This normal.");
Serial.println();
}
delay(5000);
//setSyncProvider() causes the Time library to synchronize with the
//external RTC by calling RTC.get() every five minutes by default.
setSyncProvider(RTC.get);
Serial.println("RTC Sync");
if (timeStatus() == timeSet)
Serial.println(" Ok!");
else
Serial.println(" FAIL!");
Serial.println();
}
void loop(void)
{
static time_t tLast;
time_t t;
tmElements_t tm;
//check for input to set the RTC, minimum length is 12, i.e. yy,m,d,h,m,s
if (Serial.available() >= 12) {
//note that the tmElements_t Year member is an offset from 1970,
//but the RTC wants the last two digits of the calendar year.
//use the convenience macros from Time.h to do the conversions.
int y = Serial.parseInt();
if (y >= 100 && y < 1000)
Serial.println("Error: Year must be two digits or four digits!");
else {
if (y >= 1000)
tm.Year = CalendarYrToTm(y);
else //(y < 100)
tm.Year = y2kYearToTm(y);
tm.Month = Serial.parseInt();
tm.Day = Serial.parseInt();
tm.Hour = Serial.parseInt();
tm.Minute = Serial.parseInt();
tm.Second = Serial.parseInt();
t = makeTime(tm);
//use the time_t value to ensure correct weekday is set
if(RTC.set(t) == 0) { // Success
setTime(t);
Serial.println("RTC set to: ");
printDateTime(t);
Serial.println();
}
else
Serial.println();
Serial.println("RTC set failed!");
//dump any extraneous input
while (Serial.available() > 0) Serial.read();
}
}
t = now();
if (t != tLast) {
tLast = t;
printDateTime(t);
Serial.println();
}
}
//print date and time to Serial
void printDateTime(time_t t)
{
printDate(t);
Serial.println("----------------------");
printTime(t);
}
//print time to Serial
void printTime(time_t t)
{
printI00(hour(t), ':');
printI00(minute(t), ':');
printI00(second(t), ' ');
}
//print date to Serial
void printDate(time_t t)
{
printI00(day(t), 0);
Serial.print(monthShortStr(month(t)));
Serial.println(year(t), DEC);
}
//Print an integer in "00" format (with leading zero),
//followed by a delimiter character to Serial.
//Input value assumed to be between 0 and 99.
void printI00(int val, char delim)
{
if (val < 10) Serial.print("0");
Serial.print(val, DEC);
if (delim > 0) Serial.print(delim);
return;
} |
4. 참고
http://playground.arduino.cc/Main/DS1302RTC
https://www.pjrc.com/teensy/td_libs_Time.html


