Visual Studio Code에서 CMake를 사용한 C/C++ 프로젝트 진행하는 방법을 다룹니다.
2024. 4. 6 기본 포스트에서 분리
다음 포스트를 먼저 진행하세요.
Visual Studio Code를 사용한 C/C++ 개발환경 만들기-(Windows/Ubuntu)
https://webnautes.tistory.com/1854
CMake를 사용하여 둘 이상의 소스 코드 파일로 구성된 프로젝트 컴파일하기
C++ 언어는 A를 C 언어는 B를 진행하세요.
A. CMake를 사용하여 C++ 코드 빌드하는 방법
1. (윈도우) CMake를 설치합니다.

설치 진행 중 “Add CMake to the system PATH for all users”를 체크해야 합니다.

(우분투) CMake를 설치합니다.
$ sudo apt install cmake
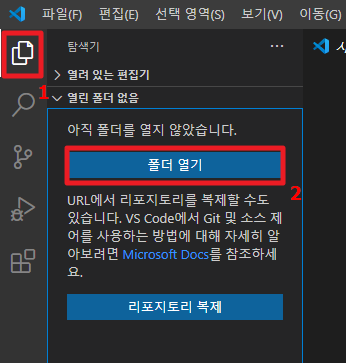
2. 새로운 폴더를 열어줍니다.
3. “새 폴더” 아이콘을 클릭한 후, 폴더 이름 main을 입력 후, 엔터를 누릅니다.
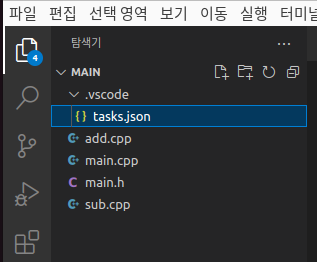
4. 새로 생성된 폴더 main을 한번 클릭한 후, 새파일 아이콘을 클릭하고 파일 이름 main.cpp를 입력 후, 엔터를 누릅니다.
같은 방식으로 main.h, add.cpp, sub.cpp를 생성합니다.
디버깅을 하려면 폴더 이름과 메인이 되는 코드의 이름을 일치 시켜야 합니다.
여기에선 폴더 이름 main과 메인이 되는 코드의 이름 main.cpp의 이름을 일치시켰습니다.

main.cpp
| #include <iostream> #include "main.h" int main() { int a = 1; int b = 2; int c = add(a, b); int d = sub(a, b); std::cout << c << " " << d << std::endl; return 0; } |
main.h
| int sub(int a, int b); int add(int a, int b); |
add.cpp
| #include "main.h" int add(int a, int b) { int c; c = a + b; return c; } |
sub.cpp
| #include "main.h" int sub(int a, int b) { int c; c = a - b; return c; } |
5. 메뉴에서 터미널 > 작업 구성을 선택합니다.
템플릿에서 tasks.json 파일 만들기를 선택합니다.

Others를 선택합니다.

탐색기의 .vscode 폴더에 tasks.json 파일이 추가되고 편집기에서 해당 파일이 열립니다.
6. 편집기에 열린 tasks.json 파일을 다음 내용으로 대체하고 Ctrl +S를 눌러 저장합니다. 윈도우와 우분투의 파일 내용이 다릅니다.
(윈도우)
| { "version": "2.0.0", "runner": "terminal", "type": "shell", "echoCommand": true, "presentation" : { "reveal": "always" }, "tasks": [ //C++ 컴파일 { "label": "compile for C++", "command": "cd ${fileDirname} && cmake . -G \"MinGW Makefiles\" && mingw32-make", "group": "build", //컴파일시 에러를 편집기에 반영 //참고: https://code.visualstudio.com/docs/editor/tasks#_defining-a-problem-matcher "problemMatcher": { "fileLocation": [ "relative", "${workspaceRoot}" ], "pattern": { // The regular expression. //Example to match: helloWorld.c:5:3: warning: implicit declaration of function 'prinft' "regexp": "^(.*):(\\d+):(\\d+):\\s+(warning error):\\s+(.*)$", "file": 1, "line": 2, "column": 3, "severity": 4, "message": 5 } } }, // 바이너리 실행(Windows) { "label": "execute", "command": "cmd", "group": "test", "args": [ "/C", "${fileDirname}\\${fileDirnameBasename}" ] } ] } |
(우분투)
| { "version": "2.0.0", "runner": "terminal", "type": "shell", "echoCommand": true, "presentation" : { "reveal": "always" }, "tasks": [ //C++ 컴파일 { "label": "compile for C++", "command": "cd ${fileDirname} && cmake . && make", "group": "build", //컴파일시 에러를 편집기에 반영 //참고: https://code.visualstudio.com/docs/editor/tasks#_defining-a-problem-matcher "problemMatcher": { "fileLocation": [ "relative", "${workspaceRoot}" ], "pattern": { // The regular expression. //Example to match: helloWorld.c:5:3: warning: implicit declaration of function 'prinft' "regexp": "^(.*):(\\d+):(\\d+):\\s+(warning error):\\s+(.*)$", "file": 1, "line": 2, "column": 3, "severity": 4, "message": 5 } } }, // 바이너리 실행(Ubuntu) { "label": "execute", "command": "${fileDirname}/${fileBasenameNoExtension}", "group": "test" } ] } |
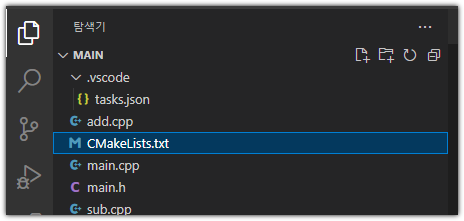
7. 새파일 아이콘을 클릭하고 파일 이름 CMakeLists.txt를 입력 후, 엔터를 누릅니다.
파일 내용을 다음 내용으로 대체하고 Ctrl + S를 눌러 저장합니다.
| cmake_minimum_required(VERSION 3.0) get_filename_component(ProjectId ${CMAKE_CURRENT_SOURCE_DIR} NAME) string(REPLACE " " "_" ProjectId ${ProjectId}) project(${ProjectId}) set (CMAKE_CXX_STANDARD 11) file(GLOB SOURCES *.cpp) add_executable(${PROJECT_NAME} ${SOURCES} ) |
8. cpp 파일 아무거나 선택해서 열은 상태에서 Ctrl + Alt + C를 눌러 컴파일을 진행합니다.
터미널에 다음과 같은 메시지가 출력됩니다.
(윈도우)
> Executing task: cd D:\work\code\cpp_project\test-1 && cmake . -G "MinGW Makefiles" && mingw32-make <
-- The C compiler identification is GNU 8.1.0
-- The CXX compiler identification is GNU 8.1.0
-- Detecting C compiler ABI info
-- Detecting C compiler ABI info - done
-- Check for working C compiler: C:/mingw64/bin/gcc.exe - skipped
-- Detecting C compile features
-- Detecting C compile features - done
-- Detecting CXX compiler ABI info
-- Detecting CXX compiler ABI info - done
-- Check for working CXX compiler: C:/mingw64/bin/g++.exe - skipped
-- Detecting CXX compile features
-- Detecting CXX compile features - done
-- Configuring done
-- Generating done
-- Build files have been written to: D:/work/code/cpp_project/test-1
Scanning dependencies of target test-1
[ 25%] Building CXX object CMakeFiles/test-1.dir/add.cpp.obj
[ 50%] Building CXX object CMakeFiles/test-1.dir/main.cpp.obj
[ 75%] Building CXX object CMakeFiles/test-1.dir/sub.cpp.obj
[100%] Linking CXX executable test-1.exe
[100%] Built target test-1
(우분투)
* 작업 실행 중: cd /home/webnautes/main && cmake . && make
-- The C compiler identification is GNU 11.3.0
-- The CXX compiler identification is GNU 11.3.0
-- Detecting C compiler ABI info
-- Detecting C compiler ABI info - done
-- Check for working C compiler: /usr/bin/cc - skipped
-- Detecting C compile features
-- Detecting C compile features - done
-- Detecting CXX compiler ABI info
-- Detecting CXX compiler ABI info - done
-- Check for working CXX compiler: /usr/bin/c++ - skipped
-- Detecting CXX compile features
-- Detecting CXX compile features - done
-- Configuring done
-- Generating done
-- Build files have been written to: /home/webnautes/main
[ 25%] Building CXX object CMakeFiles/main.dir/add.cpp.o
[ 50%] Building CXX object CMakeFiles/main.dir/main.cpp.o
[ 75%] Building CXX object CMakeFiles/main.dir/sub.cpp.o
[100%] Linking CXX executable main
[100%] Built target main
9. Ctrl + Alt + R을 눌러서 실행합니다.
다음처럼 실행결과가 출력됩니다.

10. 디버깅을 해봅니다.
다음 파일을 수정해야 합니다.
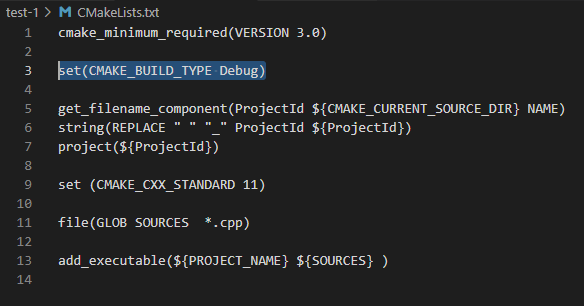
CMakeLists.txt 파일
추가
set(CMAKE_BUILD_TYPE Debug)
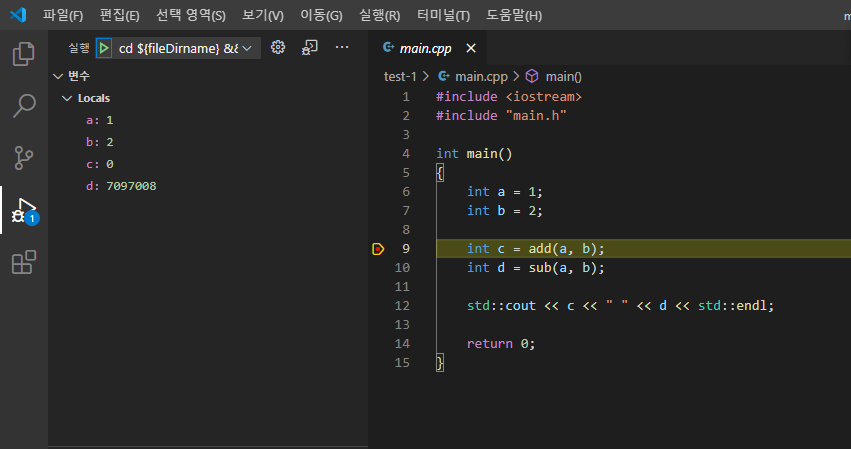
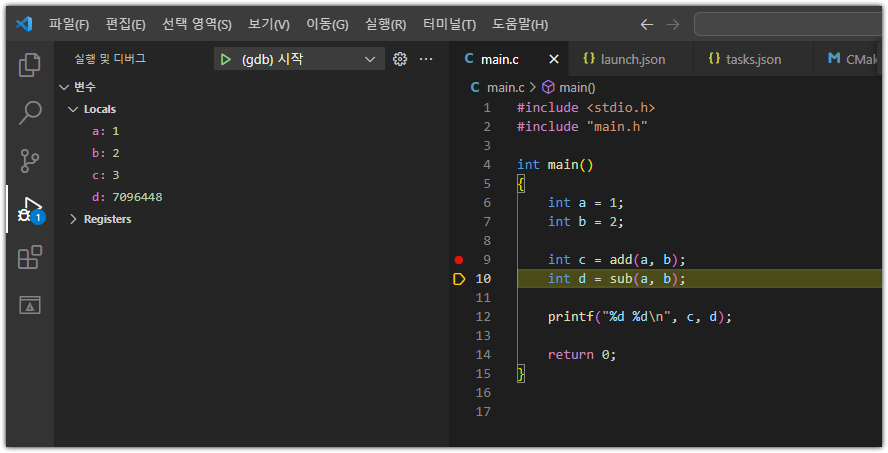
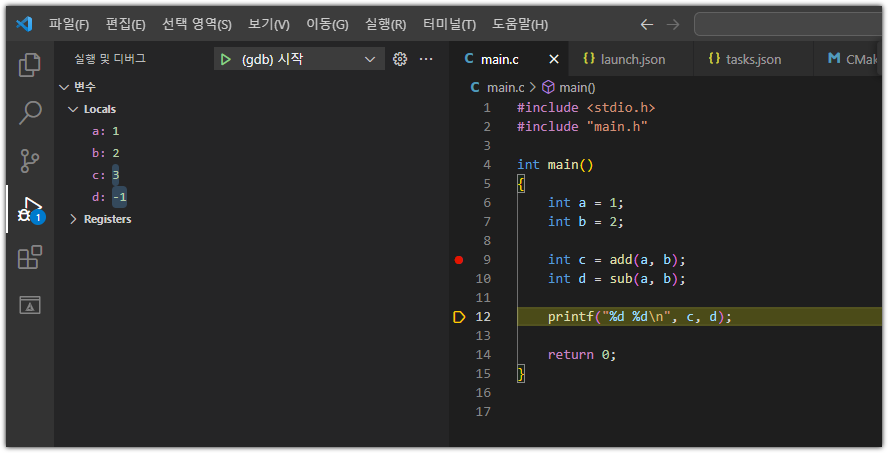
main.cpp의 9번째 줄에 브레이크 포인트를 추가하고 F5를 눌러 디버깅을 시작합니다.
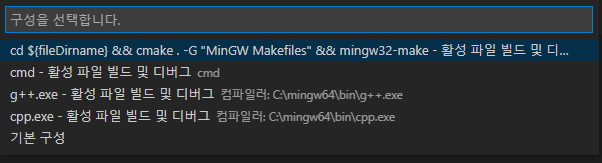
C++(GDB/LLDB)를 선택합니다. 이 메뉴가 보이지 않으면 8-12를 진행하세요.

구성에서 다음처럼 첫번째 항목을 선택해야 합니다. 이 메뉴가 보이지 않으면 8-12를 진행하세요.

11. F5를 누른후 위 스크린샷처럼 보이지 않는 경우 우선 Ctrl + Alt + C(앞에서 빌드하기 위해 사용한 단축키)를 눌러 실행파일을 우선 새로 생성합니다. 디버그 가능하도록 다시 실행파일을 만들기 위해서입니다.
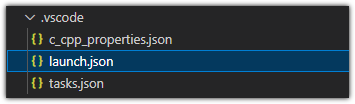
.vscode 폴더에 launch.json 파일을 생성합니다.

다음 내용으로 대체합니다. miDebuggerPath에 지정한 경로에 gdb.exe 또는 gdb가 있는지 확인해주세요.
우분투와 윈도우용 설정 파일 내용이 다릅니다.
(윈도우)
| { // IntelliSense를 사용하여 가능한 특성에 대해 알아보세요. // 기존 특성에 대한 설명을 보려면 가리킵니다. // 자세한 내용을 보려면 https://go.microsoft.com/fwlink/?linkid=830387을(를) 방문하세요. "version": "0.2.0", "configurations": [ { "name": "(gdb) 시작", "type": "cppdbg", "request": "launch", "program": "${fileDirname}\\${fileDirnameBasename}.exe", "args": [], "stopAtEntry": false, "cwd": "${fileDirname}", "environment": [], "externalConsole": false, "MIMode": "gdb", "miDebuggerPath": "C:\\mingw64\\bin\\gdb.exe", "setupCommands": [ { "description": "gdb에 자동 서식 지정 사용", "text": "-enable-pretty-printing", "ignoreFailures": true }, { "description": "디스어셈블리 버전을 Intel(으)로 설정", "text": "-gdb-set disassembly-flavor intel", "ignoreFailures": true } ] } ] } |
(우분투)
| { // IntelliSense를 사용하여 가능한 특성에 대해 알아보세요. // 기존 특성에 대한 설명을 보려면 가리킵니다. // 자세한 내용을 보려면 https://go.microsoft.com/fwlink/?linkid=830387을(를) 방문하세요. "version": "0.2.0", "configurations": [ { "name": "(gdb) 시작", "type": "cppdbg", "request": "launch", "program": "${fileDirname}/${fileDirnameBasename}", "args": [], "stopAtEntry": false, "cwd": "${fileDirname}", "environment": [], "externalConsole": false, "MIMode": "gdb", "miDebuggerPath": "/usr/bin/gdb", "setupCommands": [ { "description": "gdb에 자동 서식 지정 사용", "text": "-enable-pretty-printing", "ignoreFailures": true }, { "description": "디스어셈블리 버전을 Intel(으)로 설정", "text": "-gdb-set disassembly-flavor intel", "ignoreFailures": true } ] } ] } |
main.cpp의 9번째 줄에 브레이크 포인트를 추가하고 F5를 눌러 디버깅을 시작합니다.
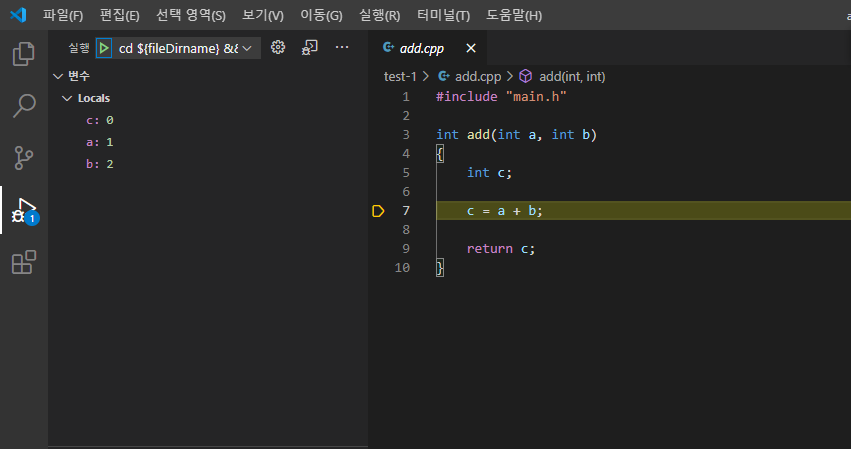
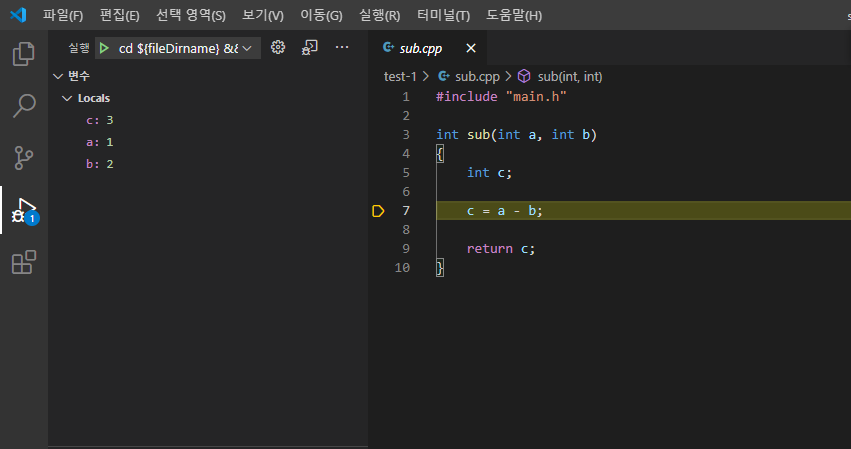
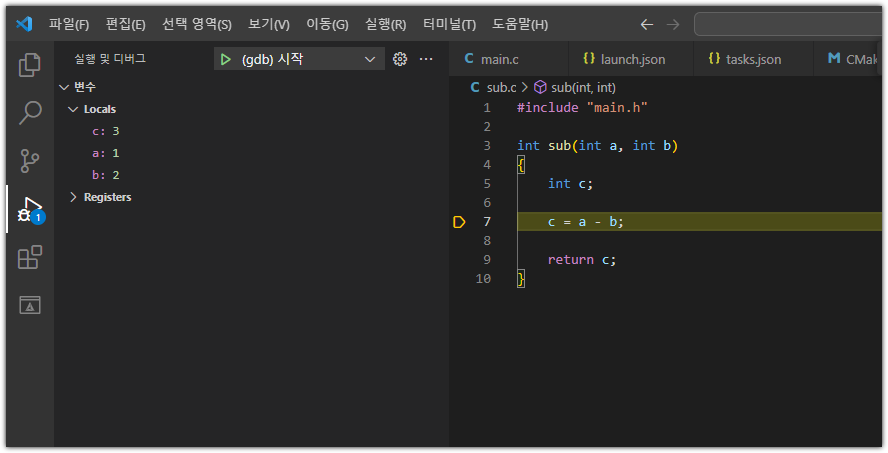
12. F11을 누르면 여러 파일을 거쳐 잘됩니다. main.cpp에서만 디버깅을 진행하려면 F10을 사용하세요.

B. CMake를 사용하여 C 코드 빌드하는 방법
1. (윈도우) CMake를 설치합니다.

설치 진행 중 “Add CMake to the system PATH for all users”를 체크해야 합니다.
(우분투) CMake를 설치합니다.
$ sudo apt install cmake
2. 새로운 폴더를 열어줍니다.

3. “새 폴더” 아이콘을 클릭한 후, 폴더 이름 main을 입력 후, 엔터를 누릅니다.
4. 새로 생성된 폴더 main을 한번 클릭한 후, 새파일 아이콘을 클릭하고 파일 이름 main.c를 입력 후, 엔터를 누릅니다.
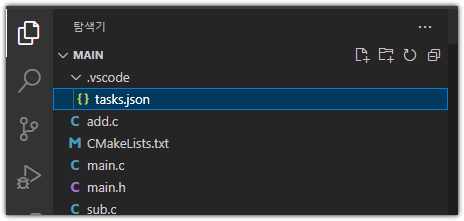
같은 방식으로 main.h, add.c, sub.c를 생성합니다.
디버깅을 하려면 폴더 이름과 메인이 되는 코드의 이름을 일치 시켜야 합니다.
여기에선 폴더 이름 main과 메인이 되는 코드의 이름 main.c의 이름을 일치시켰습니다.
main.c
| #include <stdio.h> #include "main.h" int main() { int a = 1; int b = 2; int c = add(a, b); int d = sub(a, b); printf("%d %d\n", c, d); return 0; } |
main.h
| int sub(int a, int b); int add(int a, int b); |
add.c
| #include "main.h" int add(int a, int b) { int c; c = a + b; return c; } |
sub.c
| #include "main.h" int sub(int a, int b) { int c; c = a - b; return c; } |
5. 메뉴에서 터미널 > 작업 구성을 선택합니다.
템플릿에서 tasks.json 파일 만들기를 선택합니다.

Others를 선택합니다.
탐색기의 .vscode 폴더에 tasks.json 파일이 추가되고 편집기에서 해당 파일이 열립니다.
6. 편집기에 열린 tasks.json 파일을 다음 내용으로 대체하고 Ctrl +S를 눌러 저장합니다. 윈도우와 우분투의 파일 내용이 다릅니다.
(윈도우)
| { "version": "2.0.0", "runner": "terminal", "type": "shell", "echoCommand": true, "presentation" : { "reveal": "always" }, "tasks": [ //C 컴파일 { "label": "compile for C", "command": "cd ${fileDirname} && cmake . -G \"MinGW Makefiles\" && mingw32-make", "group": "build", //컴파일시 에러를 편집기에 반영 //참고: https://code.visualstudio.com/docs/editor/tasks#_defining-a-problem-matcher "problemMatcher": { "fileLocation": [ "relative", "${workspaceRoot}" ], "pattern": { // The regular expression. //Example to match: helloWorld.c:5:3: warning: implicit declaration of function 'prinft' "regexp": "^(.*):(\\d+):(\\d+):\\s+(warning error):\\s+(.*)$", "file": 1, "line": 2, "column": 3, "severity": 4, "message": 5 } } }, // 바이너리 실행(Windows) { "label": "execute", "command": "cmd", "group": "test", "args": [ "/C", "${fileDirname}\\${fileDirnameBasename}" ] } ] } |
(우분투)
| { "version": "2.0.0", "runner": "terminal", "type": "shell", "echoCommand": true, "presentation" : { "reveal": "always" }, "tasks": [ //C++ 컴파일 { "label": "compile for C", "command": "cd ${fileDirname} && cmake . && make", "group": "build", //컴파일시 에러를 편집기에 반영 //참고: https://code.visualstudio.com/docs/editor/tasks#_defining-a-problem-matcher "problemMatcher": { "fileLocation": [ "relative", "${workspaceRoot}" ], "pattern": { // The regular expression. //Example to match: helloWorld.c:5:3: warning: implicit declaration of function 'prinft' "regexp": "^(.*):(\\d+):(\\d+):\\s+(warning error):\\s+(.*)$", "file": 1, "line": 2, "column": 3, "severity": 4, "message": 5 } } }, // 바이너리 실행(Ubuntu) { "label": "execute", "command": "${fileDirname}/${fileBasenameNoExtension}", "group": "test" } ] } |
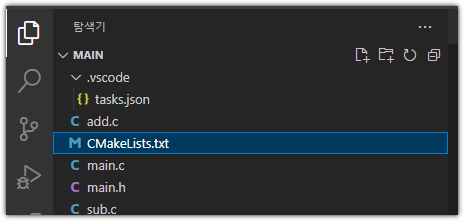
7. 새파일 아이콘을 클릭하고 파일 이름 CMakeLists.txt를 입력 후, 엔터를 누릅니다.
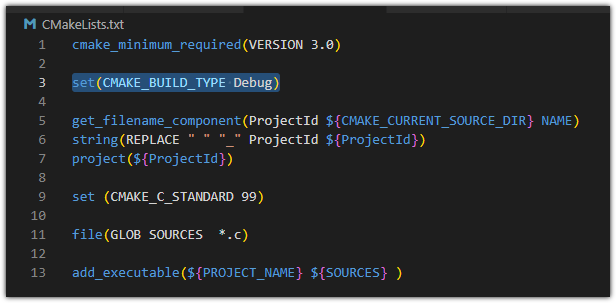
파일 내용을 다음 내용으로 대체하고 Ctrl + S를 눌러 저장합니다.
| cmake_minimum_required(VERSION 3.0) get_filename_component(ProjectId ${CMAKE_CURRENT_SOURCE_DIR} NAME) string(REPLACE " " "_" ProjectId ${ProjectId}) project(${ProjectId}) set (CMAKE_C_STANDARD 99) file(GLOB SOURCES *.c) add_executable(${PROJECT_NAME} ${SOURCES} ) |
8. cpp 파일 아무거나 선택해서 열은 상태에서 Ctrl + Alt + C를 눌러 컴파일을 진행합니다.
터미널에 다음과 같은 메시지가 출력됩니다.
(윈도우)
* 작업 실행 중: cd C:\Users\webnautes\main && cmake . -G "MinGW Makefiles" && mingw32-make
-- The C compiler identification is GNU 8.1.0
-- The CXX compiler identification is GNU 8.1.0
-- Detecting C compiler ABI info
-- Detecting C compiler ABI info - done
-- Check for working C compiler: C:/mingw64/bin/gcc.exe - skipped
-- Detecting C compile features
-- Detecting C compile features - done
-- Detecting CXX compiler ABI info
-- Detecting CXX compiler ABI info - done
-- Check for working CXX compiler: C:/mingw64/bin/g++.exe - skipped
-- Detecting CXX compile features
-- Detecting CXX compile features - done
-- Configuring done
-- Generating done
-- Build files have been written to: C:/Users/webnautes/main
[ 25%] Building C object CMakeFiles/main.dir/add.c.obj
[ 50%] Building C object CMakeFiles/main.dir/main.c.obj
[ 75%] Building C object CMakeFiles/main.dir/sub.c.obj
[100%] Linking C executable main.exe
[100%] Built target main
(우분투)
* 작업 실행 중: cd /home/webnautes/main && cmake . && make
-- The C compiler identification is GNU 11.3.0
-- The CXX compiler identification is GNU 11.3.0
-- Detecting C compiler ABI info
-- Detecting C compiler ABI info - done
-- Check for working C compiler: /usr/bin/cc - skipped
-- Detecting C compile features
-- Detecting C compile features - done
-- Detecting CXX compiler ABI info
-- Detecting CXX compiler ABI info - done
-- Check for working CXX compiler: /usr/bin/c++ - skipped
-- Detecting CXX compile features
-- Detecting CXX compile features - done
-- Configuring done
-- Generating done
-- Build files have been written to: /home/webnautes/main
[ 25%] Building C object CMakeFiles/main.dir/add.c.o
[ 50%] Building C object CMakeFiles/main.dir/main.c.o
[ 75%] Building C object CMakeFiles/main.dir/sub.c.o
[100%] Linking C executable main
[100%] Built target main
9. Ctrl + Alt + R을 눌러서 실행합니다.
다음처럼 실행결과가 출력됩니다.

10. 디버깅을 해봅니다.
다음 파일을 수정해야 합니다.
CMakeLists.txt 파일
추가
set(CMAKE_BUILD_TYPE Debug)
main.cpp의 9번째 줄에 브레이크 포인트를 추가하고 F5를 눌러 디버깅을 시작합니다.
C++(GDB/LLDB)를 선택합니다. 이 메뉴가 보이지 않으면 8-12를 진행하세요.

구성에서 다음처럼 첫번째 항목을 선택해야 합니다. 이 메뉴가 보이지 않으면 8-12를 진행하세요.
11. F5를 누른후 위 스크린샷처럼 보이지 않는 경우 우선 Ctrl + Alt + C(앞에서 빌드하기 위해 사용한 단축키)를 눌러 실행파일을 우선 새로 생성합니다. 디버그 가능하도록 다시 실행파일을 만들기 위해서입니다.
.vscode 폴더에 launch.json 파일을 생성합니다.
다음 내용으로 대체합니다. miDebuggerPath에 지정한 경로에 gdb.exe 또는 gdb가 있는지 확인해주세요.
우분투와 윈도우용 설정 파일 내용이 다릅니다.
(윈도우)
| { // IntelliSense를 사용하여 가능한 특성에 대해 알아보세요. // 기존 특성에 대한 설명을 보려면 가리킵니다. // 자세한 내용을 보려면 https://go.microsoft.com/fwlink/?linkid=830387을(를) 방문하세요. "version": "0.2.0", "configurations": [ { "name": "(gdb) 시작", "type": "cppdbg", "request": "launch", "program": "${fileDirname}\\${fileDirnameBasename}.exe", "args": [], "stopAtEntry": false, "cwd": "${fileDirname}", "environment": [], "externalConsole": false, "MIMode": "gdb", "miDebuggerPath": "C:\\mingw64\\bin\\gdb.exe", "setupCommands": [ { "description": "gdb에 자동 서식 지정 사용", "text": "-enable-pretty-printing", "ignoreFailures": true }, { "description": "디스어셈블리 버전을 Intel(으)로 설정", "text": "-gdb-set disassembly-flavor intel", "ignoreFailures": true } ] } ] } |
(우분투)
| { // IntelliSense를 사용하여 가능한 특성에 대해 알아보세요. // 기존 특성에 대한 설명을 보려면 가리킵니다. // 자세한 내용을 보려면 https://go.microsoft.com/fwlink/?linkid=830387을(를) 방문하세요. "version": "0.2.0", "configurations": [ { "name": "(gdb) 시작", "type": "cppdbg", "request": "launch", "program": "${fileDirname}/${fileDirnameBasename}", "args": [], "stopAtEntry": false, "cwd": "${fileDirname}", "environment": [], "externalConsole": false, "MIMode": "gdb", "miDebuggerPath": "/usr/bin/gdb", "setupCommands": [ { "description": "gdb에 자동 서식 지정 사용", "text": "-enable-pretty-printing", "ignoreFailures": true }, { "description": "디스어셈블리 버전을 Intel(으)로 설정", "text": "-gdb-set disassembly-flavor intel", "ignoreFailures": true } ] } ] } |
main.cpp의 9번째 줄에 브레이크 포인트를 추가하고 F5를 눌러 디버깅을 시작합니다.
12. F11을 누르면 여러 파일을 거쳐 잘됩니다. main.cpp에서만 디버깅을 진행하려면 F10을 사용하세요. .


'개발 환경 > C&C++ 개발환경' 카테고리의 다른 글
| Visual Studio Code를 사용한 C/C++ 개발환경 만들기-(Windows/Ubuntu) (43) | 2024.10.06 |
|---|---|
| Visual Studio Code에서 C/C++ 프로그래밍 with Makefile ( Windows/Ubuntu) (0) | 2024.04.06 |
| Visual Studio Code에서 GDB 원격 디버깅하는 방법 (0) | 2023.10.05 |
| GDB를 사용한 원격 디버깅 (0) | 2023.10.05 |
시간날때마다 틈틈이 이것저것 해보며 블로그에 글을 남깁니다.
블로그의 문서는 종종 최신 버전으로 업데이트됩니다.
여유 시간이 날때 진행하는 거라 언제 진행될지는 알 수 없습니다.
블로그 글과 유튜브 영상을 만드는 것은 전문가라서라기보단 공부한 내용을 함께 공유하는 게 좋아서입니다.
제가 쓴 책도 한번 검토해보세요 ^^