

객체(Objects)와 클래스(Classes)를 다룹니다.
A Swift Tour ( https://docs.swift.org/swift-book/GuidedTour/GuidedTour.html ) 문서의 코드를 Swift Playground( https://swiftfiddle.com/ ) 에서 실행시켜 보며 진행해보았습니다.
본 문서는 공부한 내용을 정리하는 목적으로 작성되었으며 A Swift Tour 문서의 내용을 바탕으로 하고 있습니다. 잘못된 점이 있을 수 있습니다
2021. 10. 19 최초작성
포스트 제목과 달리 객체라는 언급은 없고 인스턴스로 적어놓았네요.
2021. 11. 02 접속 불가 상태인 Swift Playground 사이트 변경
2022. 10. 22 최종수정
클래스를 정의하려면 class 키워드 다음에 클래스 이름을 적은 후, 중괄호 내에 상수/변수/메서드를 선언하면 됩니다. 클래스 내에 상수/변수/메서드를 선언하는 방법은 기존과 차이가 없습니다.
알아두어야 할점은 함수가 클래스 내에 정의된 경우엔 메서드라고 불립니다.
class 클래스_이름{
상수
변수
메서드
}
클래스 Shape에 변수 numberOfSides와 메서드 simpleDescription를 선언한 예제 코드입니다.
| class Shape { var numberOfSides = 0 // 변수의 값을 읽어서 출력해줍니다. func simpleDescription() -> String { return "A shape with \(numberOfSides) sides." } } // 클래스 이름 Shape 뒤에 괄호를 추가하여 클래스의 인스턴스를 만들어 변수 shape에 대입합니다. var shape = Shape() // 클래스 인스턴스가 대입되어 있는 변수 이름 shape 다음에 점을 추가한 후, // 클래스에 포함되어 있는 변수 numberOfSides를 적고 7을 대입합니다. shape.numberOfSides = 7 // 클래스 인스턴스가 대입되어 있는 변수 이름 shape 다음에 점을 추가한 후, // 클래스에 포함되어 있는 메서드 simpleDescription를 적어 호출합니다. var shapeDescription = shape.simpleDescription() print(shapeDescription) |
실행하면 Shape 클래스의 numberOfSides 변수에 저장한 값인 7을 Shape 클래스의 simpleDescription 메서드로 접근하여 가져온 결과를 화면에 출력해줍니다.

Swift에서 클래스의 생성자는 init입니다. 생성자는 클래스 인스턴스가 생성될때 자동으로 실행되는 메서드입니다.
클래스 내에 선언된 변수의 초기값을 설정하는 등의 용도로 사용할 수 있습니다.
| class NamedShape { var numberOfSides: Int = 0 var name: String // 생성자는 클래스내에 init 이름의 메서드로 정의됩니다. 일반 함수처럼 호출시 값을 전달받기 위해 파라미터를 추가할 수 있습니다. // NamedShape 클래스내에 생성자로 사용할 init 메서드를 추가하면서 파라미터로 String 타입 name 파라미터를 추가합니다. init(name: String) { // 클래스 내에 선언된 name 변수와 파라미터 변수인 name를 구분하기 위해 클래스 내에 선언된 변수 name 앞에는 self를 붙여서 사용합니다. self.name = name } func simpleDescription() -> String { return "A shape with \(numberOfSides) sides." } } // 클래스 NamedShape의 인스턴스를 생성하면서 아규먼트로 name 변수의 값 "square"을 전달합니다. var namedShape = NamedShape(name: "square") // 클래스내 변수 numberOfSides에 사각형의 변 개수인 4를 대입합니다. namedShape.numberOfSides = 4 // 클래스 NamedShape의 메서드 simpleDescription를 사용하여 변수 numberOfSides의 값이 포함된 문장을 리턴받아 변수 simpleDescription에 대입합니다. var simpleDescription = namedShape.simpleDescription() print(simpleDescription) |
실행결과입니다.
Swift에서 클래스의 소멸자는 deinit 메서드입니다.
클래스 인스턴스가 소멸되기 전에 필요한 작업이 있을 경우 deinit 메서드에서 처리하도록 합니다.
자식 클래스(또는 하위 클래스)를 정의할때 콜론(:)을 적은 후, 부모 클래스(또는 상위 클래스) 이름을 추가하여 부모 클래스를 상속 받을 수 있습니다.
부모 클래스에 정의된 메서드나 변수, 상수를 자식 클래스 내에 포함시킬 수 있게 됩니다.
부모 클래스에서 정의된 메서드를 다시 정의할 수 있습니다. 하위 클래스에서 재정의된 메서드 앞에는 override 키워드를 추가해야 합니다.
override 키워드 없이 부모 클래스의 메서드를 재정의하거나 부모 클래스내에 없는 메소드에 override 키워드를 추가한 경우 컴파일러에서 에러를 발생합니다.
전체 소스 코드입니다.
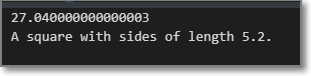
| // 부모 클래스인 NamedShape를 먼저 정의합니다. class NamedShape { var numberOfSides: Int = 0 var name: String init(name: String) { self.name = name } func simpleDescription() -> String { return "A shape with \(numberOfSides) sides." } } // 클래스 Square를 정의하면서 부모 클래스 NamedShape로부터 상속을 받도록 합니다. class Square: NamedShape { var sideLength: Double // 자식 클래스의 생성자 Init 메서드에서 super.init 메서드를 호출해주지 않으면 에러가 발생합니다. // 부모 클래스 내에 선언된 상수/변수/메소드를 자식 클래스에 선언된 것처럼 사용이 가능해집니다. // super.init의 파라미터로 클래스 Square의 생성자 Init의 파라미터로 받은 값을 전달하고 있습니다. init(sideLength: Double, name: String) { self.sideLength = sideLength super.init(name: name) numberOfSides = 4 } func area() -> Double { return sideLength * sideLength } // 부모 클래스 NamedShape의 메서드 simpleDescription를 자식 클래스 Square에서 재정의하고 있습니다. 메서드 앞에 override 키워드가 추가되어 있습니다. // 앞에서 부모 클래스 NamedShape의 변수 name에 값을 전달했었습니다. 여기에서 자식 클래스 내의 변수 name에 접근하듯이 변수 이름 name 만 적어서 접근하고 있습니다. override func simpleDescription() -> String { return "A \(name) with sides of length \(sideLength)." } } let test = Square(sideLength: 5.2, name: "square") var area = test.area() var simpleDescription = test.simpleDescription() print(area) print(simpleDescription) |
실행결과입니다.
getter와 setter 메서드를 사용할 수 있습니다.
| class EquilateralTriangle { var sideLength: Double = 0.0 init(sideLength: Double) { self.sideLength = sideLength } var perimeter: Double { get { return 3.0 * sideLength } set { sideLength = newValue / 3.0 } } } var triangle = EquilateralTriangle(sideLength: 3.1) print(triangle.perimeter) triangle.perimeter = 9.9 print(triangle.sideLength) |
EquilateralTriangle 클래스의 perimeter에 9.9를 대입하면 perimeter의 set에서 해당 값을 newValue 로 받아서 3으로 나눈 후, 지정한 변수 sideLength에 대입합니다.
EquilateralTriangle 클래스의 perimeter를 출력하면 perimeter의 get에서 지정한대로 변수 sideLength의 값에 3을 곱한 값을 리턴받아서 print문에서 출력하게 됩니다.
willSet을 사용하여 변수의 값이 변경된 것을 감지할 수 있습니다.
여기에선 인스턴스의 변수값이 바뀌는 것을 감지하여 다른 인스턴스의 값도 똑같이 바꾸어 봅니다.
| class TriangleAndSquare { var triangle: EquilateralTriangle { willSet { square.sideLength = newValue.sideLength } } var square: Square { willSet { triangle.sideLength = newValue.sideLength } } init(size: Double) { square = Square(sideLength: size) triangle = EquilateralTriangle(sideLength: size) } } |
전체 소스 코드입니다.
| class Square { var sideLength: Double init(sideLength: Double) { self.sideLength = sideLength } } class EquilateralTriangle { var sideLength: Double init(sideLength: Double) { self.sideLength = sideLength } } class TriangleAndSquare { // EquilateralTriangle 클래스 타입의 triangle 인스턴스의 sideLength 변수값이 변경되는 경우 Square 클래스 타입의 square 인스턴스의 sideLength 변수에 대입하도록 합니다. var triangle: EquilateralTriangle { willSet { square.sideLength = newValue.sideLength } } // Square 클래스 타입의 square 인스턴스의 sideLength 변수값이 변경되는 경우 EquilateralTriangle 클래스 타입의 triangle 인스턴스의 sideLength 변수에 대입하도록 합니다. var square: Square { willSet { triangle.sideLength = newValue.sideLength } } init(size: Double) { square = Square(sideLength: size) triangle = EquilateralTriangle(sideLength: size) } } var triangleAndSquare = TriangleAndSquare(size: 10) print(triangleAndSquare.triangle.sideLength) print(triangleAndSquare.square.sideLength) triangleAndSquare.square = Square(sideLength: 50) print(triangleAndSquare.triangle.sideLength) print(triangleAndSquare.square.sideLength) triangleAndSquare.triangle = EquilateralTriangle(sideLength: 80) print(triangleAndSquare.triangle.sideLength) print(triangleAndSquare.square.sideLength) |
실행결과입니다. 한쪽 인스턴스의 변수 값을 바꾸면 다른쪽 인스턴스의 변수 값도 바뀌는 것을 확인할 수 있습니다.

Swift 강좌 1 - Hello, world
https://webnautes.tistory.com/1549
Swift 강좌 2 - 상수와 변수
https://webnautes.tistory.com/1550
Swift 강좌 3 - 제어문 : if, for - in, switch, repeat - while
https://webnautes.tistory.com/1551
Swift 강좌 4 - 함수
https://webnautes.tistory.com/1552
Swift 강좌 5 - 객체(Objects)와 클래스(Classes)
https://webnautes.tistory.com/1558
Swift 강좌 6 - 열거형(Enumerations)과 구조체(Structures)
https://webnautes.tistory.com/1559
Swift 강좌 7 - 프로토콜(Protocols)과 익스텐션(Extensions)
https://webnautes.tistory.com/1562
Swift 강좌 8 - 에러 처리(Error Handling)
https://webnautes.tistory.com/1566
Swift 강좌 9 - 제네릭(Generics)
https://webnautes.tistory.com/1568
'Swift' 카테고리의 다른 글
| Swift 강좌 7 - 프로토콜(Protocols)과 익스텐션(Extensions) (0) | 2022.10.22 |
|---|---|
| Swift 강좌 6 - 열거형(Enumerations)과 구조체(Structures) (0) | 2022.10.22 |
| Swift 강좌 4 - 함수 (0) | 2022.10.22 |
| Swift 강좌 3 - 제어문 : if, for - in, switch, repeat - while (0) | 2022.10.22 |
| Swift 강좌 2 - 상수와 변수 (0) | 2022.10.22 |
시간날때마다 틈틈이 이것저것 해보며 블로그에 글을 남깁니다.
블로그의 문서는 종종 최신 버전으로 업데이트됩니다.
여유 시간이 날때 진행하는 거라 언제 진행될지는 알 수 없습니다.
블로그 글과 유튜브 영상을 만드는 것은 전문가라서라기보단 공부한 내용을 함께 공유하는 게 좋아서입니다.
제가 쓴 책도 한번 검토해보세요 ^^


