데이터베이스에 데이터를 입력하고 JSON 형식으로 데이터를 가져오는 예제입니다.
검색 결과를 가져올 수도 있습니다.
다음 세 개의 포스팅에 있는 코드를 하나의 앱에서 동작하도록 수정한 결과입니다.
나라만 검색하다록 query.php를 수정하였고 안드로이드 코드는 RecyclerView를 사용합니다.
최초 작성 - 2018. 6. 17
2018. 6. 27 - ListVIew를 RecyclerView로 변경.
2019. 11. 17 - androidx 사용하도록 변경
1. 동작 설명
2. 전체 소스코드 및 사용방법
3. 관련 포스팅
4. 참고
|
Amazon AWS를 사용하여 구현한 예제입니다.
AWS Rest API를 Android와 연동해보기( Lambda + API Gateway + DynamoDB )
https://webnautes.tistory.com/1590
1. 동작 설명
이름, 나라 항목에 데이터를 입력하고 입력 버튼을 터치하면 데이터베이스에 데이터가 저장됩니다.

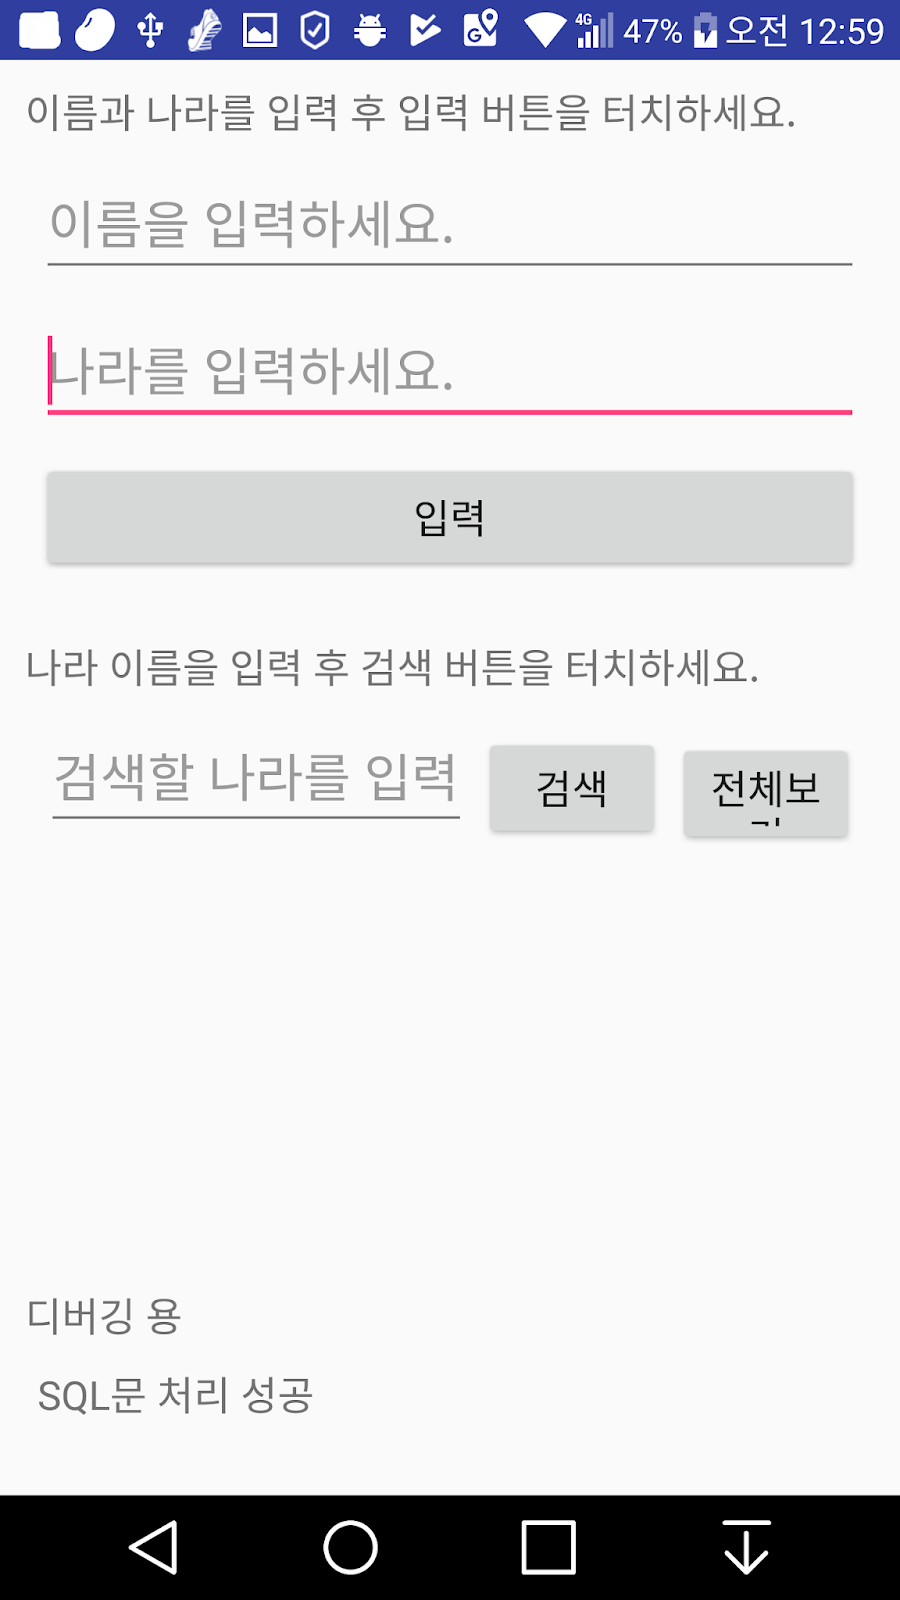
전체 버튼을 클릭하면 입력되어 있는 모든 데이터를 보여줍니다.

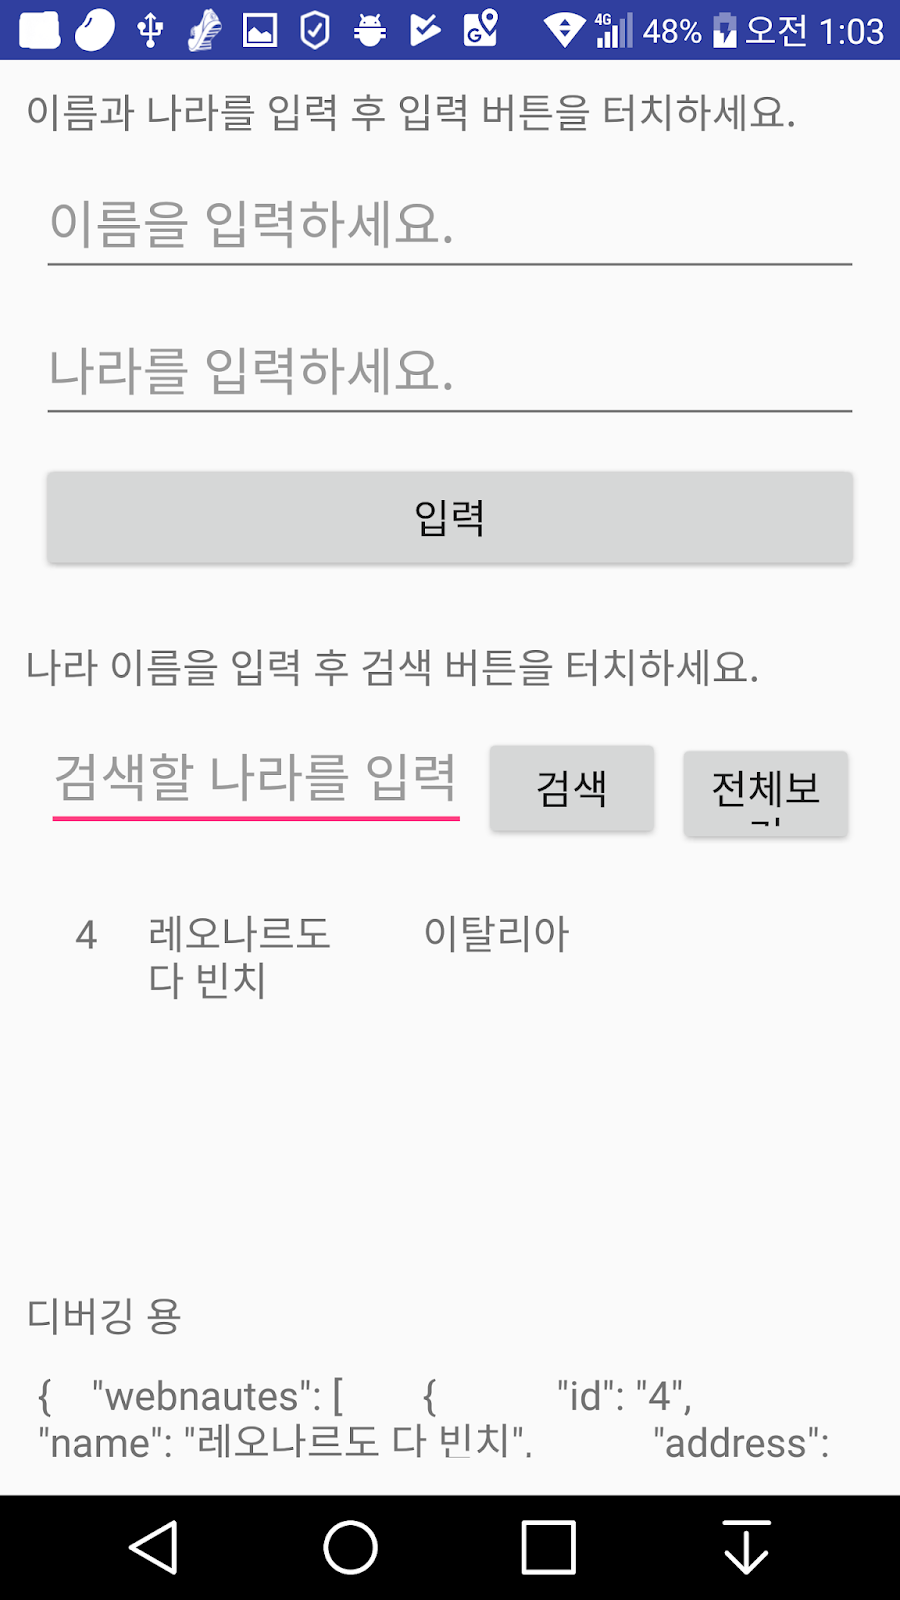
검색할 나라를 입력하고 검색 버튼을 클릭하면 해당 데이터만 보여줍니다.

2. 전체 소스코드 및 사용방법
RecyclerView를 사용하려면 build.gradle에 다음 노란줄을 추가해야 합니다.
dependencies {
implementation fileTree(dir: 'libs', include: ['*.jar'])
implementation 'androidx.appcompat:appcompat:1.0.2'
implementation 'androidx.constraintlayout:constraintlayout:1.1.3'
implementation 'androidx.recyclerview:recyclerview:1.0.0'
testImplementation 'junit:junit:4.12'
androidTestImplementation 'androidx.test.ext:junit:1.1.0'
androidTestImplementation 'androidx.test.espresso:espresso-core:3.1.1'
} |
2-1. 데이터베이스 및 테이블 생성
MySQL에서 데이터베이스 및 테이블을 생성합니다.
create database testdb DEFAULT CHARSET=utf8 COLLATE=utf8_general_ci;
use testdb;
create table Person(
id bigint(20) unsigned not null auto_increment,
name varchar(255) not null,
country varchar(255) not null,
primary key (id)
) DEFAULT CHARSET=utf8 COLLATE=utf8_general_ci; |
2-2. PHP 코드
php 파일은 우분투라면 /var/www/html 위치에, 윈도우에서 wamp를 사용한다면 C:\wamp\www 위치에 파일들을 생성합니다.
dbcon.php
<?php
$host = 'localhost';
$username = 'webnautes'; # MySQL 계정 아이디
$password = 'apple9!'; # MySQL 계정 패스워드
$dbname = 'testdb'; # DATABASE 이름
$options = array(PDO::MYSQL_ATTR_INIT_COMMAND => 'SET NAMES utf8');
try {
$con = new PDO("mysql:host={$host};dbname={$dbname};charset=utf8",$username, $password);
} catch(PDOException $e) {
die("Failed to connect to the database: " . $e->getMessage());
}
$con->setAttribute(PDO::ATTR_ERRMODE, PDO::ERRMODE_EXCEPTION);
$con->setAttribute(PDO::ATTR_DEFAULT_FETCH_MODE, PDO::FETCH_ASSOC);
if(function_exists('get_magic_quotes_gpc') && get_magic_quotes_gpc()) {
function undo_magic_quotes_gpc(&$array) {
foreach($array as &$value) {
if(is_array($value)) {
undo_magic_quotes_gpc($value);
}
else {
$value = stripslashes($value);
}
}
}
undo_magic_quotes_gpc($_POST);
undo_magic_quotes_gpc($_GET);
undo_magic_quotes_gpc($_COOKIE);
}
header('Content-Type: text/html; charset=utf-8');
#session_start();
?> |
insert.php
안드로이드 앱에서 POST 방식으로 전송한 데이터를 받아서 데이터베이스의 테이블에 저장합니다.
<?php
error_reporting(E_ALL);
ini_set('display_errors',1);
include('dbcon.php');
$android = strpos($_SERVER['HTTP_USER_AGENT'], "Android");
if( (($_SERVER['REQUEST_METHOD'] == 'POST') && isset($_POST['submit'])) || $android )
{
// 안드로이드 코드의 postParameters 변수에 적어준 이름을 가지고 값을 전달 받습니다.
$name=$_POST['name'];
$country=$_POST['country'];
if(empty($name)){
$errMSG = "이름을 입력하세요.";
}
else if(empty($country)){
$errMSG = "나라를 입력하세요.";
}
if(!isset($errMSG)) // 이름과 나라 모두 입력이 되었다면
{
try{
// SQL문을 실행하여 데이터를 MySQL 서버의 person 테이블에 저장합니다.
$stmt = $con->prepare('INSERT INTO person(name, country) VALUES(:name, :country)');
$stmt->bindParam(':name', $name);
$stmt->bindParam(':country', $country);
if($stmt->execute())
{
$successMSG = "새로운 사용자를 추가했습니다.";
}
else
{
$errMSG = "사용자 추가 에러";
}
} catch(PDOException $e) {
die("Database error: " . $e->getMessage());
}
}
}
?>
<?php
if (isset($errMSG)) echo $errMSG;
if (isset($successMSG)) echo $successMSG;
$android = strpos($_SERVER['HTTP_USER_AGENT'], "Android");
if( !$android )
{
?>
<html>
<body>
<form action="<?php $_PHP_SELF ?>" method="POST">
Name: <input type = "text" name = "name" />
Country: <input type = "text" name = "country" />
<input type = "submit" name = "submit" />
</form>
</body>
</html>
<?php
}
?> |
getjson.php
데이터베이스의 테이블에 있는 모든 데이터를 안드로이드 앱으로 가져오기 위해서 사용됩니다.
<?php
error_reporting(E_ALL);
ini_set('display_errors',1);
include('dbcon.php');
$stmt = $con->prepare('select * from person');
$stmt->execute();
if ($stmt->rowCount() > 0)
{
$data = array();
while($row=$stmt->fetch(PDO::FETCH_ASSOC))
{
extract($row);
array_push($data,
array('id'=>$id,
'name'=>$name,
'country'=>$country
));
}
header('Content-Type: application/json; charset=utf8');
$json = json_encode(array("webnautes"=>$data), JSON_PRETTY_PRINT+JSON_UNESCAPED_UNICODE);
echo $json;
}
?> |
query.php
안드로이드 앱에서 입력한 나라 이름에 대응하는 레코드만 조회하여 안드로이드앱으로 리턴하기 위해서 사용됩니다.
<?php
error_reporting(E_ALL);
ini_set('display_errors',1);
include('dbcon.php');
//POST 값을 읽어온다.
$country=isset($_POST['country']) ? $_POST['country'] : '';
$android = strpos($_SERVER['HTTP_USER_AGENT'], "Android");
if ($country != "" ){
$sql="select * from person where country='$country'";
$stmt = $con->prepare($sql);
$stmt->execute();
if ($stmt->rowCount() == 0){
echo "'";
echo $country;
echo "'은 찾을 수 없습니다.";
}
else{
$data = array();
while($row=$stmt->fetch(PDO::FETCH_ASSOC)){
extract($row);
array_push($data,
array('id'=>$row["id"],
'name'=>$row["name"],
'country'=>$row["country"]
));
}
if (!$android) {
echo "<pre>";
print_r($data);
echo '</pre>';
}else
{
header('Content-Type: application/json; charset=utf8');
$json = json_encode(array("webnautes"=>$data), JSON_PRETTY_PRINT+JSON_UNESCAPED_UNICODE);
echo $json;
}
}
}
else {
echo "검색할 나라를 입력하세요 ";
}
?>
<?php
$android = strpos($_SERVER['HTTP_USER_AGENT'], "Android");
if (!$android){
?>
<html>
<body>
<form action="<?php $_PHP_SELF ?>" method="POST">
나라 이름: <input type = "text" name = "country" />
<input type = "submit" />
</form>
</body>
</html>
<?php
}
?> |
2-3. 안드로이드 XML 코드
AndroidManifest.xml
인터넷 사용 권한을 추가합니다.
android 9.0 이상에서 동작하게 하려면 usesCleartextTraffic 옵션도 추가해야 합니다. 해주지 않으면 “cleartext http traffic to not permitted” 라는 에러가 발생합니다.
<?xml version="1.0" encoding="utf-8"?>
<manifest xmlns:android="http://schemas.android.com/apk/res/android"
package="com.tistory.webnautes.phptest">
<uses-permission android:name="android.permission.INTERNET" />
<application
android:usesCleartextTraffic="true"
android:allowBackup="true" |
styles.xml
다음 두 줄을 추가하여 타이틀 바를 보이지않게 합니다.
<resources>
<!-- Base application theme. -->
<style name="AppTheme" parent="Theme.AppCompat.Light.DarkActionBar">
<!-- Customize your theme here. -->
<item name="colorPrimary">@color/colorPrimary</item>
<item name="colorPrimaryDark">@color/colorPrimaryDark</item>
<item name="colorAccent">@color/colorAccent</item>
<!-- 타이틀바 제거 -->
<item name="windowActionBar">false</item>
<item name="windowNoTitle">true</item>
</style>
</resources> |
activity_main.xml
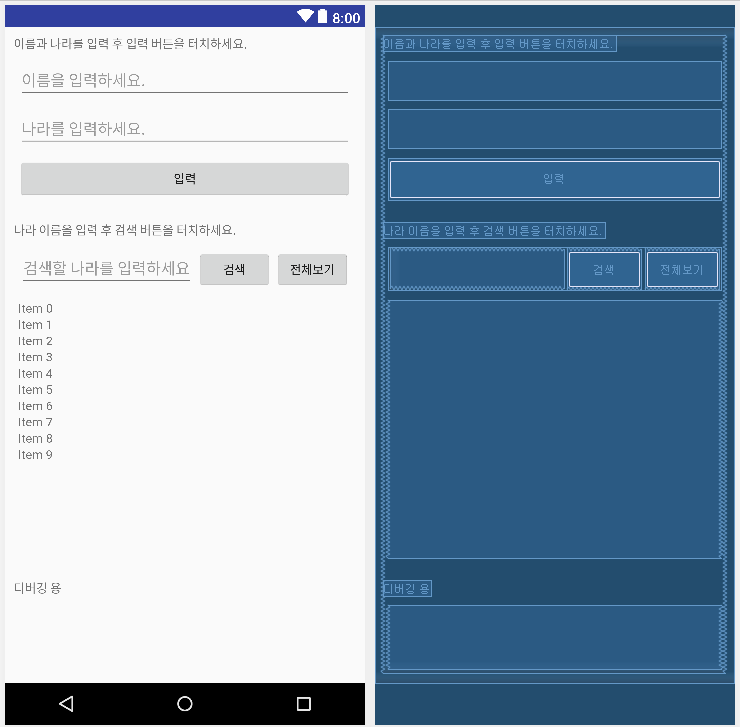
디폴트 액티비티인 MainActivity의 사용자 인터페이스(UI)로 사용되는 레이아웃 파일입니다.
<?xml version="1.0" encoding="utf-8"?>
<LinearLayout xmlns:android="http://schemas.android.com/apk/res/android"
xmlns:tools="http://schemas.android.com/tools"
android:layout_width="match_parent"
android:layout_height="match_parent"
android:orientation="vertical"
tools:context=".MainActivity"
android:padding="10dp">
<LinearLayout
android:layout_width="match_parent"
android:layout_height="0dp"
android:layout_weight="8.5"
android:orientation="vertical">
<TextView
android:layout_marginBottom="5dp"
android:text="이름과 나라를 입력 후 입력 버튼을 터치하세요."
android:layout_width="wrap_content"
android:layout_height="wrap_content"
android:id="@+id/textView_main_input" />
<EditText
android:layout_margin="5dp"
android:hint = "이름을 입력하세요."
android:inputType="text"
android:layout_width="match_parent"
android:layout_height="wrap_content"
android:id="@+id/editText_main_name" />
<EditText
android:layout_margin="5dp"
android:hint = "나라를 입력하세요."
android:inputType="text"
android:layout_width="match_parent"
android:layout_height="wrap_content"
android:id="@+id/editText_main_country" />
<Button
android:layout_margin="5dp"
android:layout_width="match_parent"
android:layout_height="wrap_content"
android:text="입력"
android:id="@+id/button_main_insert" />
<TextView
android:layout_marginTop="20dp"
android:layout_marginBottom="5dp"
android:text="나라 이름을 입력 후 검색 버튼을 터치하세요."
android:layout_width="wrap_content"
android:layout_height="wrap_content"
android:id="@+id/textView_main_search" />
<LinearLayout
android:layout_margin="5dp"
android:layout_width="match_parent"
android:layout_height="50dp"
android:orientation="horizontal">
<EditText
android:layout_margin="2dp"
android:hint = "검색할 나라를 입력하세요"
android:inputType="text"
android:id="@+id/editText_main_searchKeyword"
android:layout_width="0dp"
android:layout_weight="0.7"
android:layout_height="wrap_content" />
<Button
android:layout_margin="2dp"
android:id="@+id/button_main_search"
android:layout_width="0dp"
android:layout_weight="0.3"
android:layout_height="wrap_content"
android:text="검색" />
<Button
android:layout_margin="2dp"
android:id="@+id/button_main_all"
android:layout_width="0dp"
android:layout_weight="0.3"
android:layout_height="wrap_content"
android:text="전체보기" />
</LinearLayout>
<androidx.recyclerview.widget.RecyclerView
android:layout_margin="5dp"
android:layout_width="match_parent"
android:layout_height="0dp"
android:layout_weight="6"
android:id="@+id/listView_main_list" />
<!--- 디버깅 용 -->
<TextView
android:layout_marginTop="20dp"
android:layout_marginBottom="5dp"
android:text="디버깅 용"
android:layout_width="wrap_content"
android:layout_height="wrap_content"
android:id="@+id/textView_main_debug" />
<TextView
android:layout_margin="5dp"
android:id="@+id/textView_main_result"
android:scrollbars = "vertical"
android:layout_width="match_parent"
android:layout_height="0dp"
android:layout_weight="1.5" />
</LinearLayout>
</LinearLayout> |
데이터 입력, 데이터 조회, 디버깅용 정보 출력으로 구성됩니다.
item_list.xml
layout 폴더에 추가합니다.
RecyclerView의 한 줄에 세 개의 컬럼을 만들기 위해 사용됩니다.
<?xml version="1.0" encoding="utf-8"?>
<LinearLayout xmlns:android="http://schemas.android.com/apk/res/android"
android:layout_width="match_parent"
android:layout_height="match_parent"
android:orientation="horizontal"
android:layout_margin="5dp"
android:padding="5dp">
<TextView
android:id="@+id/textView_list_id"
android:layout_width="wrap_content"
android:layout_height="wrap_content"
android:layout_margin="5dp"
android:padding="5dp" />
<TextView
android:id="@+id/textView_list_name"
android:layout_width="100dp"
android:layout_height="wrap_content"
android:layout_margin="5dp"
android:padding="5dp" />
<TextView
android:id="@+id/textView_list_address"
android:layout_width="100dp"
android:layout_height="wrap_content"
android:layout_margin="5dp"
android:padding="5dp" />
</LinearLayout> |

2-4. 안드로이드 앱 자바코드
자바코드들은 똑같은 패키지 이름이 첫줄에 명시되어 있어야 합니다.
포스팅에서는 다음과 같은 패키지 이름을 사용합니다.
package com.tistory.webnautes.phpexample;
PersonalData.java
package com.tistory.webnautes.phpexample;
public class PersonalData {
private String member_id;
private String member_name;
private String member_address;
public String getMember_id() {
return member_id;
}
public String getMember_name() {
return member_name;
}
public String getMember_address() {
return member_address;
}
public void setMember_id(String member_id) {
this.member_id = member_id;
}
public void setMember_name(String member_name) {
this.member_name = member_name;
}
public void setMember_address(String member_address) {
this.member_address = member_address;
}
} |
UsersAdapter.java
ArrayList에 있는 PersonalData 타입의 데이터를 RecyclerView에 보여주는 작업을 합니다.
package com.tistory.webnautes.phpexample;
import android.app.Activity;
import androidx.annotation.NonNull;
import androidx.recyclerview.widget.RecyclerView;
import android.view.LayoutInflater;
import android.view.View;
import android.view.ViewGroup;
import android.widget.TextView;
import java.util.ArrayList;
public class UsersAdapter extends RecyclerView.Adapter<UsersAdapter.CustomViewHolder> {
private ArrayList<PersonalData> mList = null;
private Activity context = null;
public UsersAdapter(Activity context, ArrayList<PersonalData> list) {
this.context = context;
this.mList = list;
}
class CustomViewHolder extends RecyclerView.ViewHolder {
protected TextView id;
protected TextView name;
protected TextView address;
public CustomViewHolder(View view) {
super(view);
this.id = (TextView) view.findViewById(R.id.textView_list_id);
this.name = (TextView) view.findViewById(R.id.textView_list_name);
this.address = (TextView) view.findViewById(R.id.textView_list_address);
}
}
@Override
public CustomViewHolder onCreateViewHolder(ViewGroup viewGroup, int viewType) {
View view = LayoutInflater.from(viewGroup.getContext()).inflate(R.layout.item_list, null);
CustomViewHolder viewHolder = new CustomViewHolder(view);
return viewHolder;
}
@Override
public void onBindViewHolder(@NonNull CustomViewHolder viewholder, int position) {
viewholder.id.setText(mList.get(position).getMember_id());
viewholder.name.setText(mList.get(position).getMember_name());
viewholder.address.setText(mList.get(position).getMember_address());
}
@Override
public int getItemCount() {
return (null != mList ? mList.size() : 0);
}
} |
MainActivity.java
다음 줄에 있는 IP 주소를 MySQL 서버가 설치된 컴퓨터의 IP로 수정하세요.
private static String IP_ADDRESS = "IP_ADDRESS";
package com.tistory.webnautes.phpexample;
import android.app.ProgressDialog;
import android.os.AsyncTask;
import android.os.Bundle;
import androidx.appcompat.app.AppCompatActivity;
import androidx.recyclerview.widget.LinearLayoutManager;
import androidx.recyclerview.widget.RecyclerView;
import android.text.method.ScrollingMovementMethod;
import android.util.Log;
import android.view.View;
import android.widget.Button;
import android.widget.EditText;
import android.widget.TextView;
import org.json.JSONArray;
import org.json.JSONException;
import org.json.JSONObject;
import java.io.BufferedReader;
import java.io.InputStream;
import java.io.InputStreamReader;
import java.io.OutputStream;
import java.net.HttpURLConnection;
import java.net.URL;
import java.util.ArrayList;
public class MainActivity extends AppCompatActivity {
private static String IP_ADDRESS = "IP_ADDRESS";
private static String TAG = "phpexample";
private EditText mEditTextName;
private EditText mEditTextCountry;
private TextView mTextViewResult;
private ArrayList<PersonalData> mArrayList;
private UsersAdapter mAdapter;
private RecyclerView mRecyclerView;
private EditText mEditTextSearchKeyword;
private String mJsonString;
@Override
protected void onCreate(Bundle savedInstanceState) {
super.onCreate(savedInstanceState);
setContentView(R.layout.activity_main);
mEditTextName = (EditText)findViewById(R.id.editText_main_name);
mEditTextCountry = (EditText)findViewById(R.id.editText_main_country);
mTextViewResult = (TextView)findViewById(R.id.textView_main_result);
mRecyclerView = (RecyclerView) findViewById(R.id.listView_main_list);
mRecyclerView.setLayoutManager(new LinearLayoutManager(this));
mEditTextSearchKeyword = (EditText) findViewById(R.id.editText_main_searchKeyword);
mTextViewResult.setMovementMethod(new ScrollingMovementMethod());
mArrayList = new ArrayList<>();
mAdapter = new UsersAdapter(this, mArrayList);
mRecyclerView.setAdapter(mAdapter);
Button buttonInsert = (Button)findViewById(R.id.button_main_insert);
buttonInsert.setOnClickListener(new View.OnClickListener() {
@Override
public void onClick(View v) {
String name = mEditTextName.getText().toString();
String country = mEditTextCountry.getText().toString();
InsertData task = new InsertData();
task.execute("http://" + IP_ADDRESS + "/insert.php", name,country);
mEditTextName.setText("");
mEditTextCountry.setText("");
}
});
Button button_search = (Button) findViewById(R.id.button_main_search);
button_search.setOnClickListener(new View.OnClickListener() {
public void onClick(View v) {
mArrayList.clear();
mAdapter.notifyDataSetChanged();
String Keyword = mEditTextSearchKeyword.getText().toString();
mEditTextSearchKeyword.setText("");
GetData task = new GetData();
task.execute( "http://" + IP_ADDRESS + "/query.php", Keyword);
}
});
Button button_all = (Button) findViewById(R.id.button_main_all);
button_all.setOnClickListener(new View.OnClickListener() {
public void onClick(View v) {
mArrayList.clear();
mAdapter.notifyDataSetChanged();
GetData task = new GetData();
task.execute( "http://" + IP_ADDRESS + "/getjson.php", "");
}
});
}
class InsertData extends AsyncTask<String, Void, String>{
ProgressDialog progressDialog;
@Override
protected void onPreExecute() {
super.onPreExecute();
progressDialog = ProgressDialog.show(MainActivity.this,
"Please Wait", null, true, true);
}
@Override
protected void onPostExecute(String result) {
super.onPostExecute(result);
progressDialog.dismiss();
mTextViewResult.setText(result);
Log.d(TAG, "POST response - " + result);
}
@Override
protected String doInBackground(String... params) {
String name = (String)params[1];
String country = (String)params[2];
String serverURL = (String)params[0];
String postParameters = "name=" + name + "&country=" + country;
try {
URL url = new URL(serverURL);
HttpURLConnection httpURLConnection = (HttpURLConnection) url.openConnection();
httpURLConnection.setReadTimeout(5000);
httpURLConnection.setConnectTimeout(5000);
httpURLConnection.setRequestMethod("POST");
httpURLConnection.connect();
OutputStream outputStream = httpURLConnection.getOutputStream();
outputStream.write(postParameters.getBytes("UTF-8"));
outputStream.flush();
outputStream.close();
int responseStatusCode = httpURLConnection.getResponseCode();
Log.d(TAG, "POST response code - " + responseStatusCode);
InputStream inputStream;
if(responseStatusCode == HttpURLConnection.HTTP_OK) {
inputStream = httpURLConnection.getInputStream();
}
else{
inputStream = httpURLConnection.getErrorStream();
}
InputStreamReader inputStreamReader = new InputStreamReader(inputStream, "UTF-8");
BufferedReader bufferedReader = new BufferedReader(inputStreamReader);
StringBuilder sb = new StringBuilder();
String line = null;
while((line = bufferedReader.readLine()) != null){
sb.append(line);
}
bufferedReader.close();
return sb.toString();
} catch (Exception e) {
Log.d(TAG, "InsertData: Error ", e);
return new String("Error: " + e.getMessage());
}
}
}
private class GetData extends AsyncTask<String, Void, String>{
ProgressDialog progressDialog;
String errorString = null;
@Override
protected void onPreExecute() {
super.onPreExecute();
progressDialog = ProgressDialog.show(MainActivity.this,
"Please Wait", null, true, true);
}
@Override
protected void onPostExecute(String result) {
super.onPostExecute(result);
progressDialog.dismiss();
mTextViewResult.setText(result);
Log.d(TAG, "response - " + result);
if (result == null){
mTextViewResult.setText(errorString);
}
else {
mJsonString = result;
showResult();
}
}
@Override
protected String doInBackground(String... params) {
String serverURL = params[0];
String postParameters = "country=" + params[1];
try {
URL url = new URL(serverURL);
HttpURLConnection httpURLConnection = (HttpURLConnection) url.openConnection();
httpURLConnection.setReadTimeout(5000);
httpURLConnection.setConnectTimeout(5000);
httpURLConnection.setRequestMethod("POST");
httpURLConnection.setDoInput(true);
httpURLConnection.connect();
OutputStream outputStream = httpURLConnection.getOutputStream();
outputStream.write(postParameters.getBytes("UTF-8"));
outputStream.flush();
outputStream.close();
int responseStatusCode = httpURLConnection.getResponseCode();
Log.d(TAG, "response code - " + responseStatusCode);
InputStream inputStream;
if(responseStatusCode == HttpURLConnection.HTTP_OK) {
inputStream = httpURLConnection.getInputStream();
}
else{
inputStream = httpURLConnection.getErrorStream();
}
InputStreamReader inputStreamReader = new InputStreamReader(inputStream, "UTF-8");
BufferedReader bufferedReader = new BufferedReader(inputStreamReader);
StringBuilder sb = new StringBuilder();
String line;
while((line = bufferedReader.readLine()) != null){
sb.append(line);
}
bufferedReader.close();
return sb.toString().trim();
} catch (Exception e) {
Log.d(TAG, "InsertData: Error ", e);
errorString = e.toString();
return null;
}
}
}
private void showResult(){
String TAG_JSON="webnautes";
String TAG_ID = "id";
String TAG_NAME = "name";
String TAG_COUNTRY ="country";
try {
JSONObject jsonObject = new JSONObject(mJsonString);
JSONArray jsonArray = jsonObject.getJSONArray(TAG_JSON);
for(int i=0;i<jsonArray.length();i++){
JSONObject item = jsonArray.getJSONObject(i);
String id = item.getString(TAG_ID);
String name = item.getString(TAG_NAME);
String address = item.getString(TAG_COUNTRY);
PersonalData personalData = new PersonalData();
personalData.setMember_id(id);
personalData.setMember_name(name);
personalData.setMember_address(address);
mArrayList.add(personalData);
mAdapter.notifyDataSetChanged();
}
} catch (JSONException e) {
Log.d(TAG, "showResult : ", e);
}
}
}
|
3. 관련 포스팅
4. 참고
[1] https://developer.android.com/guide/topics/ui/layout/recyclerview
[2] http://stacktips.com/tutorials/android/android-recyclerview-example


