Google Map에 목적지 마커를 추가한 후, 사용자가 해당 마커 위치로 이동할 때마다 남은 거리를 계산 해주도록 작성해보았습니다.
‘
2017. 11. 30 최초작성
~~~~~~~~~
2019. 11. 25 FusedLocationProviderClient로 변경
다음 포스팅에 있는 코드를 기반으로 작성되었습니다.
먼저 아래 코드로 진행해보고 나서 진행하세요..
GenyMotion을 사용하여 Google Map 테스트를 진행했습니다.
자세한 사용 방법은 다음 포스팅을 참고하세요.
현재 위치를 시청역으로 설정했습니다.

목적지가 될 회현역에 마커를 추가하기 위해서 오랫동안 클릭하면 다음처럼 다이얼로그 창이 뜹니다.
마커 클릭시 보여줄 정보를 입력한 후, 완료를 클릭합니다.

빨간색 마커가 추가되며 클릭해보면 좀전에 입력했던 정보를 보여줍니다.
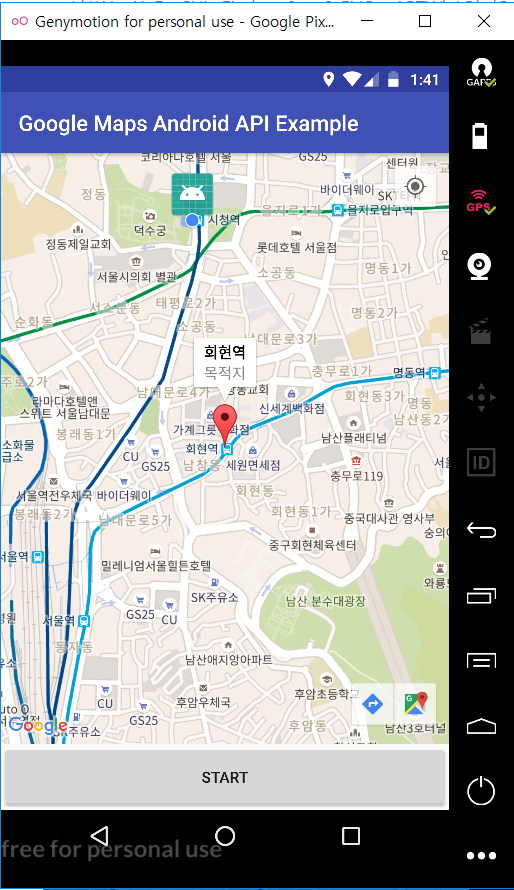
앱 하단의 버튼을 클릭하면 현재 위치와 목적지 마커 사이의 거리 계산을 시작합니다.

현재 위치를 이동시키면 회현역까지 몇미터 남았는지 알려줍니다.
(목적지와의 거리가 몇미터 이내이면 도착으로 할지 결정해서 이후 코딩을 진행하시면 될 듯합니다. )

목적지와 현재 위치간의 거리 계산을 위해서 SphericalUtil의 computeDistanceBetween 메소드를 사용했습니다.
double computeDistanceBetween(LatLng from, LatLng to) |
다음처럼 코드 수정을 진행합니다.
1. SphericalUtil를 사용하기 위해서는 build.gradle에 다음 한 줄을 추가해야 합니다.
dependencies {
implementation fileTree(dir: 'libs', include: ['*.jar'])
implementation 'androidx.appcompat:appcompat:1.0.2'
implementation 'androidx.constraintlayout:constraintlayout:1.1.3'
implementation 'com.google.android.gms:play-services-maps:17.0.0'
implementation 'com.google.android.gms:play-services-location:17.0.0'
implementation 'com.google.android.material:material:1.1.0-alpha09'
implementation 'com.google.maps.android:android-maps-utils:0.5'
testImplementation 'junit:junit:4.12'
androidTestImplementation 'androidx.test:runner:1.1.1'
androidTestImplementation 'androidx.test.espresso:espresso-core:3.1.1'
} |
2. 다음처럼 3개의 변수를 선언합니다.
Location mCurrentLocatiion; LatLng currentPosition; LatLng previousPosition = null; Marker addedMarker = null; int tracking = 0; |
3. locationCallback에서 이전 위치와 현재 위치가 다른 경우 (!previousPosition.equals(currentPosition))
정해진 목적지까지의 거리인 500미터이내에 있고(distance < radius) 트래킹 설정 중이고 (tracking == 1)
목적지 마커가 설정되어 있다면 (addedMarker != null)
Toast.makeText 메소드를 사용하여 현재위치와 목적지 사이의 거리를 출력해줍니다.
거리 계산에는 SphericalUtil.computeDistanceBetween 메소드를 사용했습니다.
LocationCallback locationCallback = new LocationCallback() {
@Override
public void onLocationResult(LocationResult locationResult) {
super.onLocationResult(locationResult);
List<Location> locationList = locationResult.getLocations();
if (locationList.size() > 0) {
location = locationList.get(locationList.size() - 1);
previousPosition = currentPosition;
currentPosition = new LatLng(location.getLatitude(), location.getLongitude());
if (previousPosition == null) previousPosition = currentPosition;
if ( (addedMarker != null) && tracking == 1 ) {
double radius = 500; // 500m distance.
double distance = SphericalUtil.computeDistanceBetween(currentPosition, addedMarker.getPosition());
if ((distance < radius) && (!previousPosition.equals(currentPosition))) {
Toast.makeText(MainActivity.this, addedMarker.getTitle() + "까지" + (int) distance + "m 남음", Toast.LENGTH_LONG).show();
}
}
String markerTitle = getCurrentAddress(currentPosition);
String markerSnippet = "위도:" + String.valueOf(location.getLatitude())
+ " 경도:" + String.valueOf(location.getLongitude());
Log.d(TAG, "onLocationResult : " + markerSnippet);
//현재 위치에 마커 생성하고 이동
setCurrentLocation(location, markerTitle, markerSnippet);
mCurrentLocatiion = location;
}
}
}; |
4. 원하는 위치를 사용자가 길게 클릭했을 경우 마커를 추가하기 위해서 onMapReady 메서드에 다음 코드를 추가합니다.
@Override
public void onMapReady(final GoogleMap googleMap) {
Log.d(TAG, "onMapReady :");
mMap = googleMap;
mMap.setOnMapLongClickListener(new GoogleMap.OnMapLongClickListener(){
@Override
public void onMapLongClick(final LatLng latLng) {
AlertDialog.Builder builder = new AlertDialog.Builder(MainActivity.this);
LayoutInflater inflater = getLayoutInflater();
View view = inflater.inflate(R.layout.dialog_place_info, null);
builder.setView(view);
final Button button_submit = (Button) view.findViewById(R.id.button_dialog_placeInfo);
final EditText editText_placeTitle = (EditText) view.findViewById(R.id.editText_dialog_placeTitle);
final EditText editText_placeDesc = (EditText) view.findViewById(R.id.editText_dialog_placeDesc);
final AlertDialog dialog = builder.create();
button_submit.setOnClickListener(new View.OnClickListener() {
public void onClick(View v) {
String string_placeTitle = editText_placeTitle.getText().toString();
String string_placeDesc = editText_placeDesc.getText().toString();
Toast.makeText(MainActivity.this, string_placeTitle+"\n"+string_placeDesc,Toast.LENGTH_SHORT).show();
//맵을 클릭시 현재 위치에 마커 추가
MarkerOptions markerOptions = new MarkerOptions();
markerOptions.position(latLng);
markerOptions.title(string_placeTitle);
markerOptions.snippet(string_placeDesc);
markerOptions.draggable(true);
markerOptions.icon(BitmapDescriptorFactory.defaultMarker(BitmapDescriptorFactory.HUE_RED));
if ( addedMarker != null ) mMap.clear();
addedMarker = mMap.addMarker(markerOptions);
dialog.dismiss();
}
});
dialog.show();
}
}); |
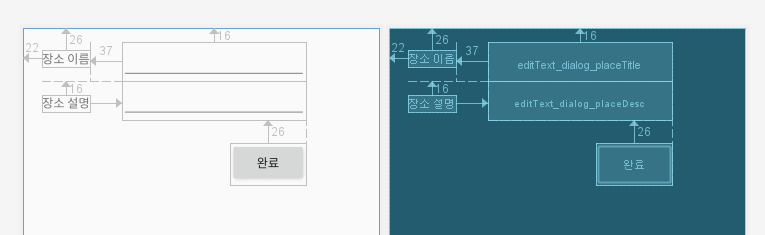
5. 위 코드에서 사용한 커스텀 다이얼로그를 위해 레이아웃 파일을 다음처럼 작성합니다.
dialog_place_info.xml
<?xml version="1.0" encoding="utf-8"?>
<RelativeLayout
xmlns:android="http://schemas.android.com/apk/res/android"
android:layout_width="match_parent"
android:layout_height="match_parent">
<TextView
android:id="@+id/textView_dialog_placeTitle"
android:layout_width="wrap_content"
android:layout_height="wrap_content"
android:layout_alignParentLeft="true"
android:layout_alignParentStart="true"
android:layout_alignParentTop="true"
android:layout_marginLeft="22dp"
android:layout_marginStart="22dp"
android:layout_marginTop="26dp"
android:text="장소 이름" />
<EditText
android:id="@+id/editText_dialog_placeTitle"
android:layout_width="wrap_content"
android:layout_height="wrap_content"
android:layout_alignParentTop="true"
android:layout_marginLeft="37dp"
android:layout_marginStart="37dp"
android:layout_marginTop="16dp"
android:layout_toEndOf="@+id/textView_dialog_placeTitle"
android:layout_toRightOf="@+id/textView_dialog_placeTitle"
android:ems="10"
android:inputType="textPersonName"
android:text="" />
<TextView
android:id="@+id/textView_dialog_placeDesc"
android:layout_width="wrap_content"
android:layout_height="wrap_content"
android:layout_below="@+id/editText_dialog_placeTitle"
android:layout_marginTop="16dp"
android:layout_toLeftOf="@+id/editText_dialog_placeTitle"
android:layout_toStartOf="@+id/editText_dialog_placeTitle"
android:text="장소 설명" />
<EditText
android:id="@+id/editText_dialog_placeDesc"
android:layout_width="wrap_content"
android:layout_height="wrap_content"
android:layout_alignLeft="@+id/editText_dialog_placeTitle"
android:layout_alignStart="@+id/editText_dialog_placeTitle"
android:layout_below="@+id/editText_dialog_placeTitle"
android:ems="10"
android:inputType="textPersonName"
android:text="" />
<Button
android:id="@+id/button_dialog_placeInfo"
android:layout_width="wrap_content"
android:layout_height="wrap_content"
android:layout_alignEnd="@+id/editText_dialog_placeDesc"
android:layout_alignRight="@+id/editText_dialog_placeDesc"
android:layout_below="@+id/editText_dialog_placeDesc"
android:layout_marginTop="26dp"
android:text="완료" />
</RelativeLayout> |
6. 사용자의 현재 위치와 목적지간의 거리 계산을 시작 또는 중지하기 위한 버튼을 지도 아래에 추가해줍니다.
activity_main.xml
<?xml version="1.0" encoding="utf-8"?>
<LinearLayout xmlns:android="http://schemas.android.com/apk/res/android"
xmlns:tools="http://schemas.android.com/tools"
android:layout_width="match_parent"
android:layout_height="match_parent"
android:id="@+id/layout_main"
android:orientation="vertical"
tools:context=".MainActivity" >
<fragment
android:layout_width="match_parent"
android:layout_height="0dp"
android:layout_weight="9"
android:id="@+id/map"
tools:context=".MapsActivity"
android:name="com.google.android.gms.maps.SupportMapFragment" />
<Button
android:id="@+id/button"
android:layout_width="match_parent"
android:layout_height="0dp"
android:layout_weight="1"
android:text="Start" />
</LinearLayout> |

7. MainActivity의 OnCreate 메소드에 다음 코드를 추가합니다.
버튼 클릭시 변경되는 트레킹 여부를 저장하기 위해 int 타입의 tracking 변수를 이용했습니다.
초기값은 0으로 해야합니다.
final Button button = (Button)findViewById(R.id.button);
button.setOnClickListener(new View.OnClickListener() {
@Override
public void onClick(View view) {
tracking = 1 - tracking;
if ( tracking == 1){
button.setText("Stop");
}
else button.setText("Start");
}
}); |
이제 테스트를 해보면 됩니다.