
MinGW 용으로 OpenCV 4.5.1을 빌드하고 Visual Studio Code에서 OpenCV 코드를 컴파일하는 방법을 다룹니다.
2021. 4. 21 최초작성
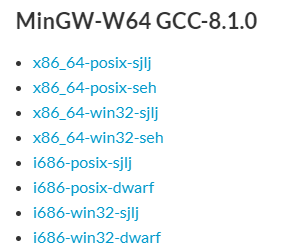
1. 아래 링크에서 x86_64-posix-seh를 다운로드하여 설치합니다.
https://sourceforge.net/projects/mingw-w64/files/mingw-w64/
2. mingw64 폴더를 C:\에 복사해주고 시스템 변수 path에 C:\mingw64\bin를 추가합니다.
3. 명령 프롬프트에서 gcc를 실행시켜 봅니다.
C:\Users\jjlee>gcc -v
Using built-in specs.
COLLECT_GCC=gcc
COLLECT_LTO_WRAPPER=C:/mingw64/bin/../libexec/gcc/x86_64-w64-mingw32/8.1.0/lto-wrapper.exe
Target: x86_64-w64-mingw32
Configured with: ../../../src/gcc-8.1.0/configure --host=x86_64-w64-mingw32 --build=x86_64-w64-mingw32 --target=x86_64-w64-mingw32 --prefix=/mingw64 --with-sysroot=/c/mingw810/x86_64-810-posix-seh-rt_v6-rev0/mingw64 --enable-shared --enable-static --disable-multilib --enable-languages=c,c++,fortran,lto --enable-libstdcxx-time=yes --enable-threads=posix --enable-libgomp --enable-libatomic --enable-lto --enable-graphite --enable-checking=release --enable-fully-dynamic-string --enable-version-specific-runtime-libs --disable-libstdcxx-pch --disable-libstdcxx-debug --enable-bootstrap --disable-rpath --disable-win32-registry --disable-nls --disable-werror --disable-symvers --with-gnu-as --with-gnu-ld --with-arch=nocona --with-tune=core2 --with-libiconv --with-system-zlib --with-gmp=/c/mingw810/prerequisites/x86_64-w64-mingw32-static --with-mpfr=/c/mingw810/prerequisites/x86_64-w64-mingw32-static --with-mpc=/c/mingw810/prerequisites/x86_64-w64-mingw32-static --with-isl=/c/mingw810/prerequisites/x86_64-w64-mingw32-static --with-pkgversion='x86_64-posix-seh-rev0, Built by MinGW-W64 project' --with-bugurl=https://sourceforge.net/projects/mingw-w64 CFLAGS='-O2 -pipe -fno-ident -I/c/mingw810/x86_64-810-posix-seh-rt_v6-rev0/mingw64/opt/include -I/c/mingw810/prerequisites/x86_64-zlib-static/include -I/c/mingw810/prerequisites/x86_64-w64-mingw32-static/include' CXXFLAGS='-O2 -pipe -fno-ident -I/c/mingw810/x86_64-810-posix-seh-rt_v6-rev0/mingw64/opt/include -I/c/mingw810/prerequisites/x86_64-zlib-static/include -I/c/mingw810/prerequisites/x86_64-w64-mingw32-static/include' CPPFLAGS=' -I/c/mingw810/x86_64-810-posix-seh-rt_v6-rev0/mingw64/opt/include -I/c/mingw810/prerequisites/x86_64-zlib-static/include -I/c/mingw810/prerequisites/x86_64-w64-mingw32-static/include' LDFLAGS='-pipe -fno-ident -L/c/mingw810/x86_64-810-posix-seh-rt_v6-rev0/mingw64/opt/lib -L/c/mingw810/prerequisites/x86_64-zlib-static/lib -L/c/mingw810/prerequisites/x86_64-w64-mingw32-static/lib '
Thread model: posix
gcc version 8.1.0 (x86_64-posix-seh-rev0, Built by MinGW-W64 project)
4. 다음 두 링크에서 OpenCV 4.5.1와 OpenCV Contrib 4.5.1 다운로드합니다.
https://github.com/opencv/opencv/releases
https://github.com/opencv/opencv_contrib/releases
OpenCV 4.5.2에서 빌드시 다음 에러나서 OpenCV 버전을 4.5.1로 변경했습니다.
C:/mingw64/bin/../lib/gcc/x86_64-w64-mingw32/8.1.0/../../../../x86_64-w64-mingw32/lib/../lib/libiconv.a(localcharset.o):localcharset.c:(.text+0x63): undefined reference to `__imp_GetACP'
collect2.exe: error: ld returned 1 exit status
mingw32-make[2]: *** [modules\world\CMakeFiles\opencv_world.dir\build.make:16054: bin/libopencv_world452.dll] Error 1
mingw32-make[1]: *** [CMakeFiles\Makefile2:3237: modules/world/CMakeFiles/opencv_world.dir/all] Error 2
mingw32-make: *** [Makefile:165: all] Error 2
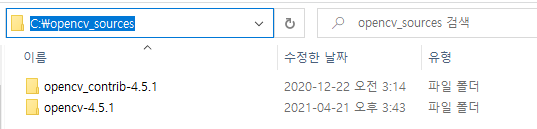
5. C:\opencv_sources 폴더에 다운로드 받은 압축파일을 풀어줍니다.
압축을 푸는 방식에 따라 opencv-4.5.1, opencv_contrib-4.5.1 안에 같은 이름의 폴더가 또 있을 수 있으니 주의하세요.
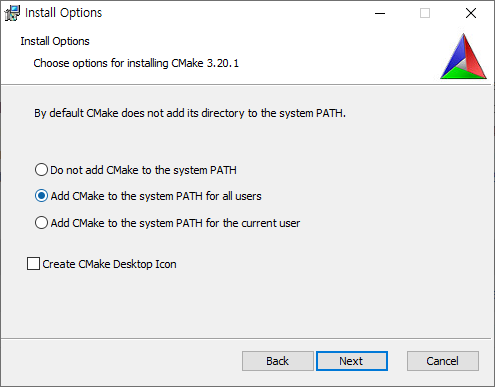
6. 아래 링크에서 CMake ( cmake-3.20.1-windows-x86_64.msi )를 다운로드 받아 설치합니다.
설치시 “Add CMake to the system PATH for all users”를 체크해야 합니다.
7. 명령 프롬프트에서 C:\opencv_sources\opencv-4.5.1로 이동한 후, build 폴더를 생성하고 build 폴더로 이동한 후에 다음 명령을 실행합니다.
마지막에 .. 을 빼먹지 마세요.
cmake -G "MinGW Makefiles" -DCMAKE_CXX_COMPILER=g++.exe -DCMAKE_MAKE_PROGRAM=mingw32-make.exe -DCMAKE_BUILD_TYPE=Release ^
-DOPENCV_EXTRA_MODULES_PATH="C:/opencv_sources/opencv_contrib-4.5.1/modules" -DCMAKE_INSTALL_PREFIX="C:/opencv-4.5.1/build" ^
-DINSTALL_TESTS=ON -DINSTALL_C_EXAMPLES=OFF -DBUILD_EXAMPLES=OFF -DBUILD_opencv_world=ON ^
-DWITH_OPENGL=OFF -DWITH_MFX=OFF -DBUILD_PACKAGE=OFF -DWITH_MATLAB=OFF -DBUILD_PREF_TESTS=OFF -DBUILD_TESTS=OFF ^
-DBUILD_opencv_python3=OFF -DBUILD_opencv_python2=OFF -DOPENCV_SKIP_PYTHON_LOADER=ON ^
-DBUILD_JAVA=OFF -DWITH_LAPACK=OFF -DWITH_VTK=OFF -DWITH_1394=OFF -DWITH_GSTREAMER=OFF ^
-DWITH_TBB=OFF -DWITH_EIGN=OFF -DMKL_WITH_TBB=OFF -DBUILD_WITH_STATIC_CRT=OFF ^
-DOPENCV_ENABLE_NONFREE=ON -DBUILD_opencv_rgbd=OFF ..
참고로 CUDA를 포함시키려고 해봤는데 다음과 같은 에러가 났습니다.
-- compilation is disabled (due to only Visual Studio compiler supported on your platform).
CMake Warning at cmake/OpenCVFindLibsPerf.cmake:45 (message):
OpenCV is not able to find/configure CUDA SDK (required by WITH_CUDA).
CUDA support will be disabled in OpenCV build.
To eliminate this warning remove WITH_CUDA=ON CMake configuration option.
Call Stack (most recent call first):
CMakeLists.txt:712 (include)
관련 CMake 파일을 찾아보니 아래처럼 윈도우에선 무조건 비주얼스튜디오 사용하게 되어있습니다.
if((WIN32 AND NOT MSVC) OR OPENCV_CMAKE_FORCE_CUDA)
message(STATUS "CUDA compilation is disabled (due to only Visual Studio compiler supported on your platform).")
return()
endif()
8. 빌드합니다. 코어 개수 만큼 -j 뒤에 숫자를 붙여준다.
mingw32-make -j4
9. 지정한 위치 C:\opencv-4.5.1\build 로 빌드 결과물 복사합니다.
mingw32-make install
10. Visual Studio Code에서 OpenCV 코드 빌드하는 방법은 다음 포스트를 참고하세요.
Visual Studio Code에서 CMake, MinGW를 사용하여 OpenCV 코드 컴파일 하는 방법
https://webnautes.tistory.com/2127
'OpenCV > Windows개발 환경&라이브러리 빌드' 카테고리의 다른 글
| Visual Studio에서 OpenCV 설치, 사용하는 방법 (0) | 2023.12.03 |
|---|---|
| Visual Studio Code에서 CMake, MinGW를 사용하여 OpenCV 코드 컴파일 하는 방법 (0) | 2023.10.21 |
| 윈도우 환경에서 OpenCV의 VideoCapture가 웹캠 오픈이 늦은 경우 해결 방법 (0) | 2021.06.10 |
| Visual Studio 2019에서 CUDA를 적용한 OpenCV 빌드하기 (0) | 2020.07.06 |
| C++, Python, Android에서 OpenCV의 Extra 모듈과 nonfree 모듈 사용하는 방법 (0) | 2019.10.17 |
문제 발생시 지나치지 마시고 댓글 남겨주시면 가능한 빨리 답장드립니다.
도움이 되셨다면 토스아이디로 후원해주세요.
https://toss.me/momo2024
제가 쓴 책도 한번 검토해보세요 ^^

